Presenting the Zero Waste Bra Pattern
Here’s the pattern for the zero waste bra I’ve been working on.
The previous posts about this project are: June 2021 when I thought I could make a bra; this led to a zero waste bra in one size but I put the project aside; then I picked it up again some weeks ago; last week I made a trial wearable zw bra; and here we are now.
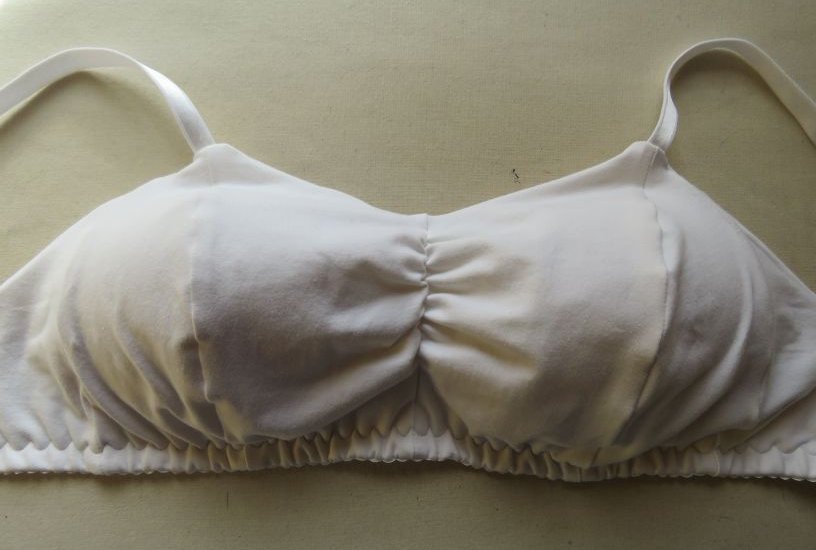
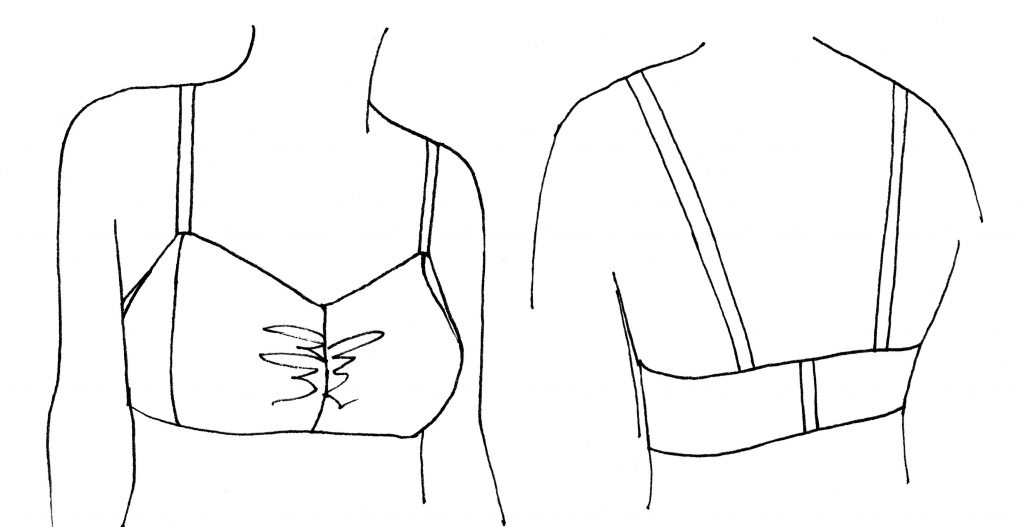
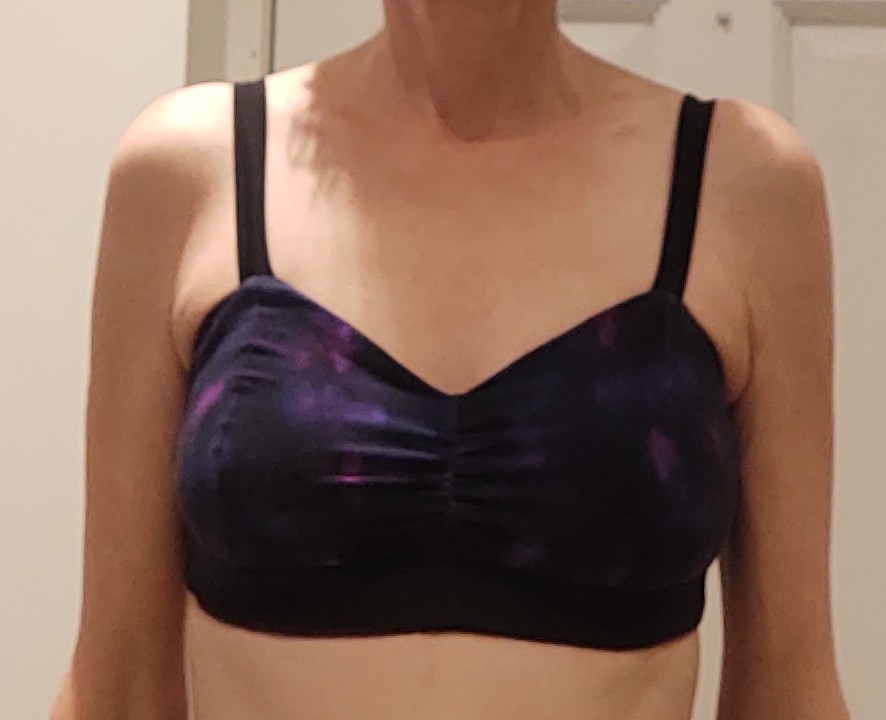
In the absence of a model, here’s a traced photograph of the bra being worn:
I emphasize that this is an experimental pattern and hasn’t had the rigorous testing I would normally do for a pdf pattern. I’ve successfully made size 37 as an Aussie 12D bra, and done a fit check on size 49.
I would also point out that I’m not an experienced bra maker or wearer. However, I offer it as something you might like to try, and shape to suit yourself.
The pattern prints out on 4 sheets of A4 paper, landscape orientation.
I graded 8 sizes, from a 35″/89cm bust to a 49″/124.5cm. It’s zero waste until size 43, then it’s low waste. If you need a bigger size, just follow the pattern of the grading and draw in a new line. If you’re in between sizes, draw in a new line between the two sizes.
This pattern has a Creative Commons licence, and can be freely shared, adapted and improved upon, provided I (Liz Haywood) am credited as the original creator and the source is linked to. Derivative works must use the same licence terms. This pattern can be used to create physical items to sell.
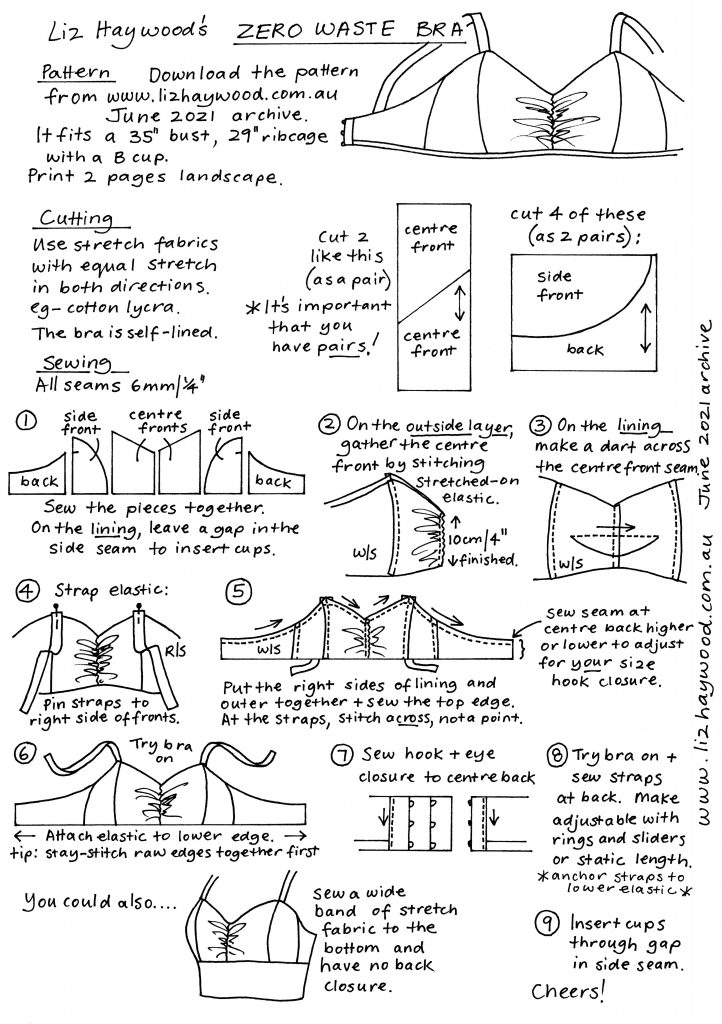
Here is the original instruction sheet from 2021 to give you an overview of the construction. I’ve since made a few changes, notably on Step 2, so below is a sew-a-long with lots more details and info.
You will need
- Fabric such as cotton lycra with equal stretch in both directions, since the grainlines go both ways. The bra is self-lined.
- Bra strap elastic.
- Rings and sliders for the bra straps if you want them to be adjustable.
- A bank of 4 hooks & eyes for the back, 3″/7.5cm tall. You can adjust the pattern if you can only get a set of 3 or 2. Btw, you don’t have to have any (the pattern has a 6mm seam allowance at the centre back) – you could just step into the bra or pull it on over your head.
- 19mm wide plush elastic for the lower edge.
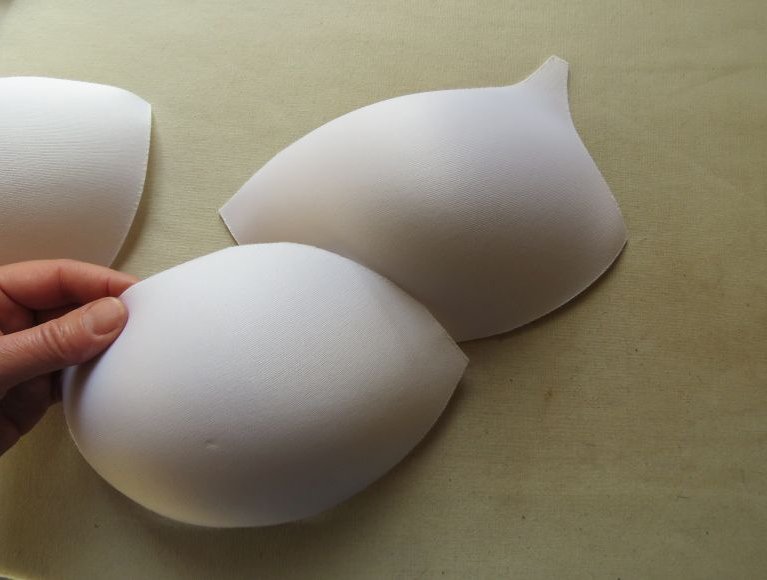
- Moulded foam cups, which you might be able to harvest from an old bra. (Mine are Booby Trap’s “full moulded cups” in size 16 for an Aussie 12D.)
- 3″/7.5cm of 6mm wide elastic for the front gathers.
I ordered all my haberdashery from Booby Traps in New South Wales, Australia, and was impressed with their service and quality.
Choosing a size
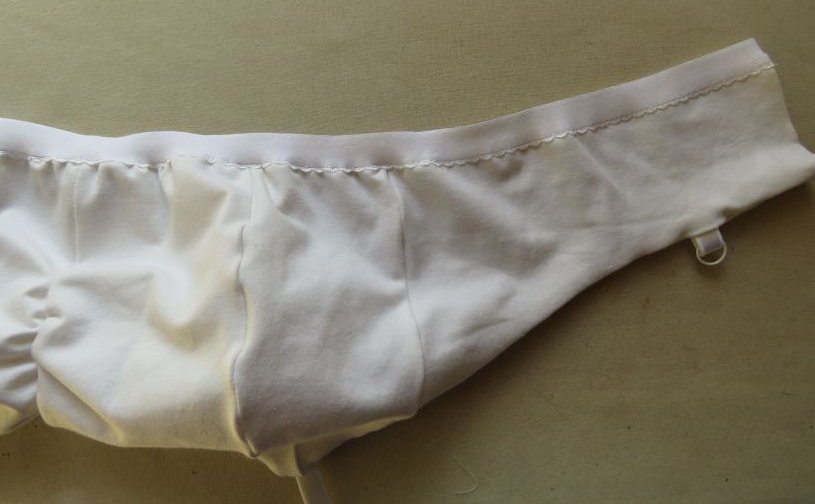
The bra is more like a crop top than a structured bra.
The names of the sizes relate to your bust measurement. Measure around the fullest part of your bust in inches, and choose a size with the matching number.
Run together a trial bra to try on, like the one below. There’s a 6mm seam allowance at the centre back so you can pin it closed at the back. Remember that there will be plush elastic at the lower edge, turned under to create a band.
Some fitting notes:
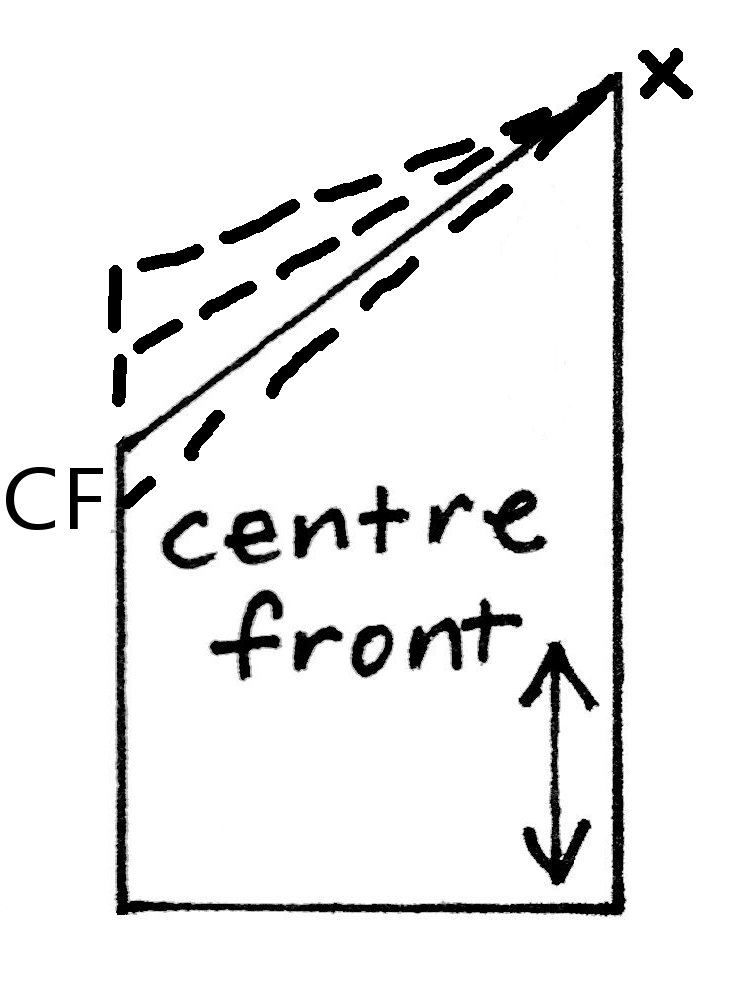
The centre front neckline can be any angle – if you want it higher or lower, just change the angle with ruler. The pattern piece will still fit together with itself.
To reduce the cup size, re-draw the curve on the side front so it’s flatter (you can see that this will fill in the back curve more, which is OK). This will make the seamline shorter, so walk the edge along the centre front panel to find out how much, and make the centre front panel correspondingly shorter (and maybe less gathered in the centre).

Cutting out
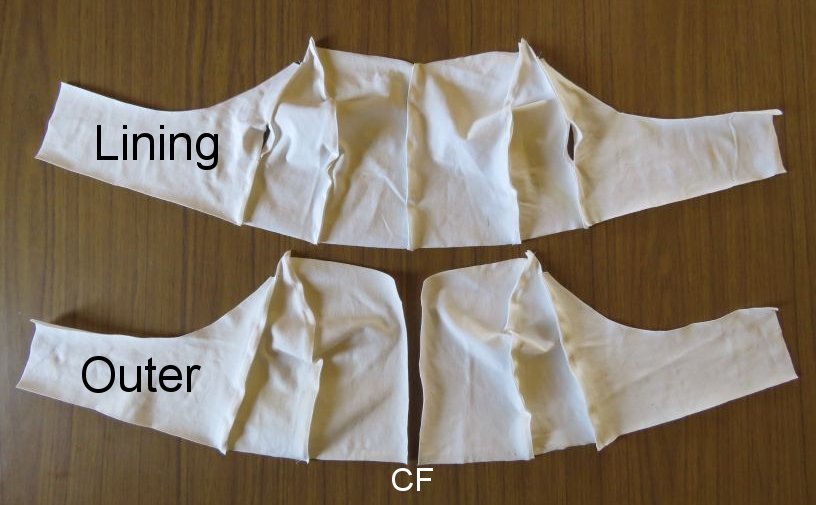
Fold the fabric in half so you create a pair of pieces when you cut them out.

Notice how the centre fronts (front and front lining) fit together.
I positioned mine so the grainlines of the front and side front matched. The grainline of the back will run horizontally when the bra is worn.
Sewing
All seam allowances are 6mm/quarter inch. I used a small zig zag stitch and a stretch needle, but you could sew most of the seams on a 4-thread overlocker if you wanted.
The Step numbers correspond to the original instruction sheet.
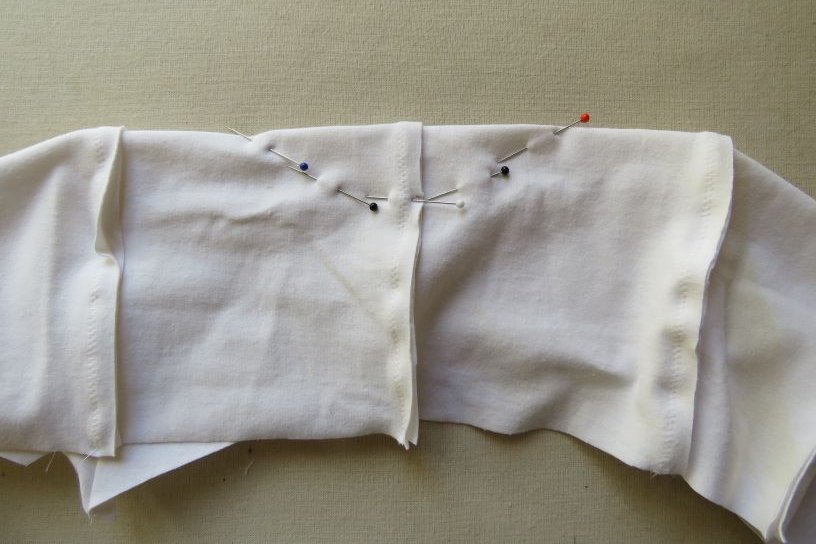
Step 1.
Sew Seams
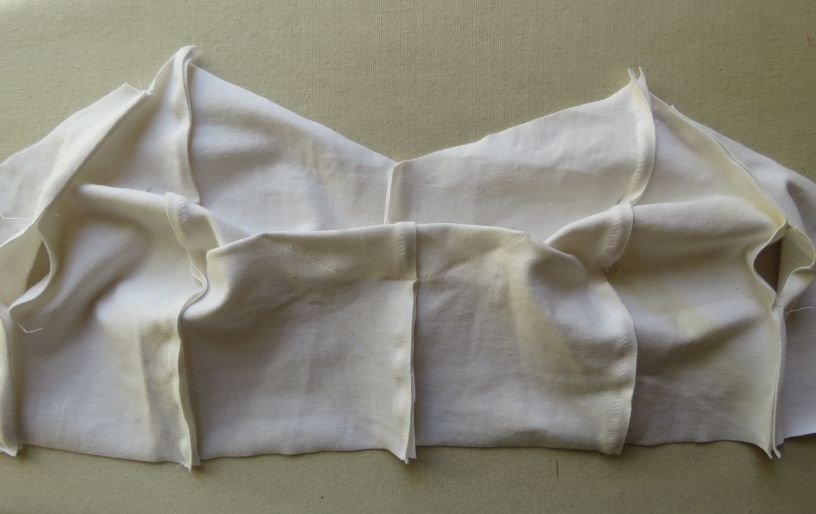
Here are the pieces all laid out, how they’ll be sewn. One set is for the lining and the other is for the outer layer.

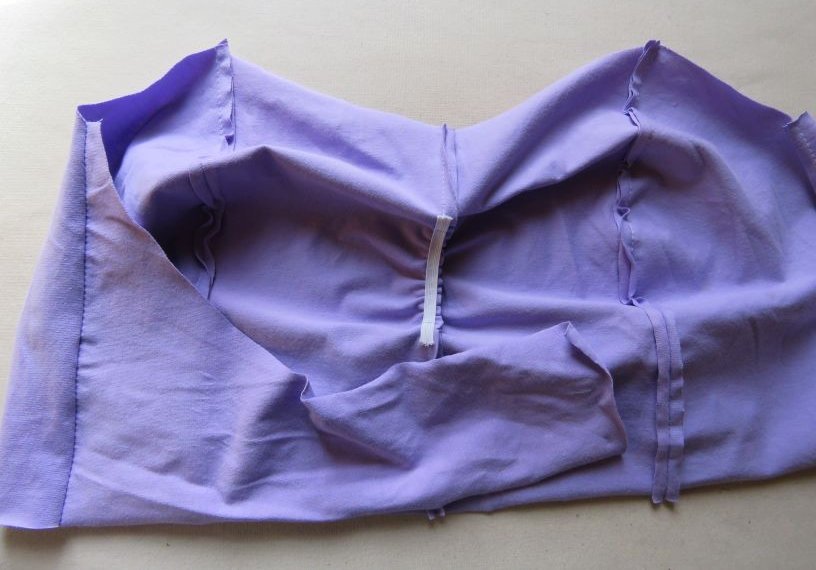
Sew the seams together as shown below. On the LINING, leave a gap in each side seam between the notches, to insert cups. On the OUTER, don’t sew the centre front (CF) seam yet.
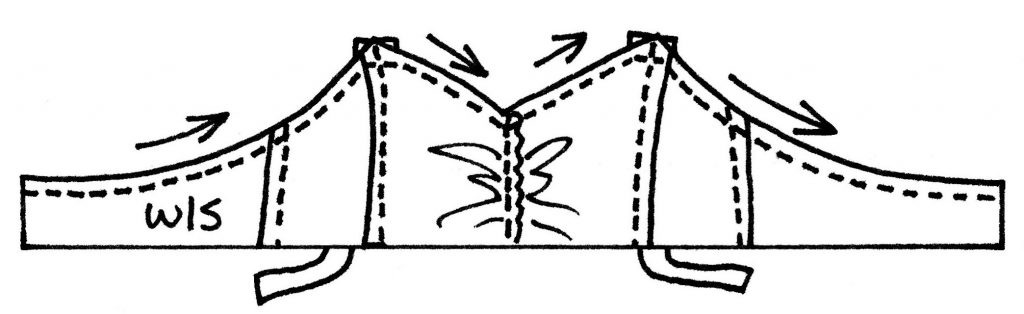
Step 2.
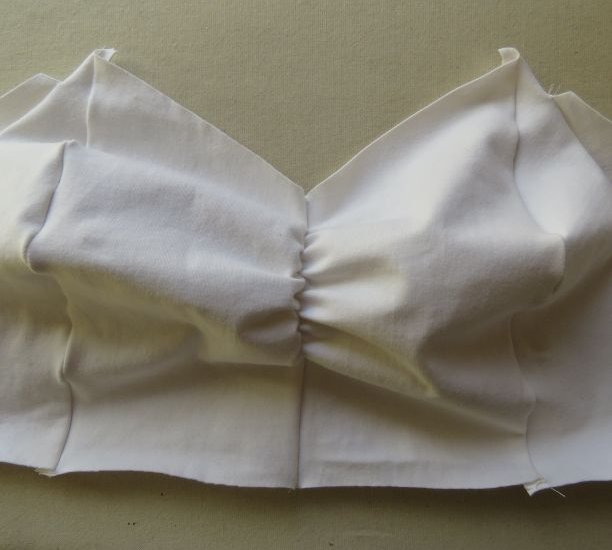
Sew centre front gathers.
Take the piece of 6mm elastic and make 2 marks on in, 2″/5cm apart.

Align the marks with the notches on the centre front.


Begin sewing the seam, then switch to straight stitch when you reach the first mark in the elastic. Pull the elastic really tight and straight stitch over the top, then switch back to zig zag for the rest of the seam. If you use zig zag for the whole thing it will overstretch the elastic and the gathers won’t be as tight.
You’re gathering a 10cm section into 5cm. If you don’t gather this tightly, the centre front of the bra will be longer.
Do you dislike doing stretch-and-stitch elastic like this? If you prefer, you could put a dart at the front like the lining has (see next step) – you might need to elongate the dart at each end. Or tiny pleats, or two inverted pleats facing each other. As long as you make the seam 5cm/2″ shorter.
Step 3.
Sew the dart in the lining.
On the lining, make a dart across the centre front seam.
Flip the central seam allowance one-one-way-and-one-the-other-way, so it’s not so bulky to sew over.
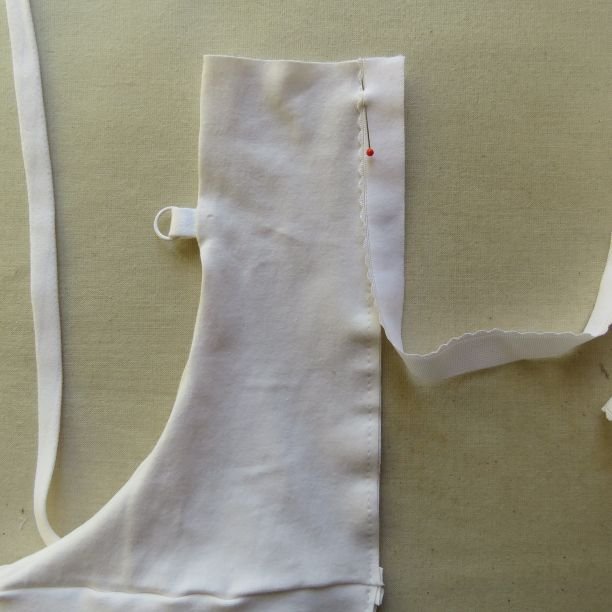
Step 4.
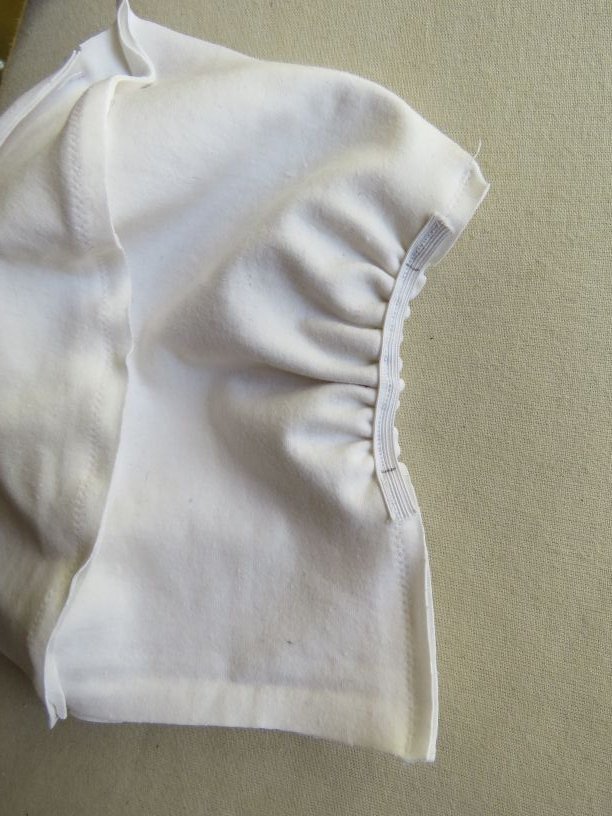
Strap elastic.
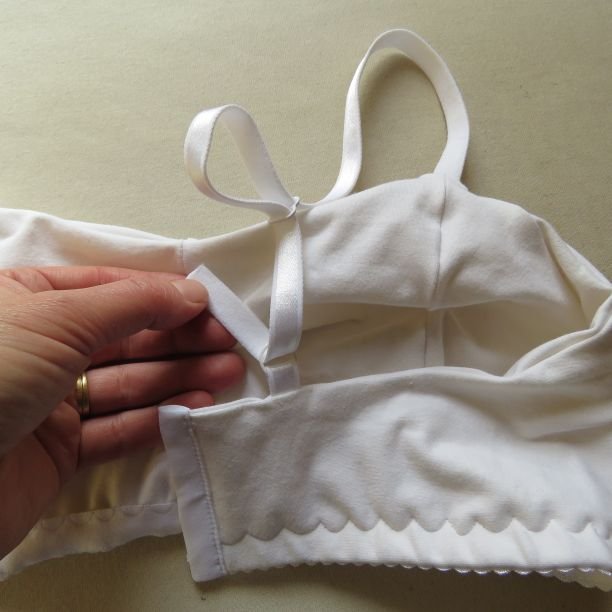
Cut the bra strap elastic and pin it to the right sides of the fronts, face down so the right sides of both are facing each other.

If you know the back strap position, put those on too, but it’s hard to know the position until the bra can be tried on. Luckily, it’s easy to undo a small section of the seam allowance after the plush elastic (Step 6) has been sewn on but before the hooks & eyes (Step 7). I’m a couple of bras ahead with this so my strap position is already marked on my pattern. On reflection, I could have made the loop holding the ring a bit longer.
Step 5.
Sew the top edge.
Place the right sides of the lining and outer together and sew across the top edge. When you reach the straps, sew across, not a point. There’s no elastic in this seam; it didn’t seem to need any.
If your hook & eye closure is less than 7.5cm tall, lower the height of the centre back. Not sure? You can go back and change it after the plush elastic has been applied in the following step.
Step 6.
Attach plush elastic to lower edge
Stay-stitch the lower edges together, using a long straight stitch.
Put some plush elastic around your ribcage and see how tight you want it. Cut it off with a 6mm seam allowance at each end.
Lay the plush elastic on the bra, lapping it 6mm over the edge. Have the bra facing right side up, and the elastic facing plush side up.
Stitch the plush elastic just next to the scalloped edge, so that when it’s turned under you’ll see the tiny scallop.
Use a zig zag stitch so the stitching will stretch with the elastic. However, I used a long straight stitch so I could try the bra on my daughter and undo it if it was wrong. Afterwards, the stitching didn’t crack when I stretched it, so I left it there. One week and a few wears later, it still seems to be fine.
The other thing I did, which I hesitate to mention because it’s not normally done, is I stretched the elastic more under the bust than at the back. Usually the elastic is stretched evenly all the way along. I’m too inexperienced to offer advice on which way to go here; you must find you own path.
At this stage you can fold the plush elastic under and try the bra on to check how it’s going.
When you’re happy with the elastic, fold it under and stitch in place with zig zag or 3-step zig zag. I used a scallop-y stretch stitch on my machine.

Sew the straps on the back if you haven’t already.
Step 7.
Hoods & eyes.
Sew the hooks & eyes to the back. CHECK FIRST: how much do you need to trim the centre backs? There is a 6mm centre back seam allowance there – if you sew the hooks & eyes on the bra will be too big. Do up the hooks and lay it on the back to see where they land. I cut 1″/2.5cm off each side and then sewed the hook & eyes on.
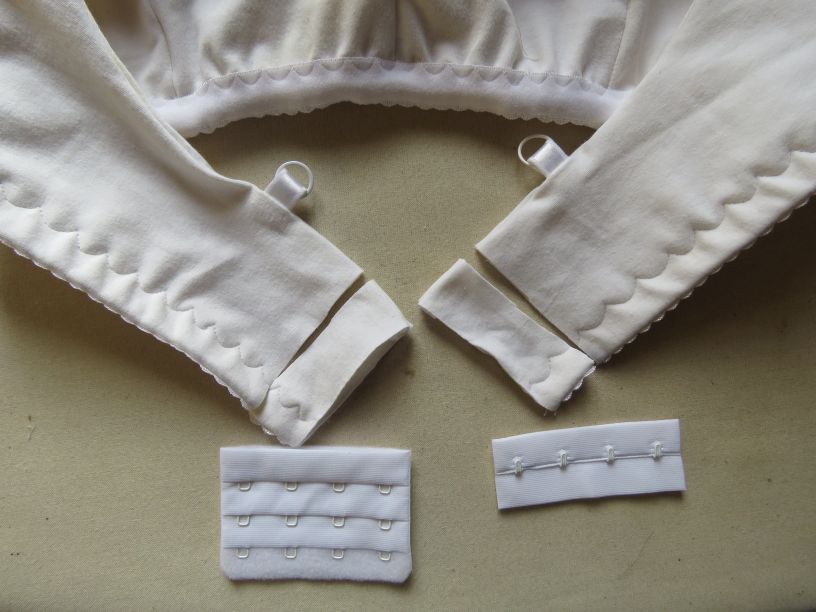
Make the bra so it hooks onto the first set of eyes, and over time as it stretches it will move across to the last set.
To sew these on, first sew one side of them onto the wrong side of the bra….
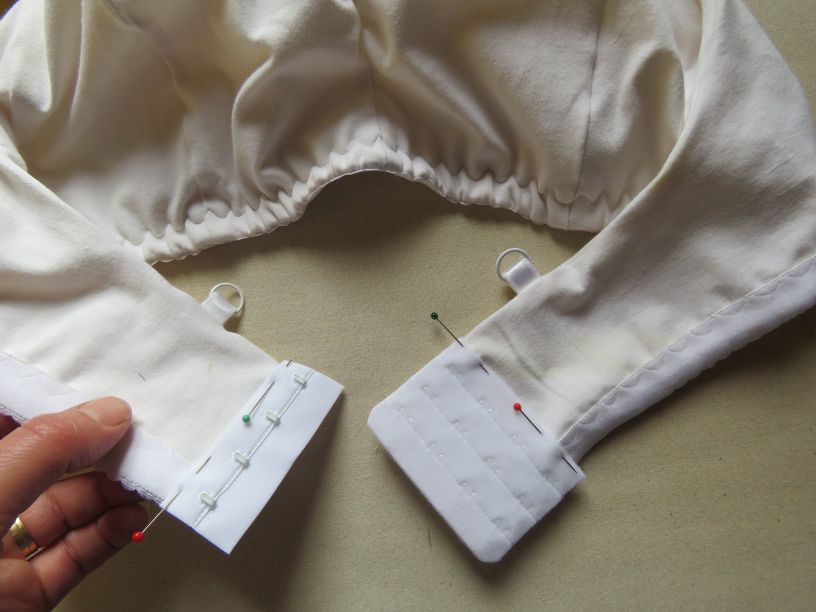
…then bring them over and sew them down on the right side.

Btw, you don’t have to have hooks & eyes – if you can manage to step into the bra or pull it on over your head, you could just have a centre back seam.
Step 8.
Thread the straps.
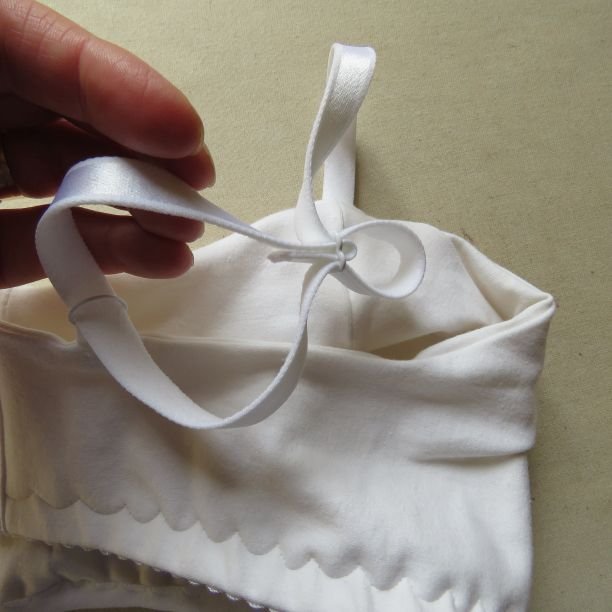
Thread the slider through the strap.
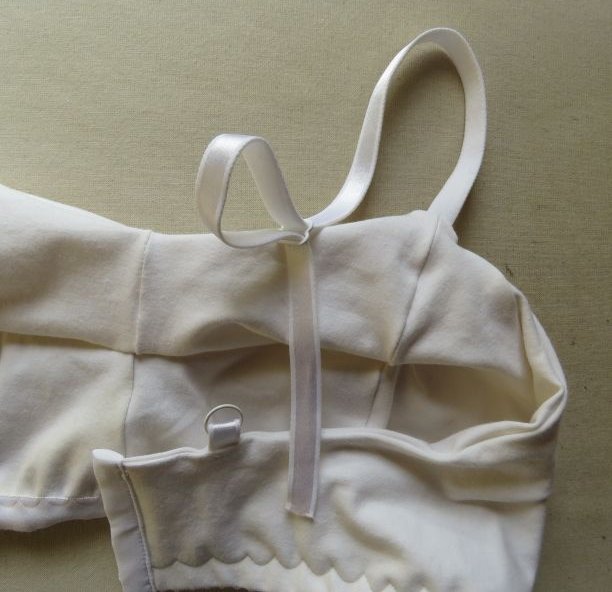
Loop the strap through the ring, from front to back.
Bring the strap end through the middle of the slider and stitch it to hold.
Step 9.
Cups.
Insert the cups through the gaps in the lining’s side seams. I trimmed the cups first to make them an eye shape.
You’ll probably need to tack the cups in place so they don’t migrate. I quickly did this with last week’s black bra, but will do something a bit better when I have time.

And there you have it. Please enjoy, and I hope yours goes well.

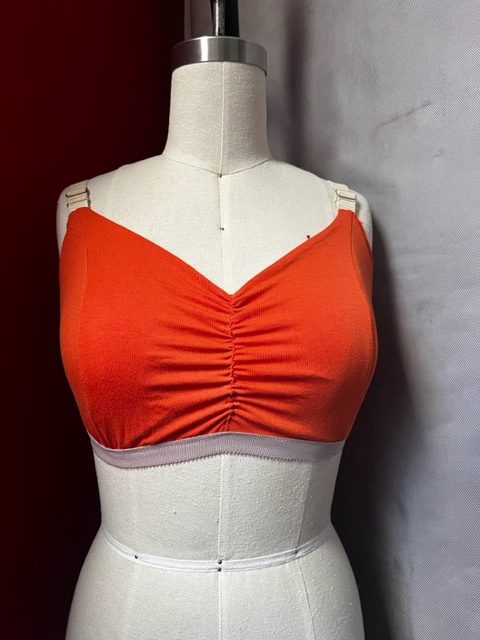
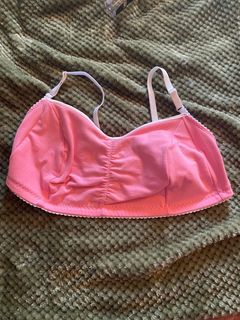
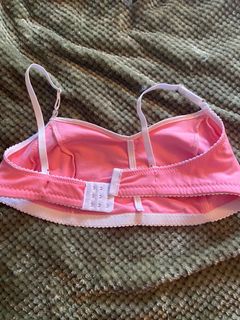
Sue and Michelle in the comments last week both tried this bra, and kindly let me share their photos. Sue’s is orange – it hasn’t got cups in it yet and the plush elastic hasn’t been tucked under. She made hers a step-in bra with no hooks at the back. Michelle is an experienced bra maker (and gave me some handy tips), and made a pink bra with two layers of cotton jersey treated as one.
Related: zero waste underpants pattern, with a pro tip for leg elastic.
Cheers!
Update: Donna-in-the-comments made one and thoughtfully sent a photo. She used medium weight cotton lycra, with athletic wear fabric to make 2 straps and an underbust band with 1″ elastic inserted. She sized down to a 33″ and lowered the front, but didn’t change the cup curve. Overall she was very pleased with it however she thought the centre was too high and found the front ruching a bit bulky but will try darts next time.
Another update: EmikaBird made one using leftover fabric and reused parts, and posted it on Reddit.
Discover more from The Craft of Clothes
Subscribe to get the latest posts sent to your email.
Hello, I’ve been reading your blog for a while now and haven’t commented yet I think. I had tried the first version of the bra but didn’t get to finish it as I didn’t use the right fabric and was very pregnant at the time. This new trial is going to be perfect for this Summer: my bathing suit died and I have a tiny bit of bathing suit fabric, which would not fit for a full non-ZW pattern. I think with the help of your website, I’ll be able to be decent at the beach, so thank you very much!
Ah, I had not considered it as a swimsuit top – good idea.
Thanks for reading my blog.
This is super!
Eventually my RTW bras will wear out and I will be entering the bra-making world. But this seems so much more achievable (no mention of power mesh, stretch lace wire curvature, length or trimming!) than many patterns or kits out there. And one with cups really appeals – small bust confidence givers.
I realise this is zero waste but I reckon there must be scraps in my scrap bag that the individual pieces would fit onto – if only for a multi coloured toile.
Thank Liz for another really useful, realistic design.
You’re welcome Wendy. Yes, bra making is a whole new world! Luckily, people who make their own bras are very friendly and forthcoming with good advice, and there’s lots of help.
Ooh thanks for revisiting your bra adventures – trying a zero waste bra has been long on my list and as ever your instructions are really clear to give me confidence to try. Just some questions on the sizing – as I’m in the UK and not sure if it’s the same. Are the inches are the under bust measurement? And cup size is altered via the curve on the back/side front piece? Is the pattern drafted for a D cup? Many thanks
Thanks for asking that Donna, because I didn’t talk about cup sizes as much as I should have.
The one I made for my daughter (37″) fitted a D cup, and the one I fit tested on a 49″ bust was at least a D cup.
I haven’t done extensive fit testing or checked it on a range of cup sizes, sorry.
The inches are the measurement around the fullest part of the bust. The cup size is a bit variable because the fabric is stretchy and the underbust elastic length is cut to fit the person not a particular size. Yes, you can change the cup size via the curve on the back/side front pieces.
Interested to hear how you get on with it.
Fab, thanks for the info. Will definitely let you know how I get on with a smaller cup size….Am planning to do an underbust band with 1.5″ elastic inserted (which is how I make my non zero waste ones)
Could you tell me where we can purchase this pattern please?
Hi Debby, it’s a free pattern with a Creative Commons license – the download is within the blog post. To download the pattern, click on the double chevrons (“Tools”) in the top right hand corner of the frame holding the pattern.
I hope your bra-making goes well 🙂