New Pattern: the Sandie shirt
Finally! Introducing my new pattern, the Sandie shirt.
It’s in my shop now; please enjoy 25% off during May.
This pattern has taken a long time to develop and write, and it’s the most ambitious one I’ve attempted yet. I’m extremely happy with it – the samples have firmly worked their way into my wardrobe and I think I’ve found my new favourite shirt pattern 🙂
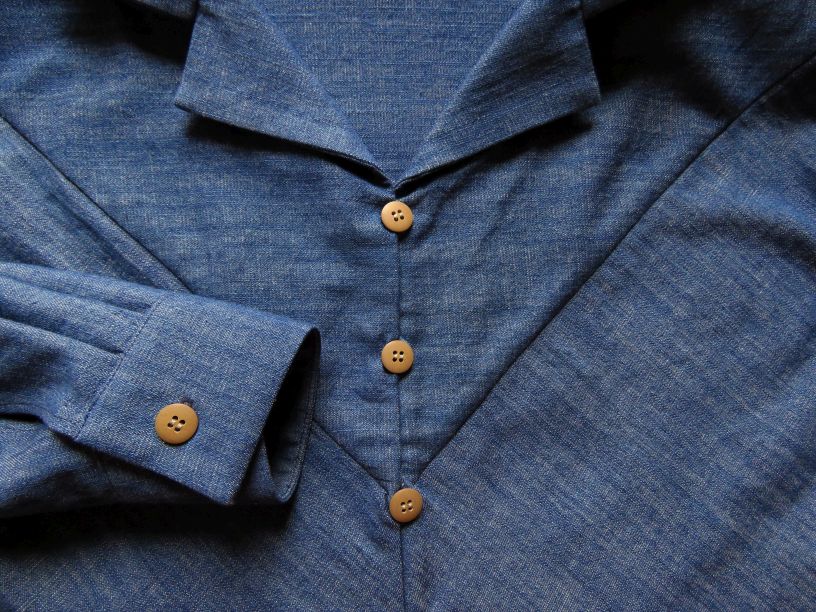
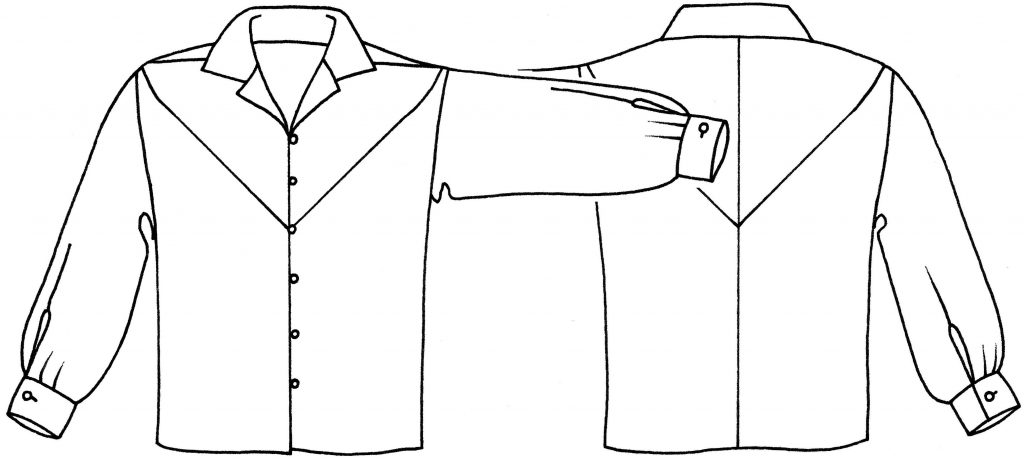
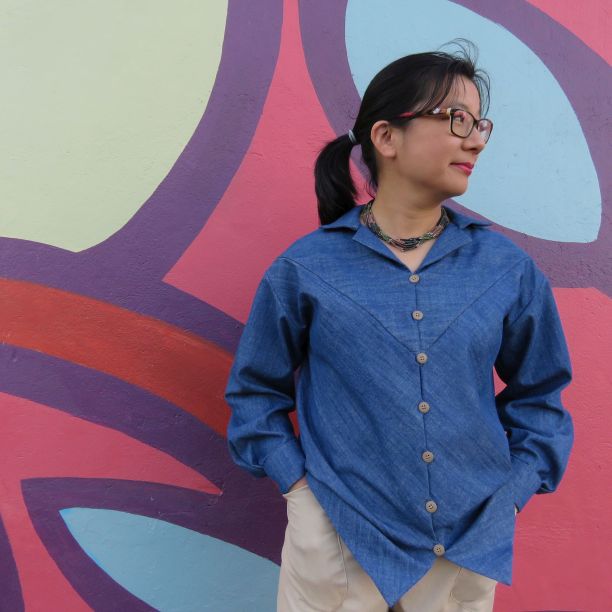
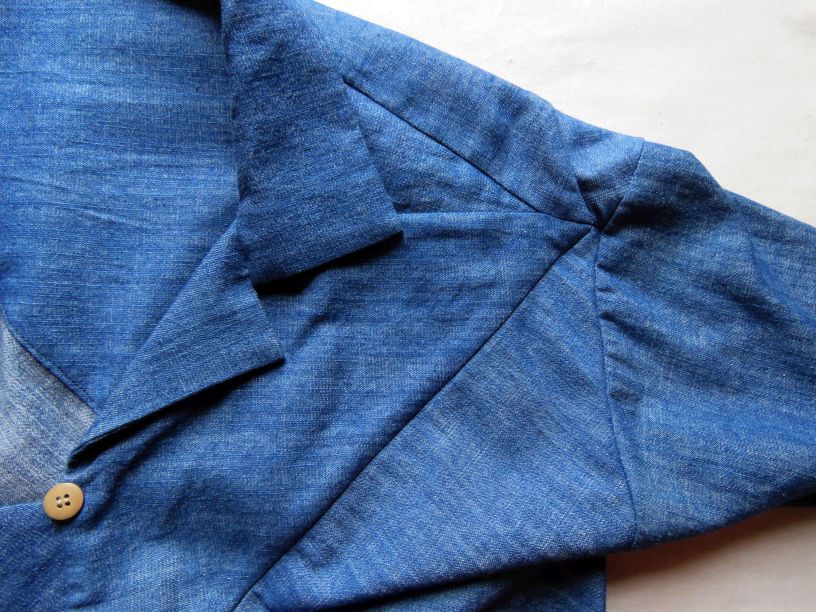
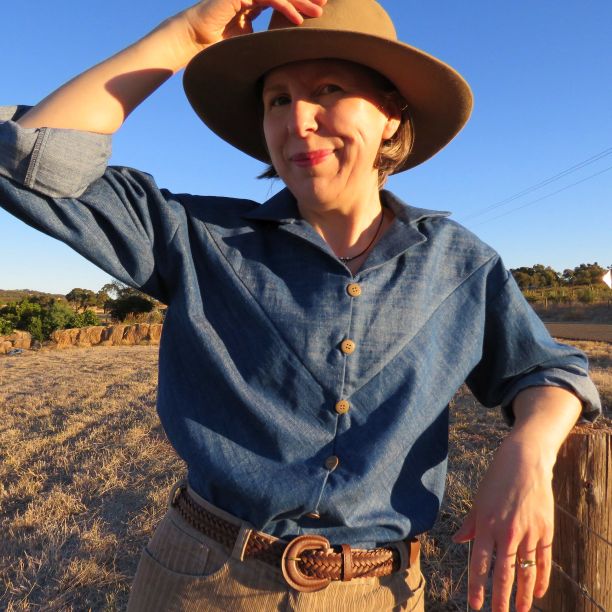
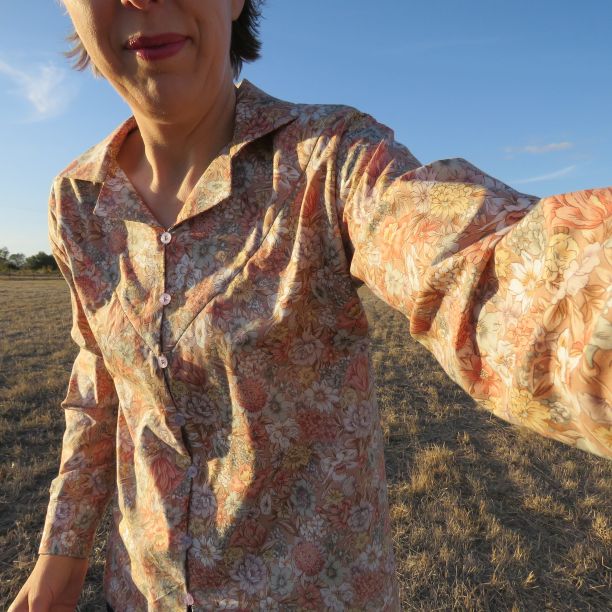
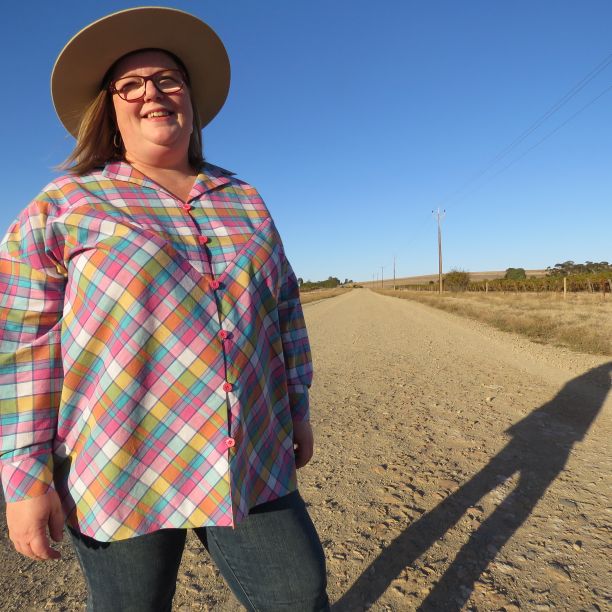
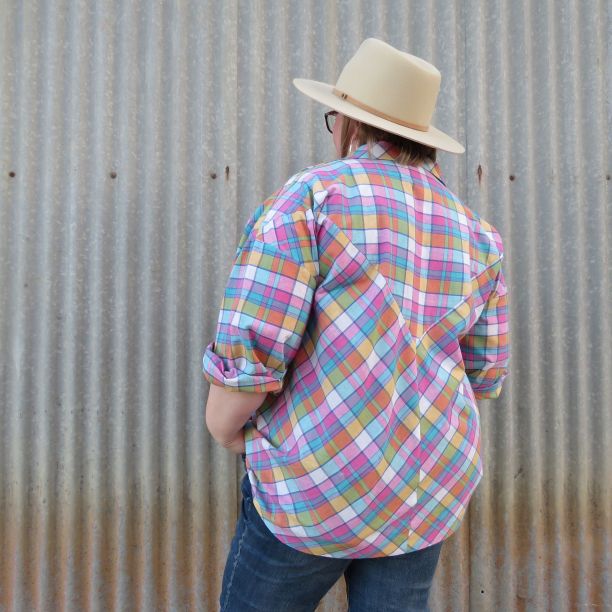
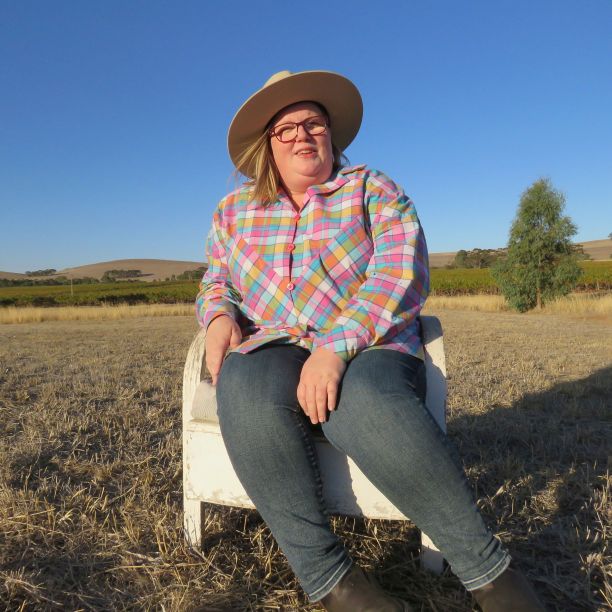
The Sandie shirt is a classic shirt featuring V-shaped double yokes, open-neck collar, long sleeves with cuffs, bias-cut body, shoulder gussets and a button & loop front closure. The triangular gussets and yokes form an almost patchwork quilt-like detail on the shoulders. The pattern lends itself to fun variations in cut and embellishment, making it very versatile – I’ll be showing you some of these next week (update: here they are).
Sandie began as a zero waste pattern and along the way became a minimal waste one to accommodate a wide size range and variety of fabric widths – some size and fabric width combinations might result in a zero waste shirt. Either way, it’s very economical on fabric; the pattern uses around 25% less fabric than a regular shirt and yields usable-shaped offcuts.
The Sandie shirt comes in fourteen sizes, from an 86cm/34″ bust to a 152cm/60″.
It’s designed for stable woven fabrics such as lawn, linen, chambray, lightweight wool, poplin, quilting cotton and shirting in plains, stripes or checks. The cutting layout can be adapted to suit various fabric widths.
Who’s Sandie?
The late Sandie Davies was a colleague at The Sewing School where we were both sewing teachers. I didn’t see her very often because our classes were on different days, but I was rather in awe of her. She’d been sewing for longer than I’ve been on this planet and she was one of those people who are calm and kind. She was very generous with her sewing knowledge. Sandie was a huge fan of Liberty Tana lawn and wore beautiful shirts in this fabric. We think Sandie would like this shirt.
Sandie’s taste in fabrics was first-rate. If you’re in Adelaide, the last part of Sandie Davies’s huge stash of fabrics, notions, books and patterns will be sold on the 15th & 16th May, Hungarian Club, 82 Osmond Terrace, Norwood (bring your own bags, cash only).
Here’s a gallery of Sandie shirts:
The body of the shirt is cut on the bias, so it fits well without darts.
As this fabric is fairly fluid, I went up one size to adjust for the drop in the bias-cut body.
I fall between sizes; this one is half a size bigger.
There’s an opportunity to cut the collars and cuffs on the bias.
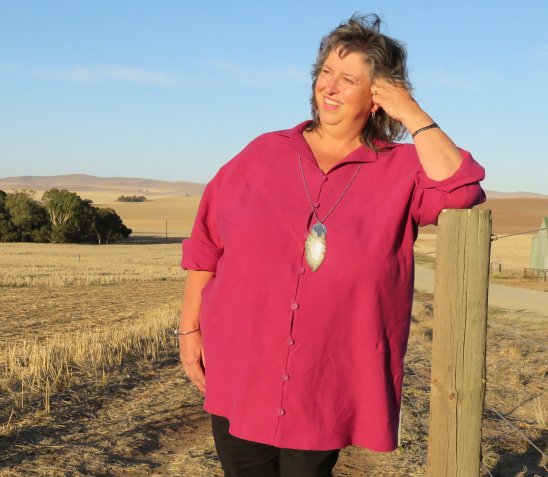
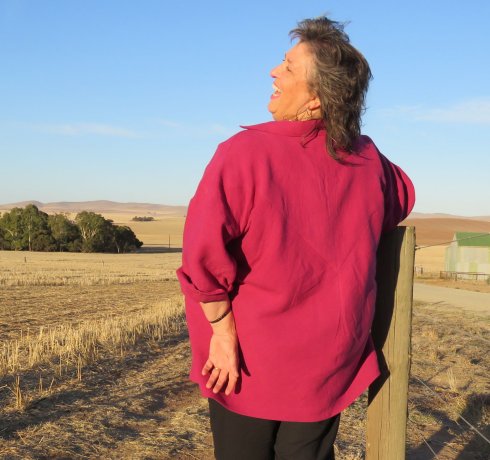
I went up two sizes for this shirt – one for extra ease and an additional size to allow for the soft fabric to drop on the bias.
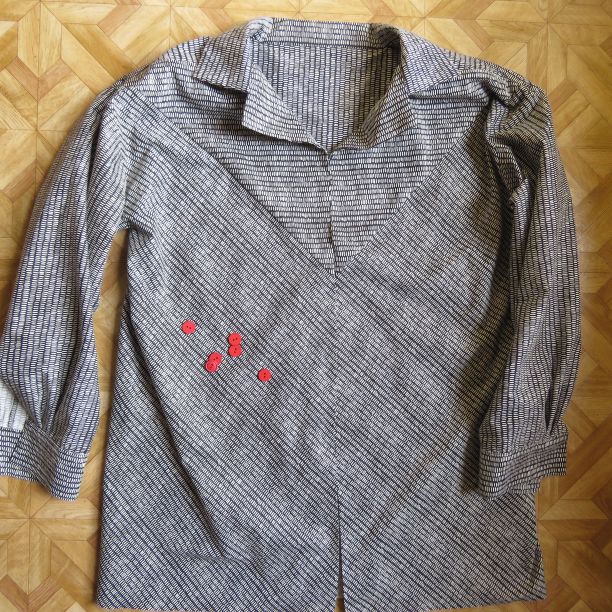
The fabric is a Northcott quilting cotton.
While this is no “5-minute make” (it takes me a day and a half to cut and sew one) it will give you a very satisfying sewing experience. The cut and construction are unorthodox and require some sewing experience, and if you’re a shirt wearer & sewer looking for something interesting, this could be it.
Cheers!
UPDATE: thanks Rachel-in-the-comments for asking more about stripes. Yes, stripes will fall across the body diagonally in the same direction.
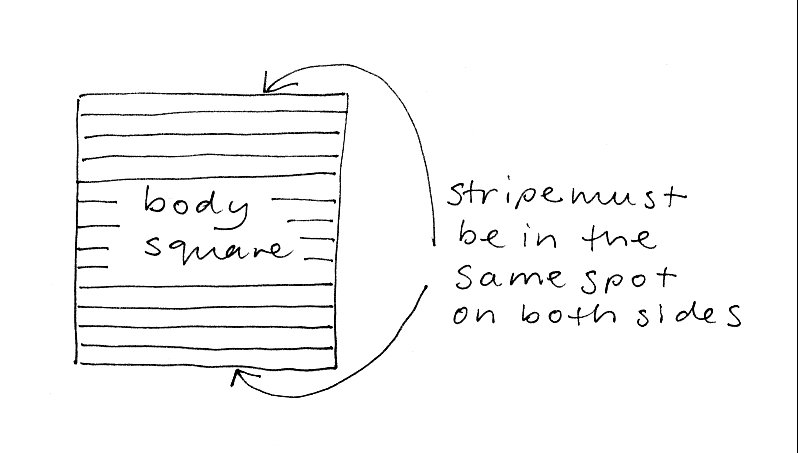
You’ll notice that the pink madras check shirt in this blog post doesn’t match across the centre back/front (although the yokes do). That’s because the check is an uneven or unbalanced check. Uneven stripes will perform the same way.
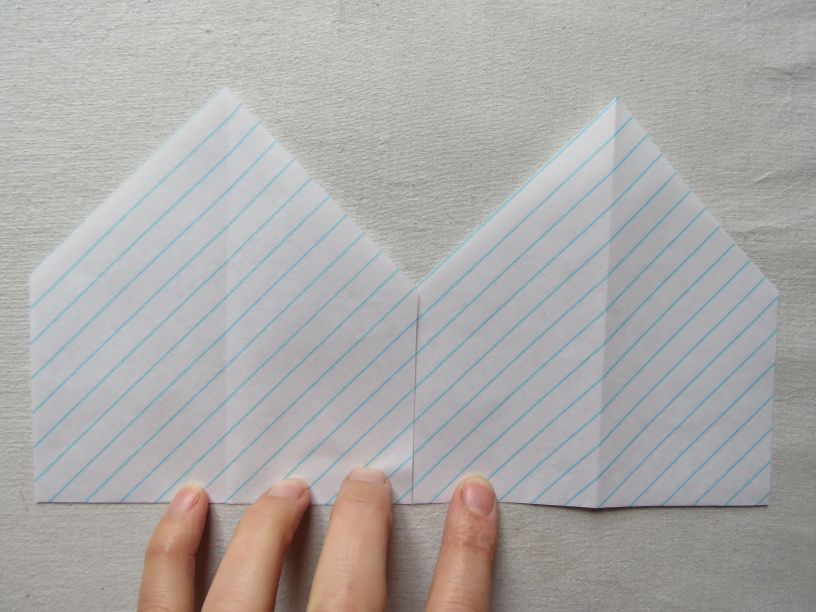
You can see the stripes running diagonally across the centre seam.
How interesting! I love the lines. It does look like a challenge but I love shirts may give this a try. BTW I have been asked by my local sewing guild small group to do a presentation on zero waste fashion on May 22. Your name will be invoked many times during that presentation, so if your ears are burning…
Hi Martha, I think you would like it 🙂 Best wishes for your presentation.
Liz! This is sooo brilliant. I’ve had some Tana Lawn I’ve been saving for a button down shirt. This is perfect<3
Thanks Michelle; it works really well in Tana Lawn 🙂
Hi Liz, this shirt looks great. As a shirt lover I will put this project on my wishlist for sure. I am curious about the loop and button system though. How do you arrange this to avoid your bra and/or skin does not show through? 😀
Hi Anna, thanks for asking about that – there’s a button shield behind the buttons. You can just see the corner of it in the bottom left of the photo of the chambray shirt showing the shoulder detail.
Yay! I can’t wait to try your new pattern. I need a white button down for work, though I will definitely also experiment with using a print to take advantage of the amazing design details. I’m so glad I found your blog. Your work has been a great source of inspiration and sewing adventures.
Thank you for your lovely comments Jenifer. I think this shirt would be a good addition to your professional wardrobe 🙂
I like the look of the shirt very much but I’m concerned about fit adjustments for me. I have a very rounded back but I think that I can do the adjustment. However it’s the shoulder adjustments that the pattern needs to accomodate. I have forward shoulders (3cm), sloping shoulders and slightly narrow shoulders. The forward shoulders have implications for the set of the sleeve. Over many years of sewing I’ve learnt how to make these adjustments but am just not sure if a less conventional pattern makes these adjustments possible.
Hi Barbara, I’m not sure either. A friend with very narrow shoulders tried it on and it looked fine, however she doesn’t have a rounded back. There are shoulder seams on this shirt but no side seams; the sleeves are inserted in-the-round. Sorry I don’t have a definitive answer, but if you do make it I would be very interested in your feedback.
Really looking forward to making this shirt. I’ve made a couple of button-down shirts with cuffs and collars from Burda patterns, so I hope those will have been useful experience. They definitely weren’t very fabric-efficient! I’ll be especially interested to see how cutting the body pieces on the bias affects ease of fit and movement.
Looking at the striped sample, I’m curious as to why you’ve done the stripes running in the same direction on both body pieces. Was that a design choice or something necessitated by keeping it low/no-waste? I love it when bias-cut stripes result in chevrons and I’m wondering whether this pattern accommodates that.
Hi Rachel, thank you; I can attest that this is a very comfortable shirt and I’ve been wearing the samples LOTS.
Re: the striped sample, the stripes on the body just go that way, due to the orientation of the pieces in the layout. I love chevrons too 🙂 however these pieces don’t form chevrons when they’re together.
Oh well, then I shall just have to do two striped shirts at the same time and give one to a friend.
Just thought: you wouldn’t have to if you had a yarn-dyed stripe that looks the same on both sides – you could flip one of them. I’ve put some photos at the bottom of the post to illustrate.
Hi
This shirt is classic look. I like it’s pattern. Soooo. Beautiful.
Thanks Barkat!
Hi Liz I want to have a go at this but I’m at the top size, bust not too big but with a big tummy and I usually have to do a fba ( full belly adjustment) on patterns. Do you think it might work for me? What kind of fabric would you use?
Hi Linda, thanks for asking.
The shirt has no way to do full belly adjustments, however, if your belly measurement is the same or less than your bust, you might get away with no adjustment as the bias cut is very forgiving (please check the finished measurements chart on Etsy). The models wearing the pink shirt and the checked shirts would normally need a full bust adjustment but the pattern works fine without one.
For fabric, any of the recommended ones should be okay. The easiest to use is quilting cotton or something similar because it’s so stable to cut & sew.
The reason why the sizing stops at a 60″ bust is because if it’s any bigger it won’t fit on 150cm wide fabric. If you need to go bigger due to wanting more ease or using a fluid fabric likely to drop, and you can find a wider fabric for it (the next size up needs 154cm wide fabric), I’ll happily send you the cutting details.
If you get stuck, I’m here to help!