Making Holly McQuillan’s zero waste spiral trousers
In the world of zero waste pattern cutting, Holly McQuillan’s spiral trousers are considered a must-do/bucket list pattern.
These unusual trousers have been on my mind for some time, but I didn’t feel brave enough to try them until I saw Sue Stoney’s blog post on them and saw Holly demonstrate how they’re constructed at an online zero waste workshop.
The pattern appears in the book Zero Waste Fashion Design as just a layout and a garment sketch. It doesn’t have measurements or sewing instructions; it’s offered as a starting point for experimentation.
However, others have made them: @stikleif on Instagram has made them as full-length trousers, shorts, capris, and yoga pants; Modconned wrote a blog post; Anouk van de Visch made a tie-dyed pair; Kathleen Fasanella trialed a pair in calico; and they’re on the Make/Use website. The #spiraltrousers page on Instagram shows pairs made in striped fabric. If you’re planning to make a pair, I highly recommend looking at all of these; it’s such a big help.
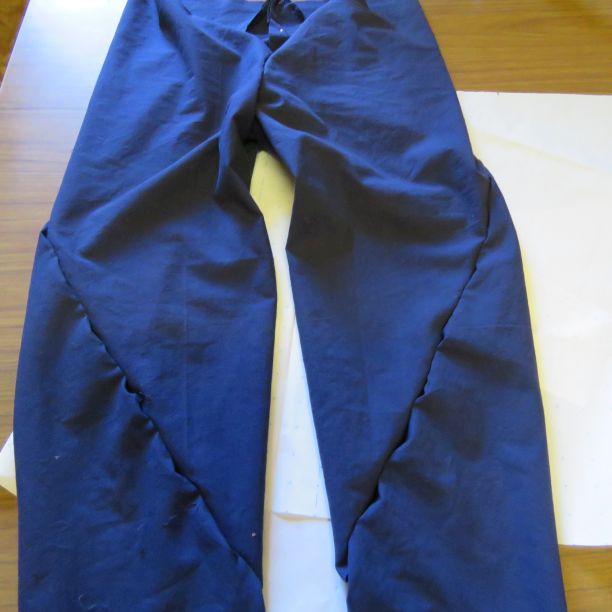
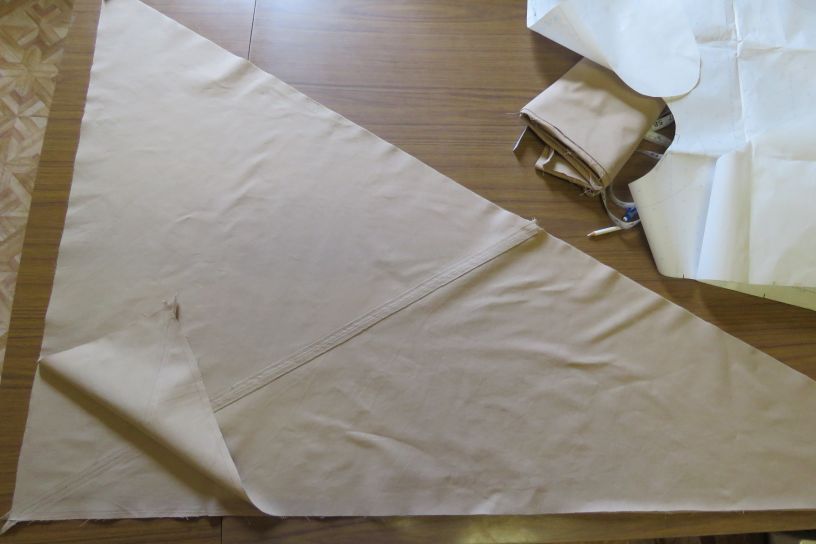
The legs are triangular pattern pieces – so unlike any other trouser pattern and an example of the kind of creative patternmaking wrought by the parameter of zero waste.
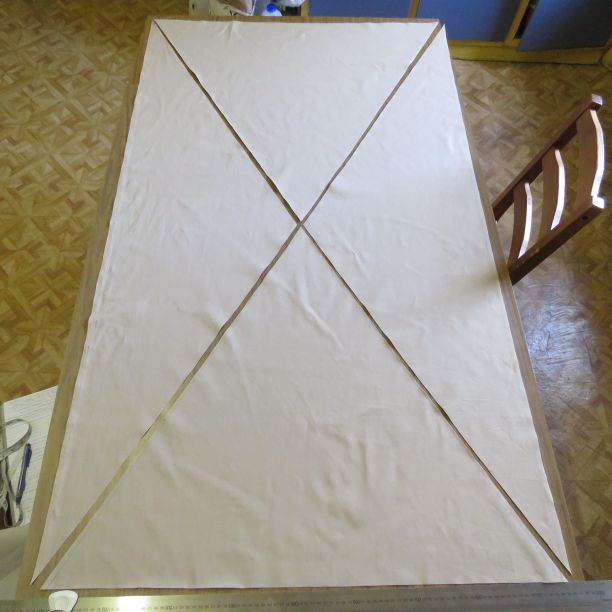
Here are the pieces cut out:
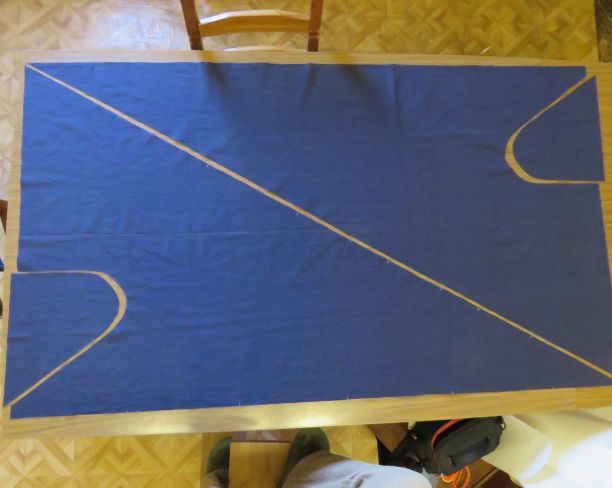
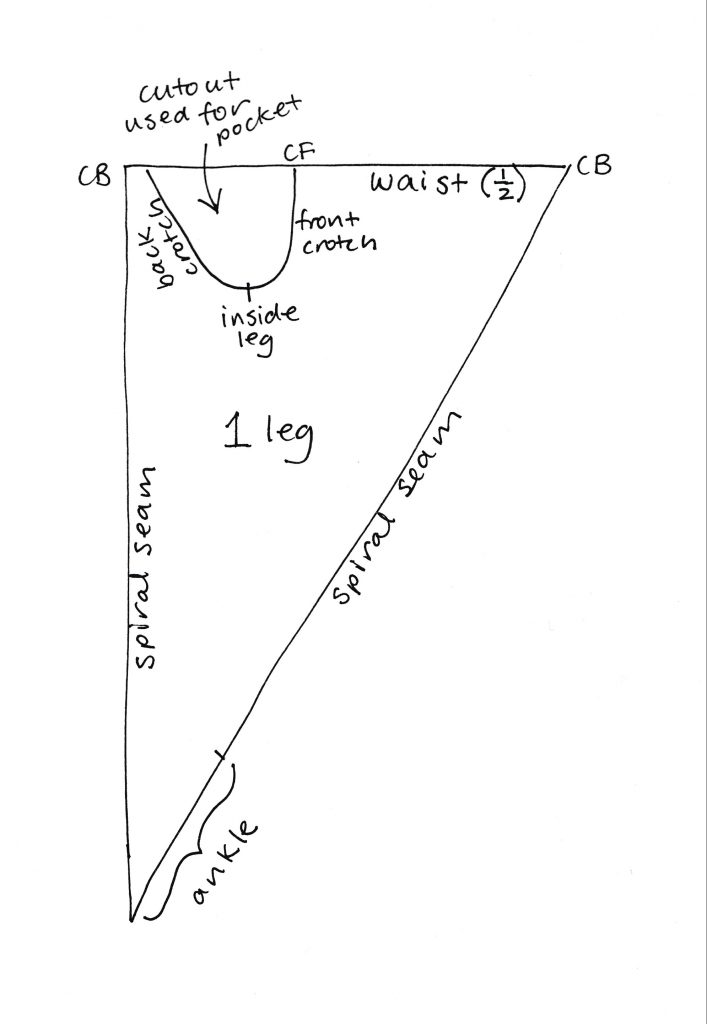
Below is an explanation of the pattern pieces. Each triangle is a leg, with the crotch cutout being used for pockets. You can see that the ankle is on the bias and the waist is on the straight. The waist isn’t actually half the waist measurement; it just wraps half way around the body and needs darts to fit it to the waistband.
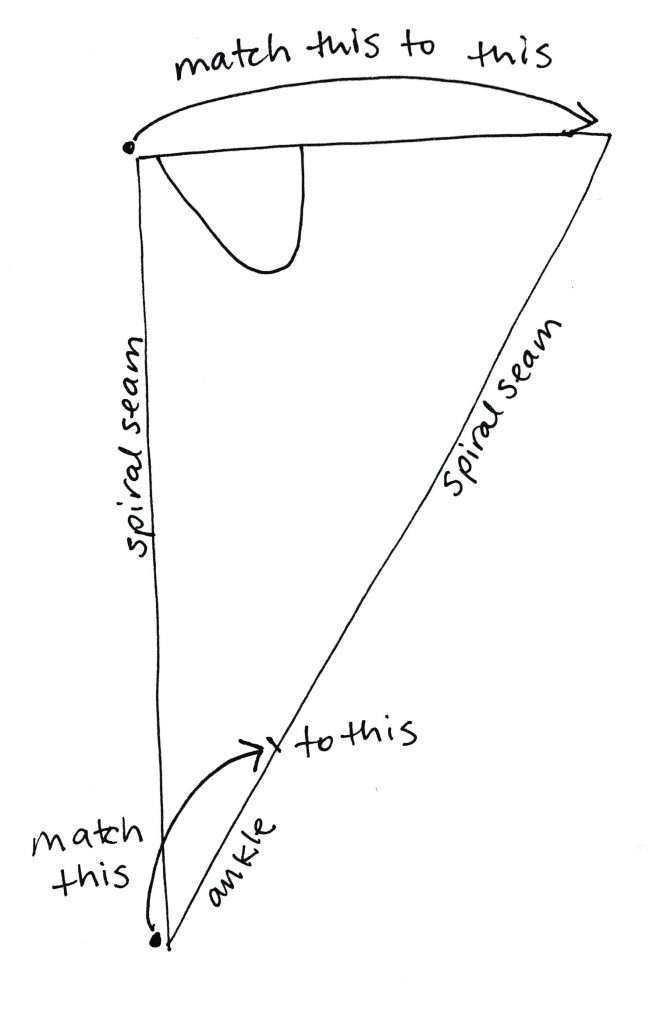
The spiral seam gets sewn like this, and spirals its way around the leg to the ankle.
Here’s a short video showing the spiral concept:
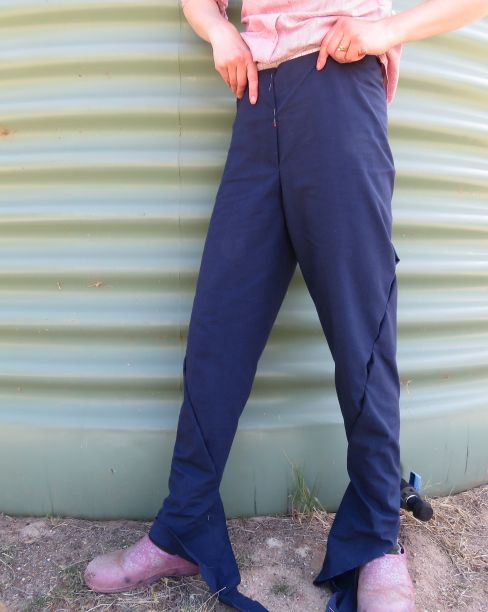
I pinned together the spiral seam first and tried the trousers on, and immediately discovered the ankle was too small. It only measured 11cm across and I just couldn’t squeeze my foot through!

So I unpinned them a bit to get them on. The fit was quite good.
Then I went off for a bike ride to think through the ankle problem.
I had been very cautious about not stretching the diagonal side of the spiral seam, and even notched each side at 20cm intervals so I could match it properly. But what if that’s a bad idea and it’s better to let the bias stretch? That would give a bigger ankle section.
I unpinned then re-pinned, disregarding the notches: 13.5cm ankle.
I actively stretched the bias edge, then re-pinned again: 15cm ankle.
Fourth and final effort: 16cm. Victory! I put a 32cm notch along the bias edge for the ankle.
However, by stretching the bias edge into submission, the seam bulges on the straight grain side because I’m essentially easing it on. After a good press this didn’t look as bad on the finished trousers, and for my second pair I topstitched both sides.
UPDATE: something to try next time is to convert the excess fabric into a dart that’s somewhere at knee level.
This wouldn’t be a problem for larger sizes or elastic-waisted versions, because the angled edge would be longer, giving a longer ankle section.
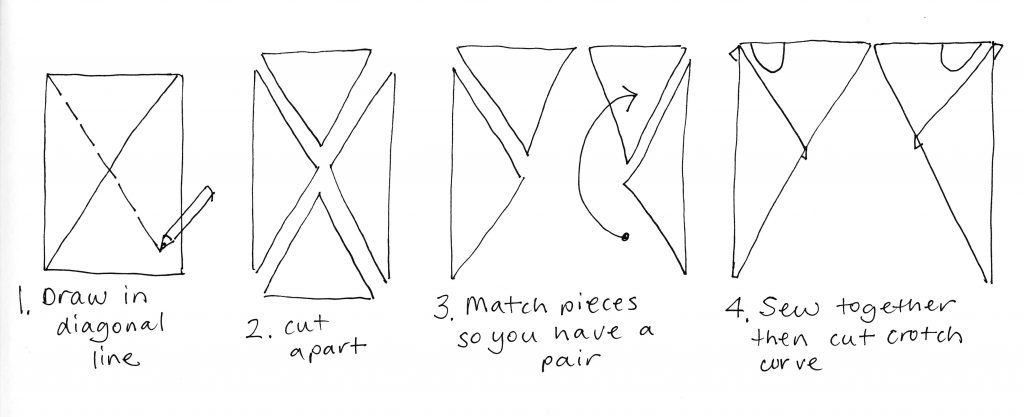
One of the restrictions with this pattern is that you’re cutting two legs the same, not a pair. To get paired legs, either the fabric needs to be the same on both sides so that one can be flipped (which is what I did) or you need to cut two trousers the same with the fabric paired. Further down this blog post I experimented with adding an extra seam to use fabric that has a right and wrong side.
Once the pattern is sorted, it’s quicker to sew than regular trousers. I sewed the spiral seam on each leg then proceeded as per usual for trousers (zip, waistband, hem).
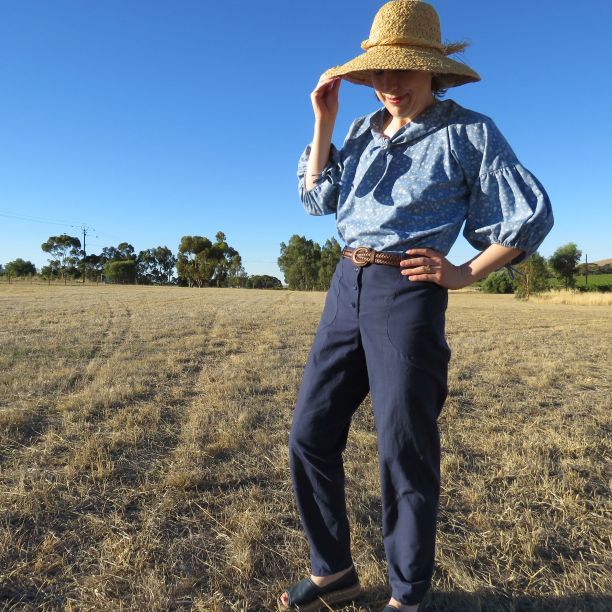
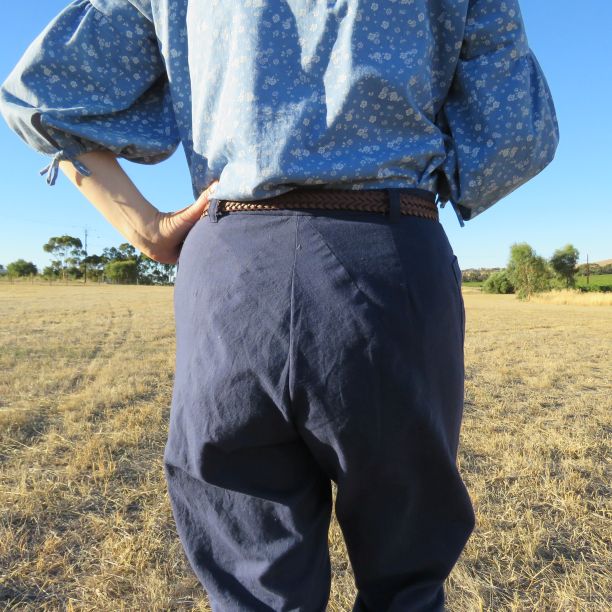
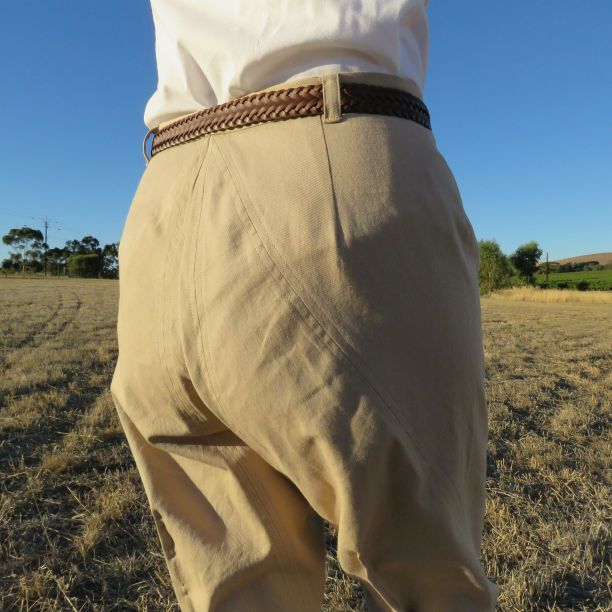
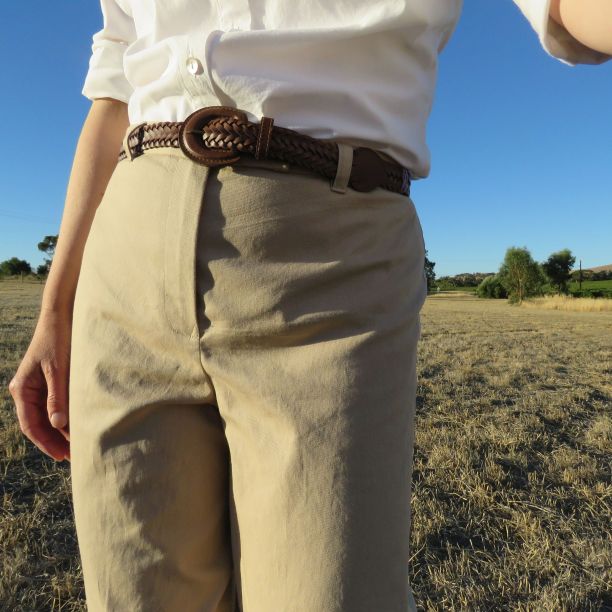
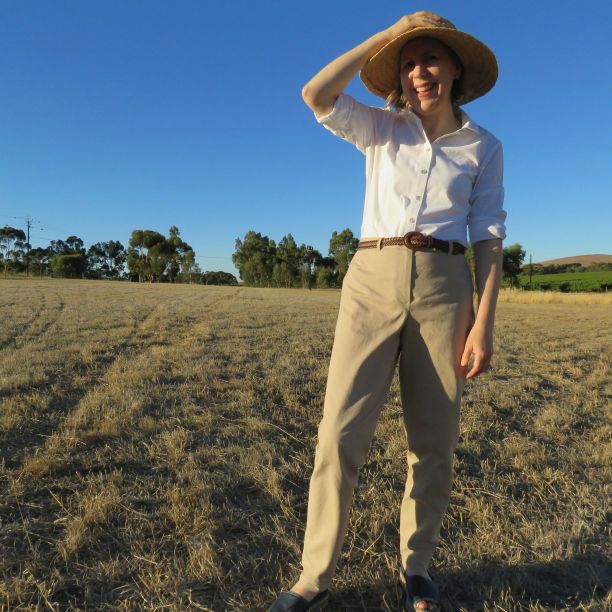
I was very happy with how mine turned out and I’m wearing them now as I write this! They’re very comfortable and don’t feel any different to wearing regular-cut trousers.

In case you’re thinking about making these and want to cut down on the amount of trial-and-error involved, fyi here’s how I did mine:
I made a paper pattern for the trousers, but you could draw them straight onto the fabric if you record the dimensions and make a template for the crotch cutout.
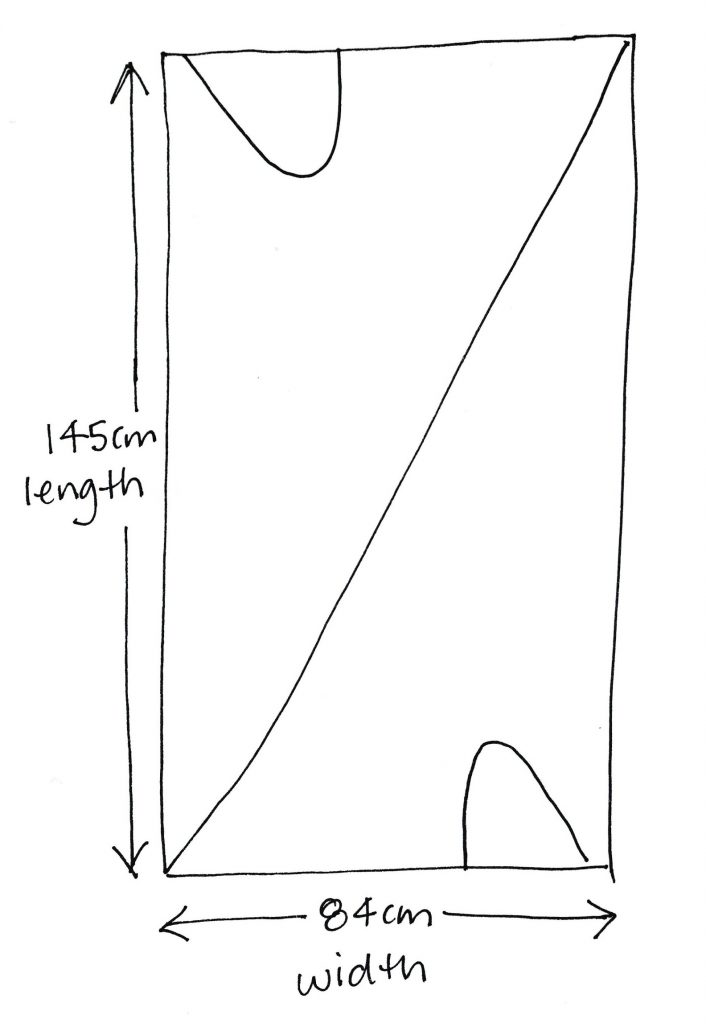
The width was 84cm/33″ to fit my 101cm/40″ seat/hips. You can see from the above photos how much room this gives – I probably wouldn’t want them any closer fitting. For bigger sizes, I would increase it 1 1/4″ per size (ie, if you have 42″ hips, make it 41 1/4″; for 44″ hips, make it 42 1/2″, etc). Of course you could make it bigger than this.
I took a 1cm seam allowance on the spiral seam.
The 145cm length was barely adequate, and I could only do a 1cm hem. I’m 168cm/5’6″ tall. You’ll notice that 145cm is waaaay longer than you’d normally cut trousers length at, because the spiral seam loses length as it winds around the leg.
To get the crotch shape correct, I used a trouser block that I knew fitted.
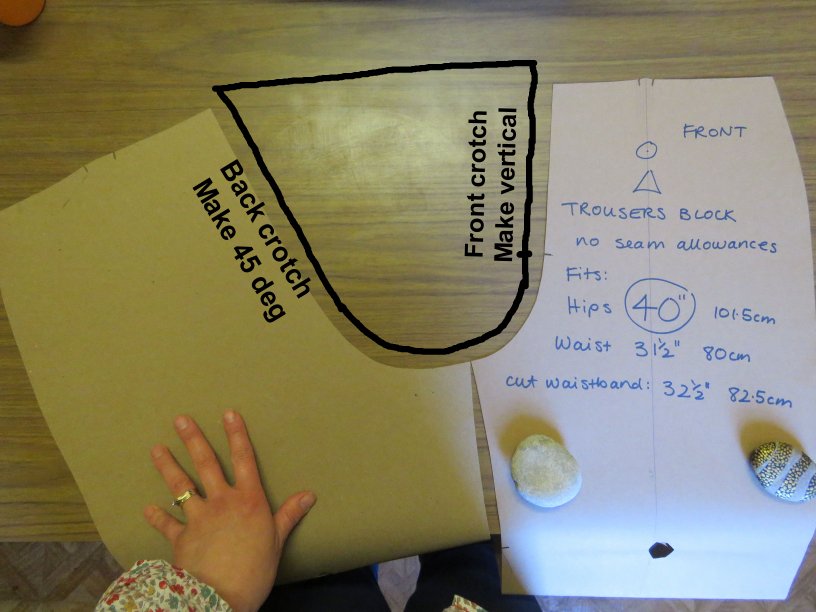
From memory I think I straightened up the centre front crotch so it wasn’t angled slightly like the block is.
If you don’t have a trouser pattern handy, you could trace the shape off a RTW pair that fits.
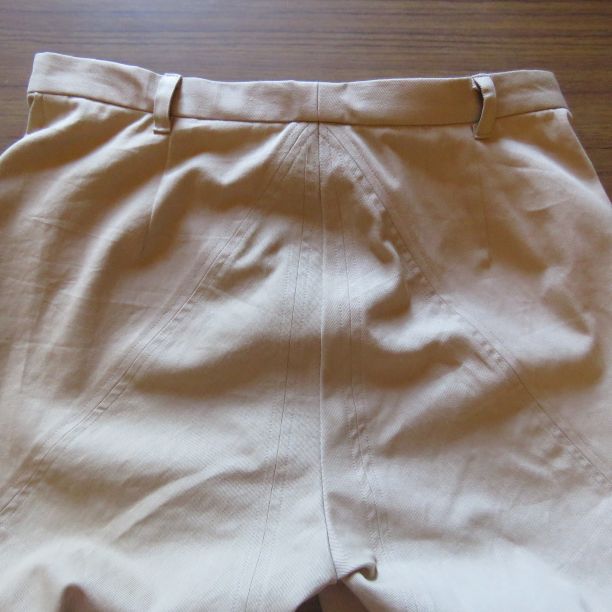
Here’s what the top of my pattern looks like. You can see there’s a side dart (to shape the waist in lieu of a side seam) and a back dart. To decide on the darts, I cut a waistband to fit my waist then darted the trousers to fit:
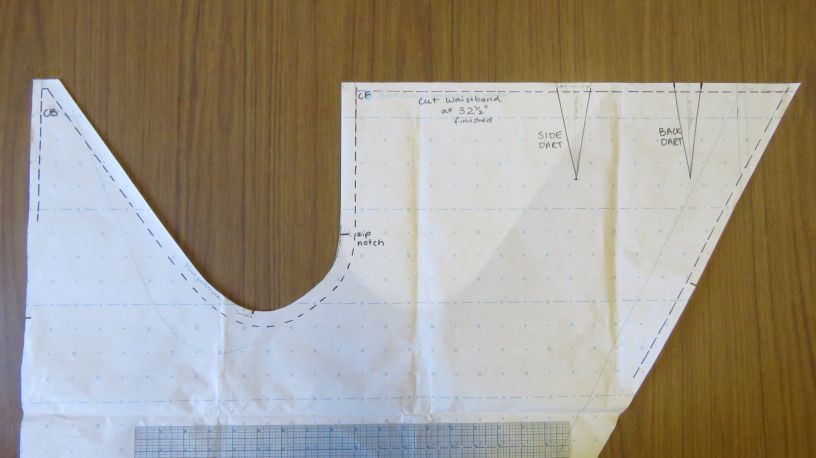
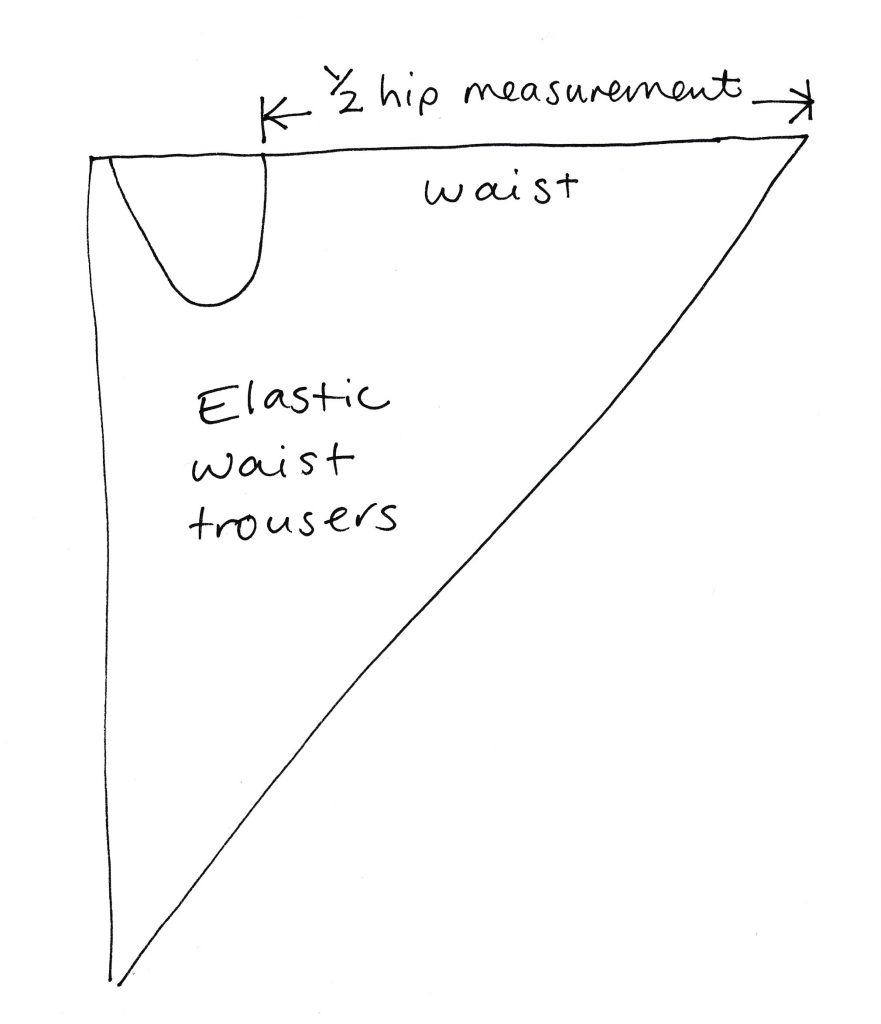
If you wanted to make an elastic waisted pair, the top edge (minus the crotch cutout) would need to be at least half your hip measurement so that you could get them on:
Using fabric with a right and wrong side
I wondered if, by adding an extra seam, a single pair of spiral trousers could be cut from fabric that has a right and wrong side.
Here’s the idea:
But that means there would now be two diagonal seams radiating from one’s butt – how would that look?
Well, you’ve gotta try these things!
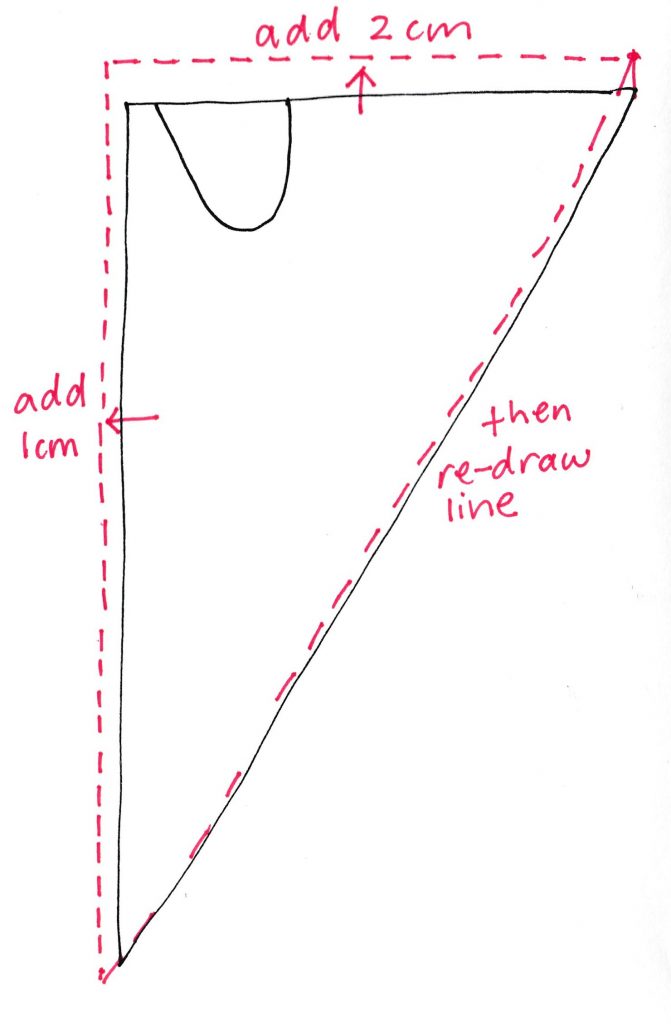
I added onto my pattern so that there would be enough for the extra seam allowances needed:
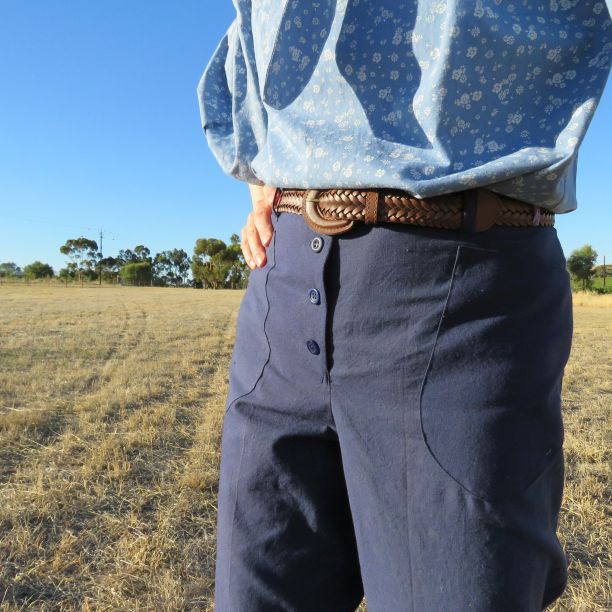
I used some taupe cotton drill, slightly heavier and crisper than the navy cotton.
After seaming the pieces back together again, I laid them on top of each other (paired) and cut the crotch curve:
I think it turned out okay!
Here’s where the seams end up – the black line is the spiral seam and the white one is the one I added. I pressed both seams open and topstitched 6mm on both sides:
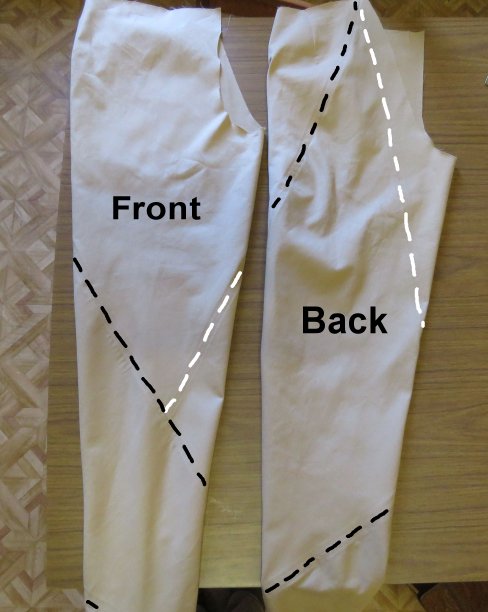
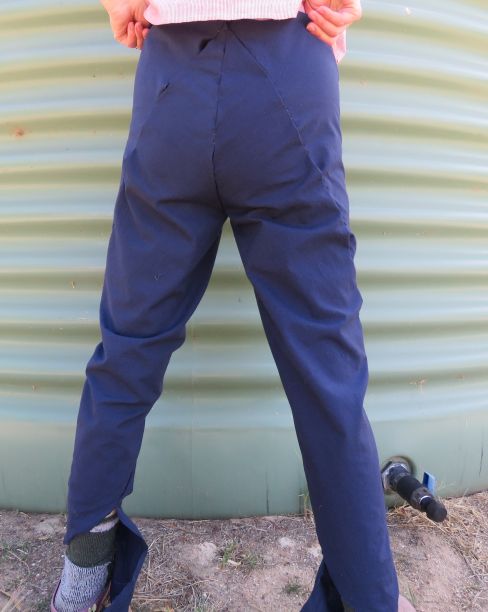
Here’s what the back looks like:
I haven’t put the pockets on these yet, but I will before I wear them properly.
The verdict: highly recommended for a unique trouser sewing experience!
Cheers!
UPDATE: read about Ecatarina’s spiral trousers, with a better way for cutting fabric that has a right and wrong side.
Discover more from The Craft of Clothes
Subscribe to get the latest posts sent to your email.
Thank you so much for the explanation, really helpful, tempted to try myself now. Yours look great and comfy, I’m off to check out the insta hashtag now.
Ah, just go for it Anna!
These are definitely on my to make list. I love your hack to make a pair. I have similar hip/ height measurements to you So I may use yours as a starting point
I wish I’d made these sooner! Hope yours turn out really well too.
Que faire d’un rectangle de tissu ? Eureka ! , C’est super, merci pour l’idée et les explications…
Pas de quoi!
Also on my sewing to-do/wish list. Brilliant work!
Thank you! Hope yours go well!
Thanks for writing this up Liz. This is such an intriguing idea. My measurements are similar to yours, but I’m 5’10 , most of that is in my legs, to the point that the need for pants long enough got me into sewing as a teen. I’ve got this on my bucket list!
Any comments on varying the length?
Thanks for reading Sue 🙂
I would make mine 150cm long next time. To make them longer, you’ll need to add 1.5 times the amount you want eg – for a 10cm longer leg add 15cm.
Great post Liz. Thank you so much for sharing. I’m going to give these a go now 🙂
Cheers Beth, so glad it was helpful.
Fab post Liz, it all makes sense now! I did wonder about the legs being the same and couldn’t work it out at all but that is super clear
Cheers Morag!
These were on my wish list, thankyou so much for this, very helpful!
You’re welcome!
Your idea of cutting 1 pair of fabric with right and wrong side is so clever ! I might want to try another pair
Your Instagram pairs were sooo good!
Thank you so much for all the infos! I was dreading to try these trousers because of the try and error factor * time spent. This post will be soooooo helpful! Merci <3
I confess that that’s what put me off making them for so long, but it really helped seeing other people’s. Best wishes for yours 🙂
So cool! Both pairs look fabulous! Thank you for posting all the details. My measurements are similar to yours and I may use your samples as a jumping off point, as I am really intrigued!
They are fun to make! Best wishes for yours 🙂
I’m behind my daughter, Michelle Cahill on this. This is the first time I have seen these and they are incredibly interesting. I would have never imagined that you could even make a zero-waste trouser. Thank you for putting down clear instructions.
Yes, such a fascinating and unlikely-looking pattern. I highly recommend trying them!
Wow!
Stumbled on this while looking for cutting layouts — I always try to use the “waste” as a t-shirt or vest, but now must try this waste-free idea. Particularly like the patch pockets on the blue pair!
Yes, it’s a bit of a wow! pattern, isn’t it? You must try them! I’ve worn both these pairs lots (the taupe pair now has pockets) and they’re very comfortable – I think it’s because of the bias cut leg.
Hi Liz, thank you so much for sharing your experience in making these! I’ve been eyeing them for a while, but what really puts me off is the idea that they’re sewn on the bias and they’re an area that really gets a lot of bendy movement (hips, bum, knees). After wearing them for almost a year, have you found the bias to be a problem? I’m about to draft my crotch curve and try them in any case, but I’m curious about your experience. Thanks!
Hi Karen, I haven’t found the bias to be a problem. I’ve worn the taupe pair the most, and the seat & knees stretch a little when I wear them but I’d say no more than an ordinary straight-grain pair of trousers would.
The bias cut makes them really comfortable to wear.
Best wishes for yours!
(After cutting and taping for an hour) But they aren’t on the bias, are they? It’s only the seam that’s on the bias. These pants are genius! And it’s the bias thing that’s frightened me for so long… Onward!
Yes, only some bits hang on the bias and they’re not on the true bias. Sure are genius!
These are beautiful! But how do you make them longer? I’m a (uk) 16 trouser with a 34” minimum inseam depending on style.
Yes, you can make them longer – you make the triangle longer. Read Sue Harper’s question and reply in the comments. Btw, I’m 5’6″ tall.