Flying High! – Mastering Fly Fronts
The words fly fronts and intimidating are often used in the same sentence. Yes, fly fronts look complicated. There are lots of ways to sew them, and everyone has their preferred way (or no way, if you’ve never done one).
I thought I’d share My Way with you, which I learned when I was a fashion student. I remember totally messing it up in the exam! But 30 years on, I’ve had more practice and made plenty of patterns for fly fronts.
Here’s a hand drawn overview, followed by step-by-step photos.
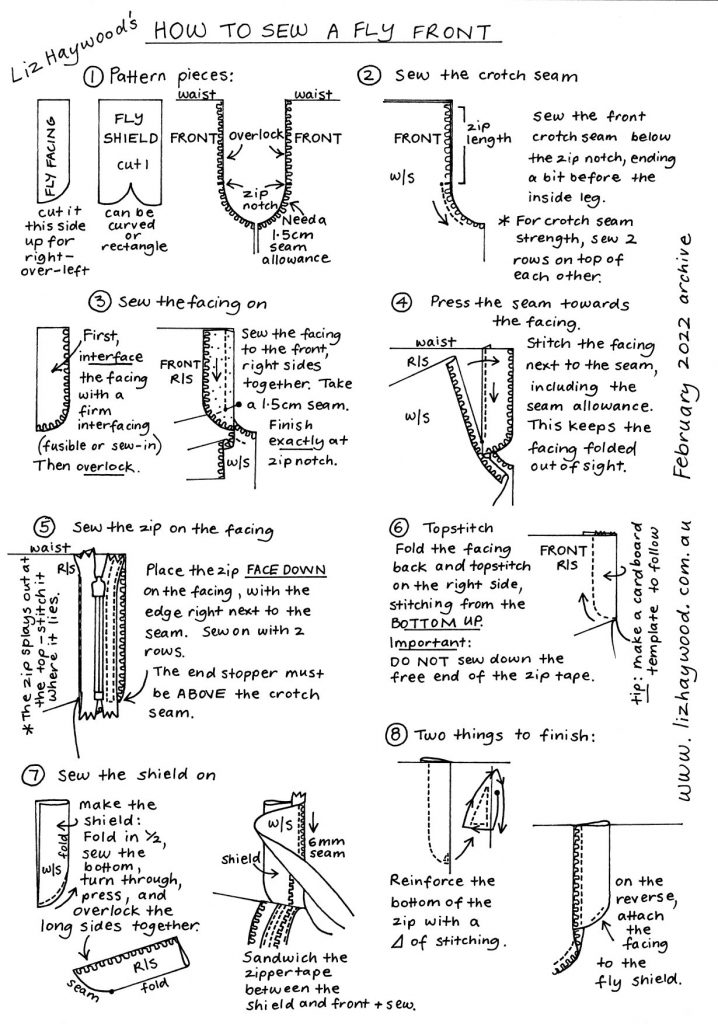
Step 1 Pieces
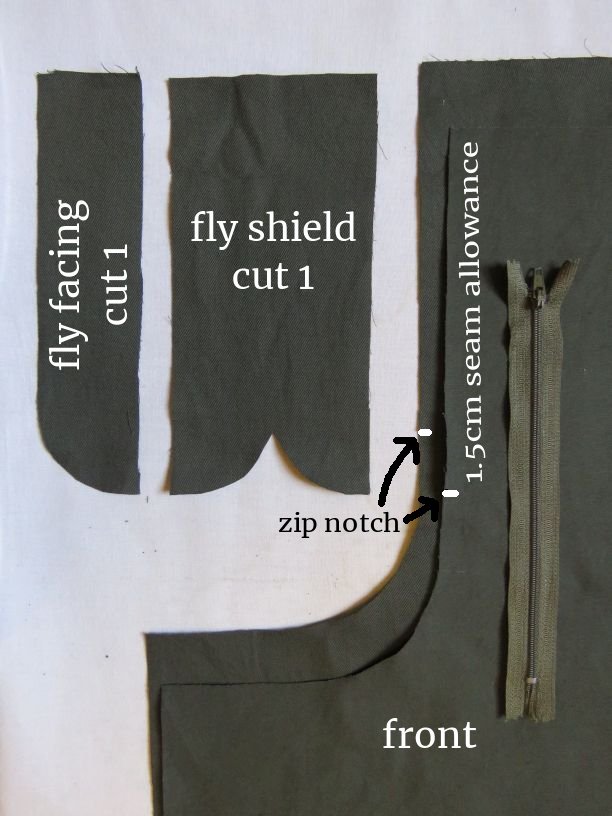
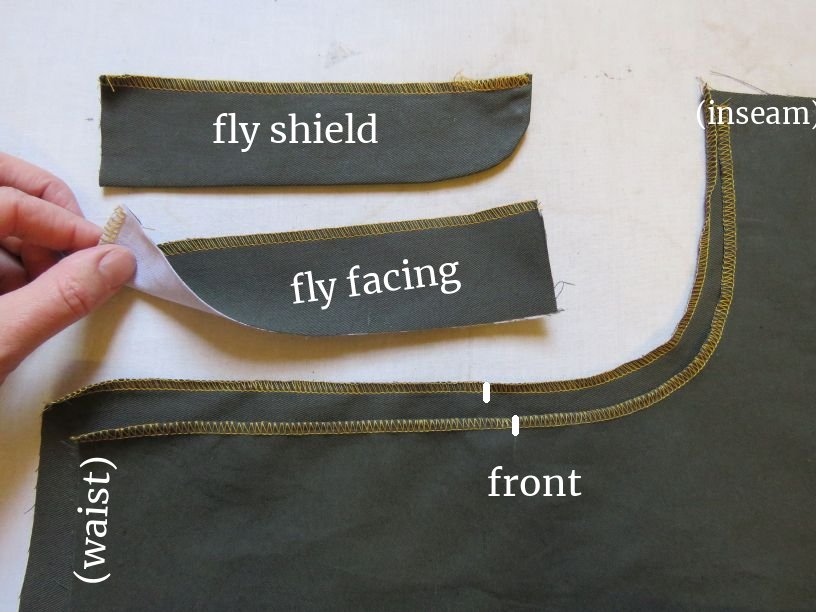
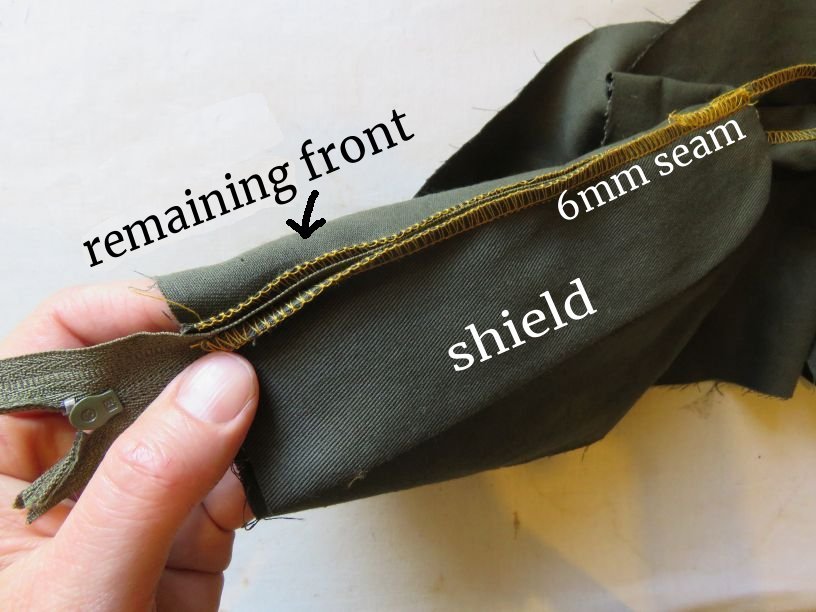
The fly shield will go behind the zip so no-one sees your undies if your zip comes undone. The pattern piece can be curved like this one or simply rectangular. Cut 1.
The fly facing is typically curved like this one. Cut 1, but pay attention to which way you cut it – the facing here, cut right side up, will make a left-over-right opening as used traditionally for menswear. Flip the pattern piece over to cut a right-over-left opening.
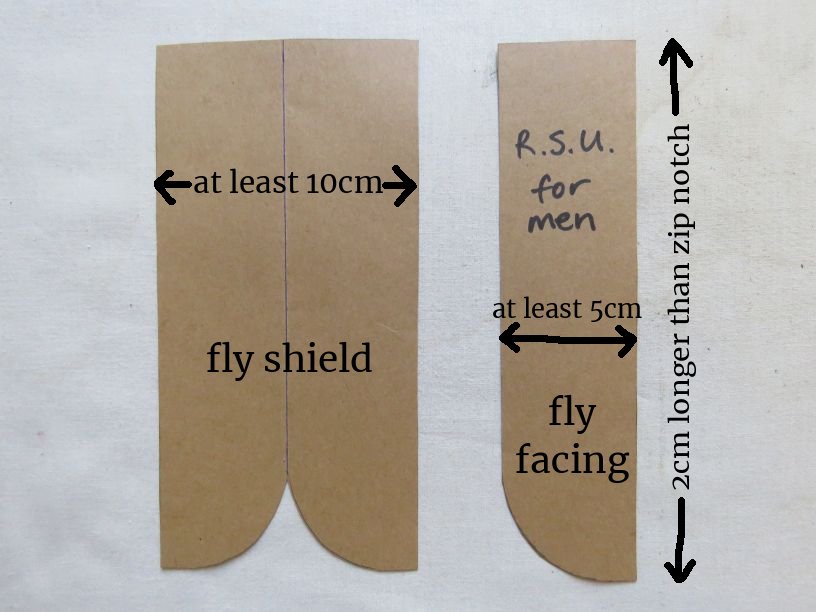
Sometimes the facing is half the width of the shield as in this case, but it doesn’t have to be. Facings can be much wider, but don’t cut the facing any narrower than 5cm (or it will be too narrow for the zip and topstitching). I favour about 6cm.
As mentioned above, the shield can simply be a rectangle.
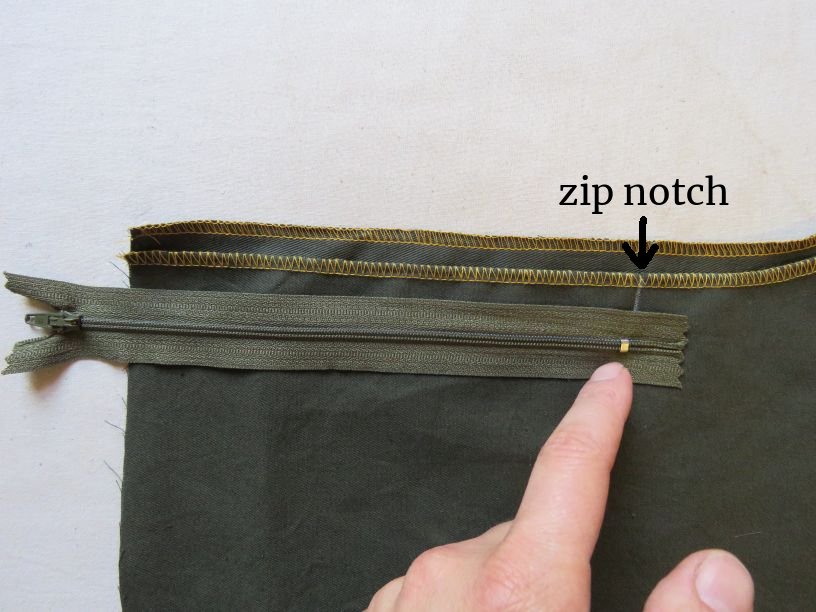
It’s perfectly fine to move the zip notch a couple of millimetres in either direction to suit your zip.
Get ready to sew
1. Overlock the fronts – you should still be able to see the zip notch beneath the overlocking.
2. Interface the fly facing with some firm-ish interfacing (fusible or woven), then overlock the long curved edge.
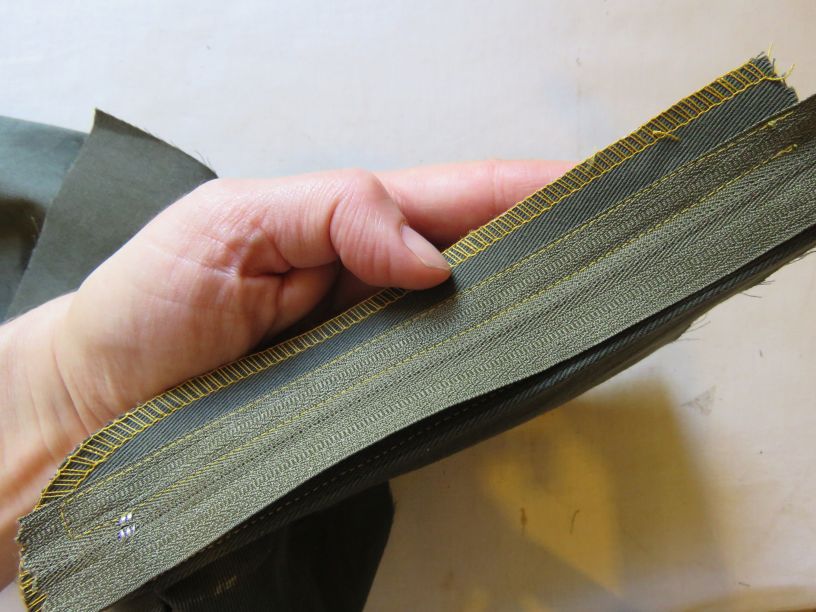
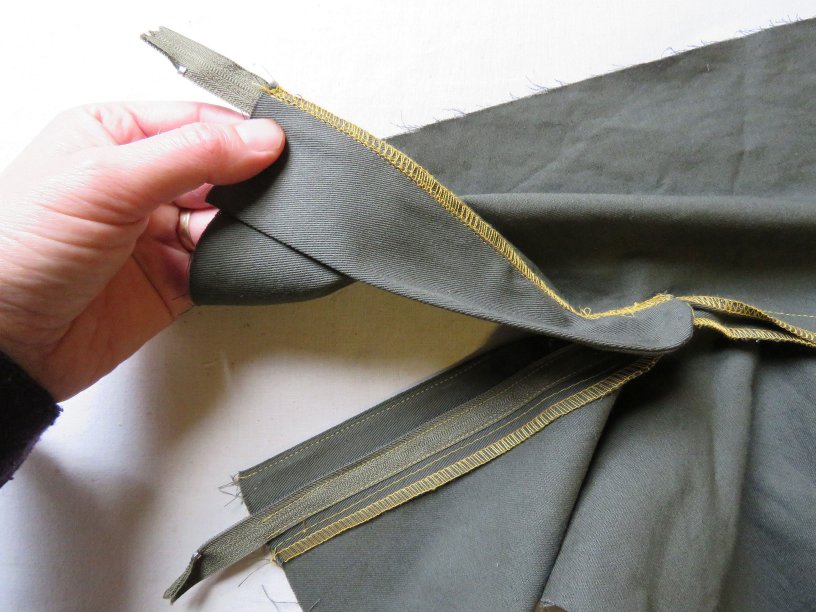
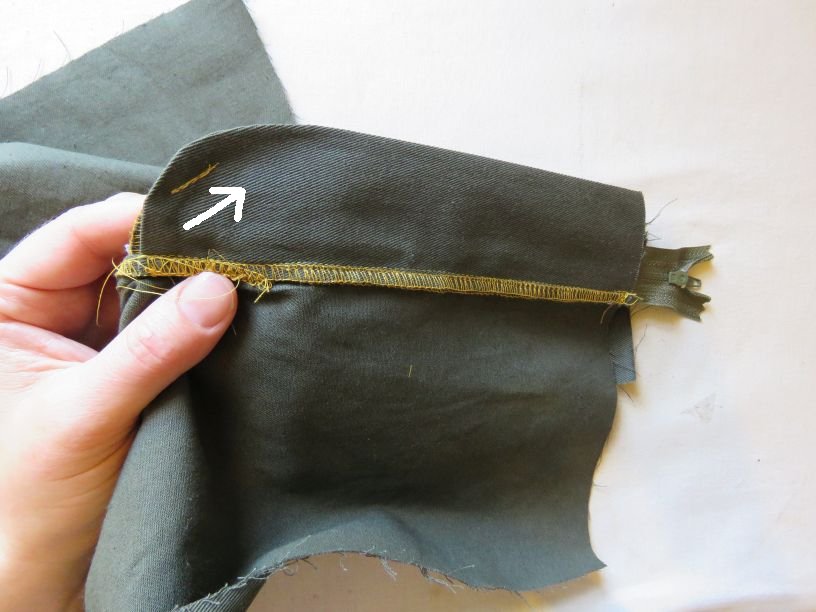
3. Sew the bottom of the fly shield with a 6mm seam allowance, turn through to the right side, then overlock the long sides together (see below).
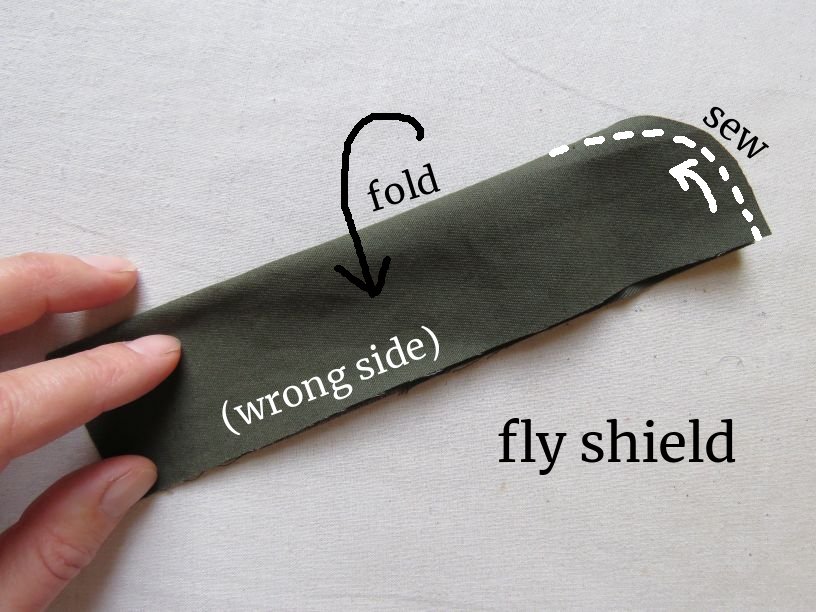
Then turn it through to the right side, press, and overlock the long sides together.
Step 2 Sew the crotch seam
I like to sew two rows of stitching on top of each other, for strength. I stop a bit short of the inseam, so I can sew the inside leg seam later.
Step 3 Sew the facing on
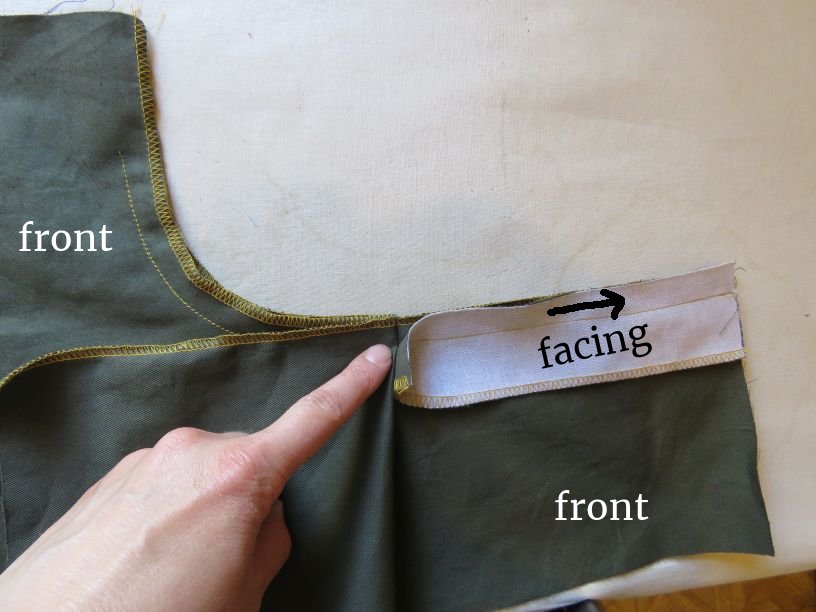
Sometimes, if the fabric is very thick, I’ll step the facing 5mm back from the edge of the front to reduce bulk. Which means I’m sewing it on with a 1cm seam on the facing and 1.5cm seam on the front.
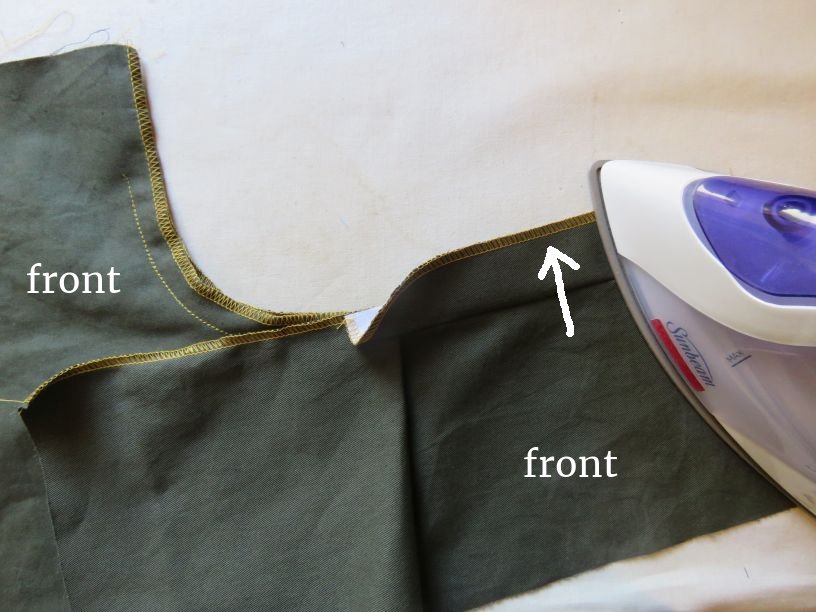
Step 4 Press the seam towards the facing
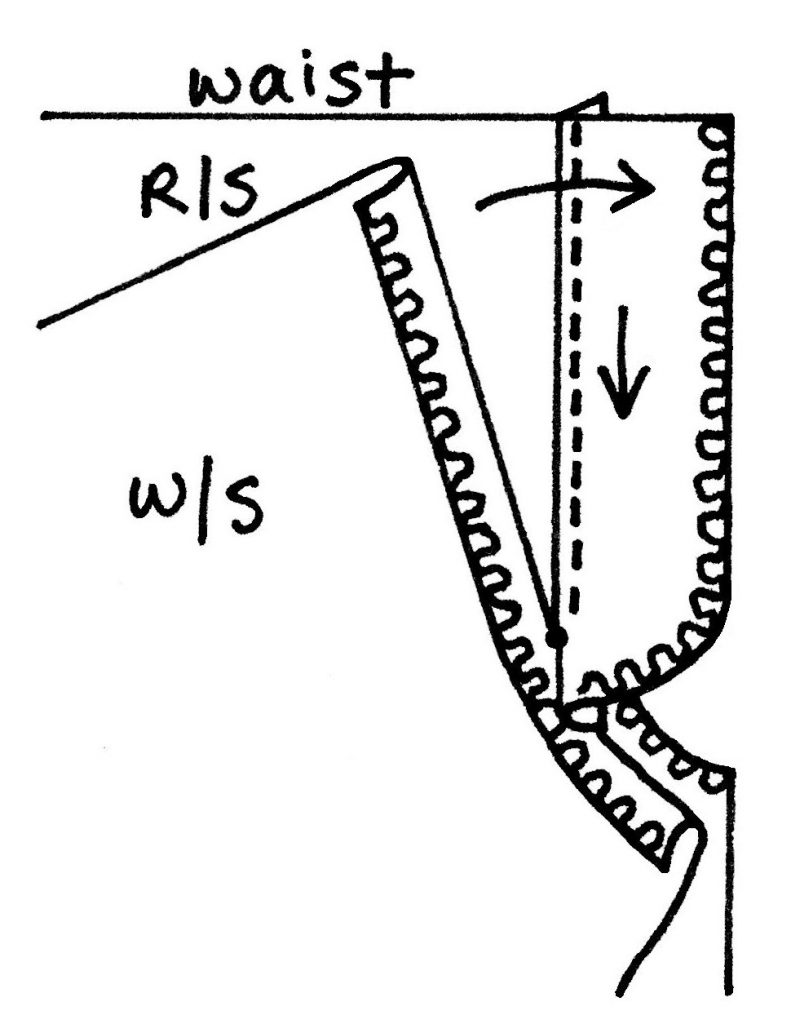
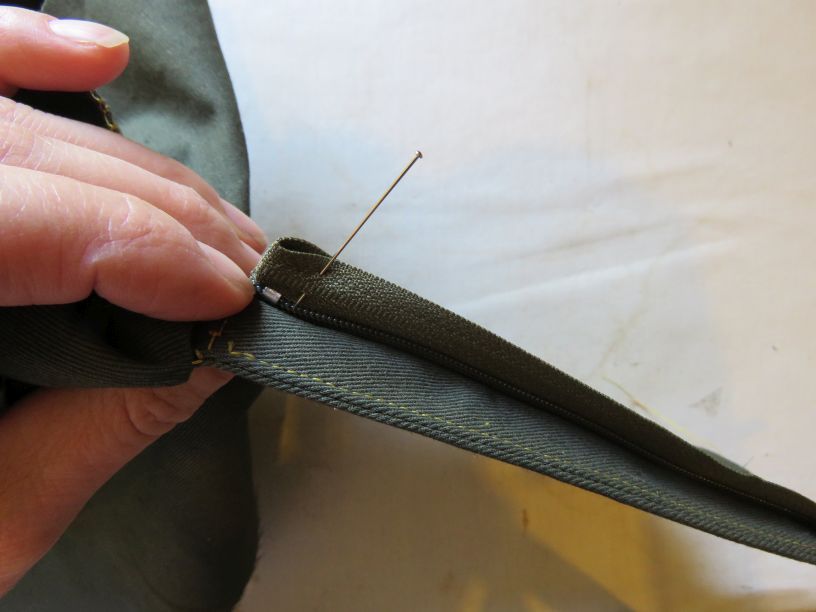
Step 5 Sew the zip on the facing
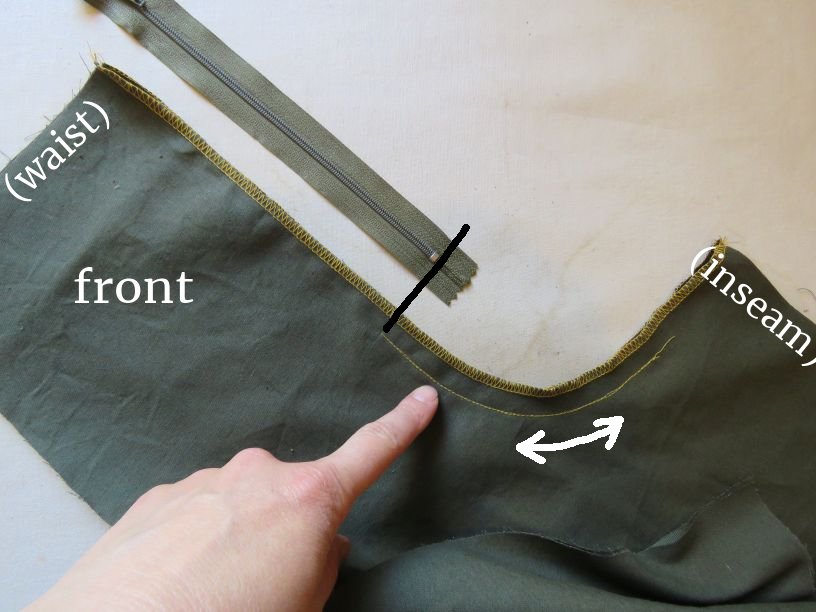
Line up the edge of the zip with the seam.
Make sure the bottom stop of the zip is above the crotch seam. You’ll be sewing the zip on the side nearer the overlocking – where I’ve got it pinned.
If your zip is the correct length (unlike mine), you’ll notice that at the top the sides splay out. Stitch the zip on where it lies, ie splayed out.
(From memory, this is where I messed up in my sewing exam – I aligned the zip with the overlocking instead of the seam.)
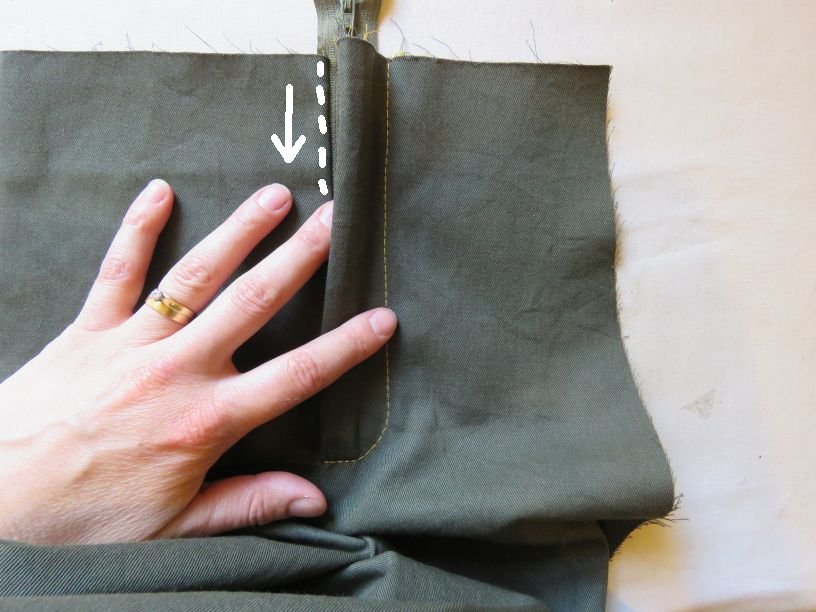
Step 6 Topstitch
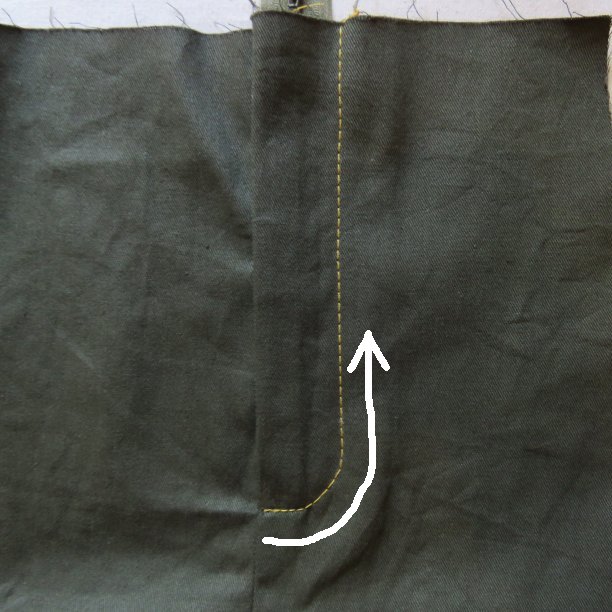
You’ll be stitching from the bottom of the fly front UP.
Don’t try and stitch from the top down – the fabric will form a bubble at the bottom.
Note that the top layer will want to move forwards as you stitch, so hold your hands each side of the presser foot and try and encourage it backwards.
I sewed mine using topstitching thread. If you do this, don’t backstitch at the beginning – instead, leave long tails to bring to the back and tie off later. (I’ve already tied mine off in this photo.)
Also, don’t catch in the other front or its seam allowance.
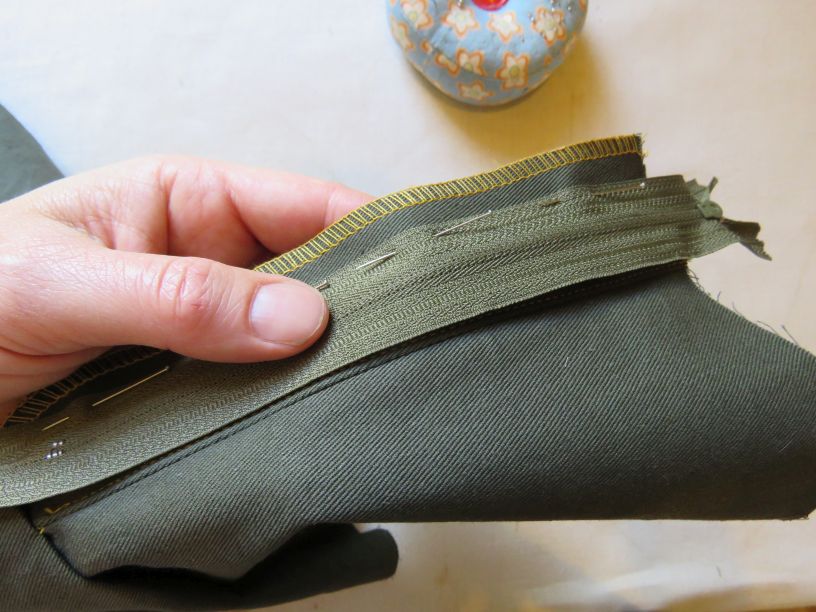
Step 7 Sew the shield on
Some people like to sew this part in two steps: first they sew the zip to the front, then they sew the shield on.
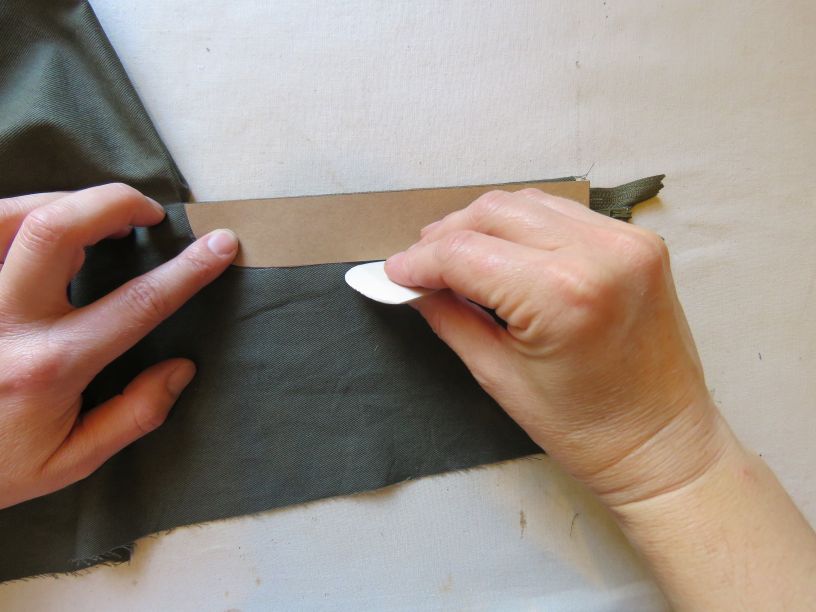
Step 8 Two things to finish
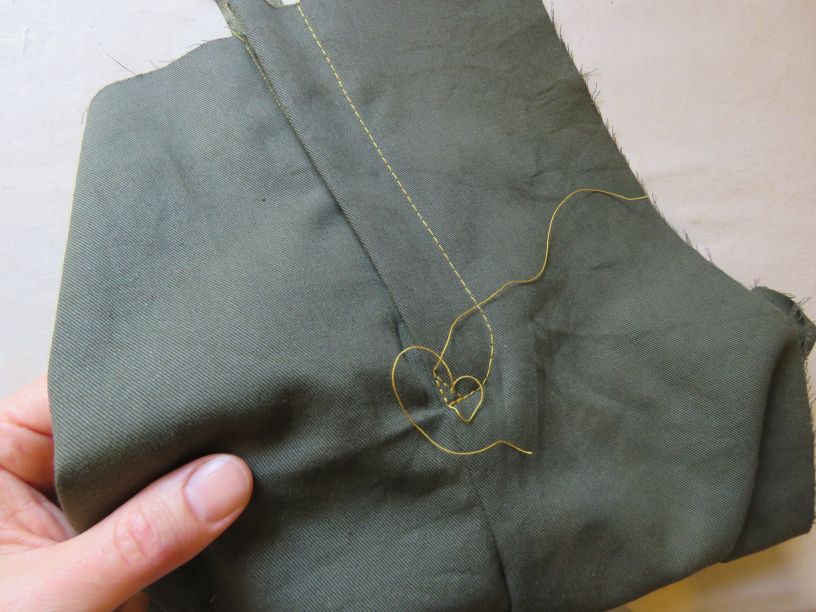
Again, I used topstitching thread for this, and I’ll bring the ends to the back and tie them off.
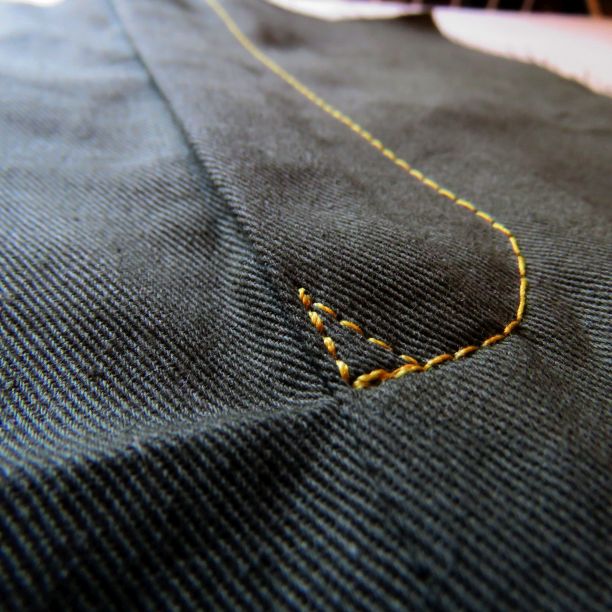
Btw, please don’t be tempted to omit the triangle in the pursuit of a clean, minimalist aesthetic. Without it (or any sort of reinforcing at the bottom of the fly), there will be stress on the fabric every time the fly is unzipped and it will eventually tear at the bottom point. Can you hear the regretful voice of experience?
If your zip is too long, like mine, leave the extra length there for now. Shorten it after you’ve sewn the waistband on, making sure the zip pull is on the correct side!
Troubleshooting
Of course things go wrong in sewing! Here’s some advice from The Dressmaker’s Companion:
The bottom of the fly front doesn’t sit right
Possible solutions:
- Does it just need a press? Try unpicking the triangular stitching and the bar tack holding the shield, and give it a press.
- Unpick the whole shield side of the zip. Re-pin this side in position with the fly shield and check before re-sewing.
Why does it happen?
- The sides of the zip might not be aligned correctly before sewing, or one side might have stretched. Reduce the likelihood by pressing the facing side after topstitching, and pin and check before sewing the second (shield) side. Some fabrics are more prone to this – take extra care on unforgiving, “bouncy” or difficult-to-crease fabrics such as microfibre.
- Don’t extend the zip into the curved part of the crotch unless you’re using specially made curved pattern pieces (in the olden days, the fly front sometimes extended into the curved part of the front, requiring a curved facing and shield – these in the Met Museum look like they do).
Cheers!
Looking for other zip tutorials? Invisible zips are here, and regular zips are here with a demo video (6mins). How to shorten a metal zip is here.
Discover more from The Craft of Clothes
Subscribe to get the latest posts sent to your email.
That is the best tutorial for sewing fly fronts! I have been sewing elastic waisted pants to avoid the dreaded fly front. I am going to try it again with the pictures, and save the tutorial on my computer. Thanks Liz!
Thanks Michelle, that is very nice of you to say! I don’t think you are alone with avoiding fly fronts 🙂
Great tutorial, explains and shows the technique very clearly. Thank you!
Cheers Toni!
Very clear tutorial. Thank you so much
Many thanks Sathish.
This is very clear and very helpful thank you.
BUT I want to add a lining to my fly fronted skirt. I have found tutorials about how to attach the lining to the back vent, but how do you cut the lining and where do you attach it at the fly front?
Hi Imelda,
If you’re sewing the skirt and adding the lining at the same time, sometimes the lining edges are basted to the skirt edges and the fly front is put in through both layers. Then you need to snip into the lining’s seam allowance so the seam will face to the inside below the fly front.
Another way is to make the fly front first but don’t stitch the bottom of the zip shield and facing together. Attach the lining as a free-hanging lining from the waistband, with a slit in the centre front seam the same length as the fly front. Hand sew the lining’s edges to the edges of the zip, and finally stitch the zip shield at the bottom to hold it in place.
I’ll ask my tech editor if she has any further thoughts.