Free Pattern: Make a Hat
Are you a hat person? Have you ever sewn yourself a hat? It’s been a while since I did a free pattern on this blog, but here is a hat pattern I hope you’ll like.
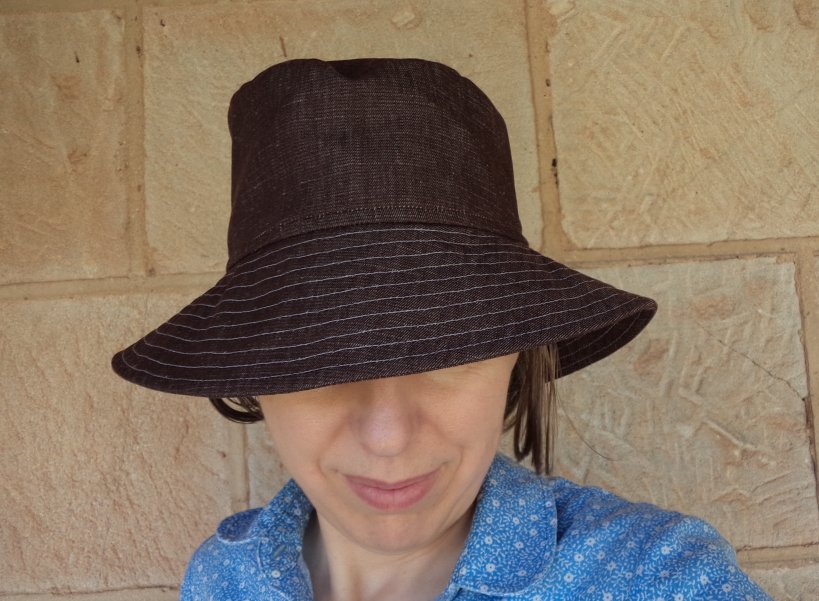
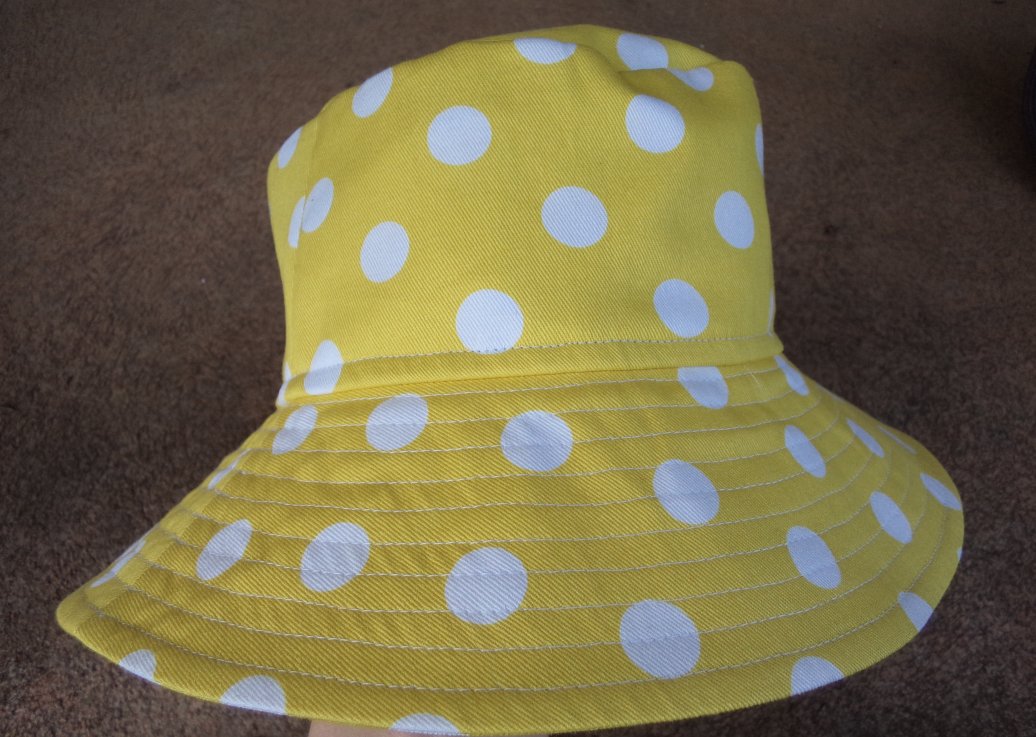
This hat has an oval crown, with side seams on the crown’s side and brim. It has a slightly deeper brim than a classic bucket hat. It’s easy to machine wash and can be squashed into a handbag or suitcase.
Fabric: Suitable fabrics are quilting cotton, drill, lightweight denim or baby cord. As always, choose a fabric that you love and will enjoy wearing.
I used brown linen for one hat and yellow spotty cotton drill for the other. Both came from Spotlight a long time ago. I was originally going to make a hat in baby cord (I was thinking of a Corduroy Day project). However, while I was searching for fabric I came across these offcuts which I liked better, and ended up making two hats.
How much fabric? If you’re buying some you’ll need 45cm of 110 wide fabric, and the same of firm interfacing. A lining can be easily cut out of a fat quarter. However, you probably have something suitable at home in that fabric stash or left from something else.
Choose a firm interfacing, preferably iron-on. I used Shapewell (a firm woven sew-in) because I didn’t have anything else handy.
Pick something fun for the lining; it will make you smile each time you put your hat on. Here are the insides of my hats:

The brown linen hat has roses, from the collection of 1960’s fabric.

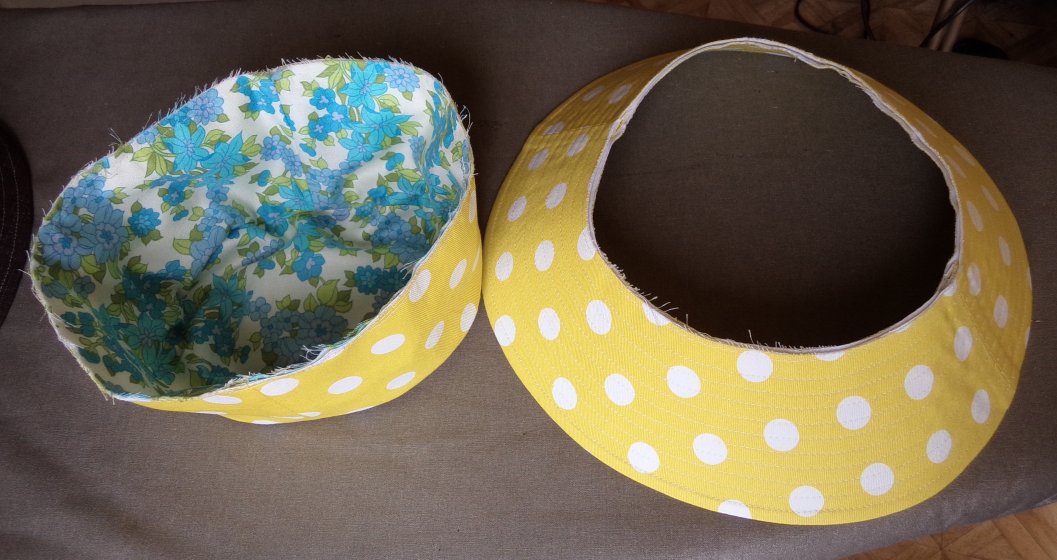
The spotty hat also has a lining cut from the collection of 1960’s fabric.
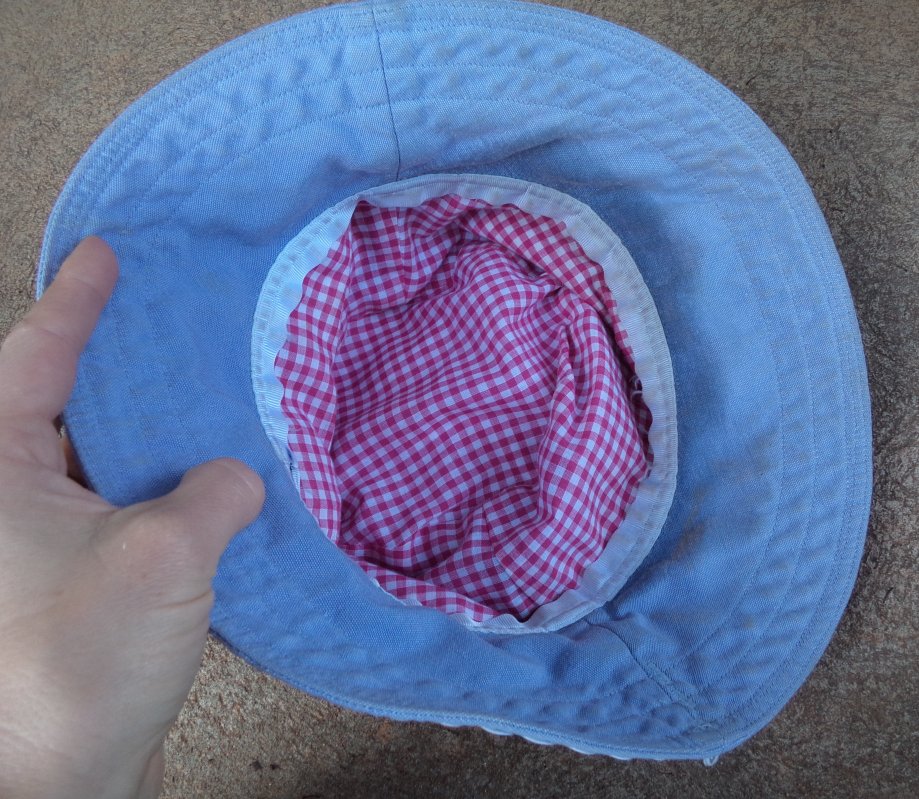
My old blue hat has gingham. I’m wearing this hat while gardening here.
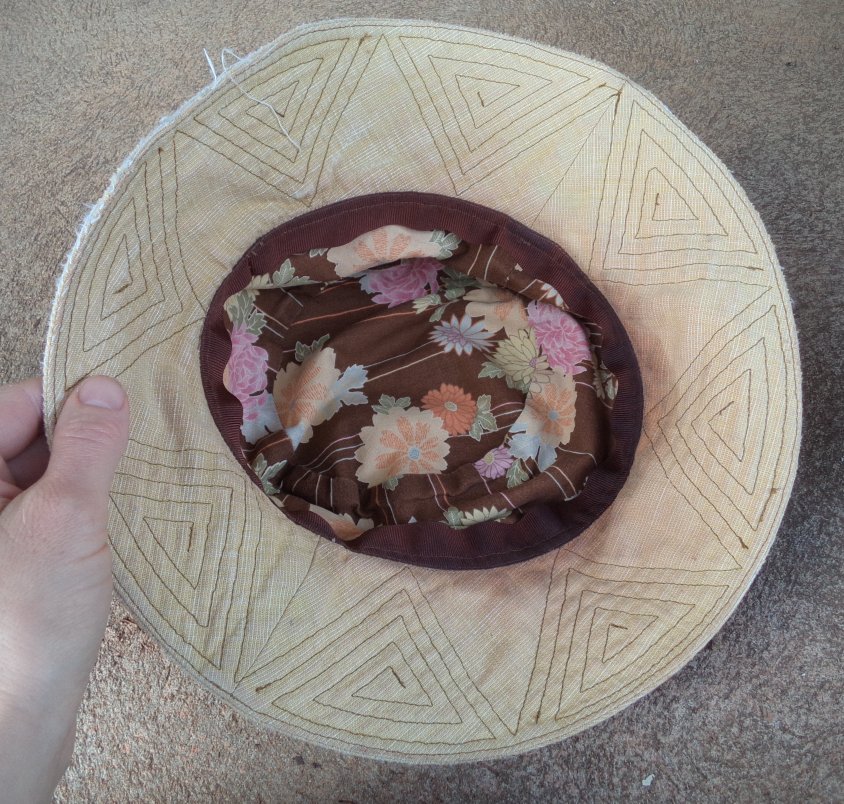
My old old version of this hat has fabric from favourite skirt.
Sizes and fit: You’d be surprised how many people in this world have big heads and have trouble finding hats to fit (or not, if you’re one of them). A survey once in my sewing class revealed one in four are above the “average” 56cm (22″) head size. This pattern is in sizes 54cm, 56cm, 58cm, 60cm and 62cm head circumference; pick the size to match the measurement of your head. The pattern measures slightly bigger than the head measurement to allow for the stitching and the thickness of the fabric. If you discover you need to tweak the fit, the interior ribbon can be cut up to 1.2cm (1/2″) smaller or bigger than the instruction’s measurement, and stretched or eased onto the hat.
Patterns: Download the hat pattern – all sizes are together. It’s on 4 pages, landscape. Be sure to print at 100%. Sticky tape the sheets together matching the crosses at the corners.
Free Pattern Make a Hat All Sizes nested
UPDATE: Apologies, there is no test square but the height of the crown pattern measures exactly 11cm in the centre.
For a classic bucket hat with a circular, rather than oval, top, there’s an optional round top (all sizes, one page):
Free Pattern Make a Hat Optional round top
Instructions:
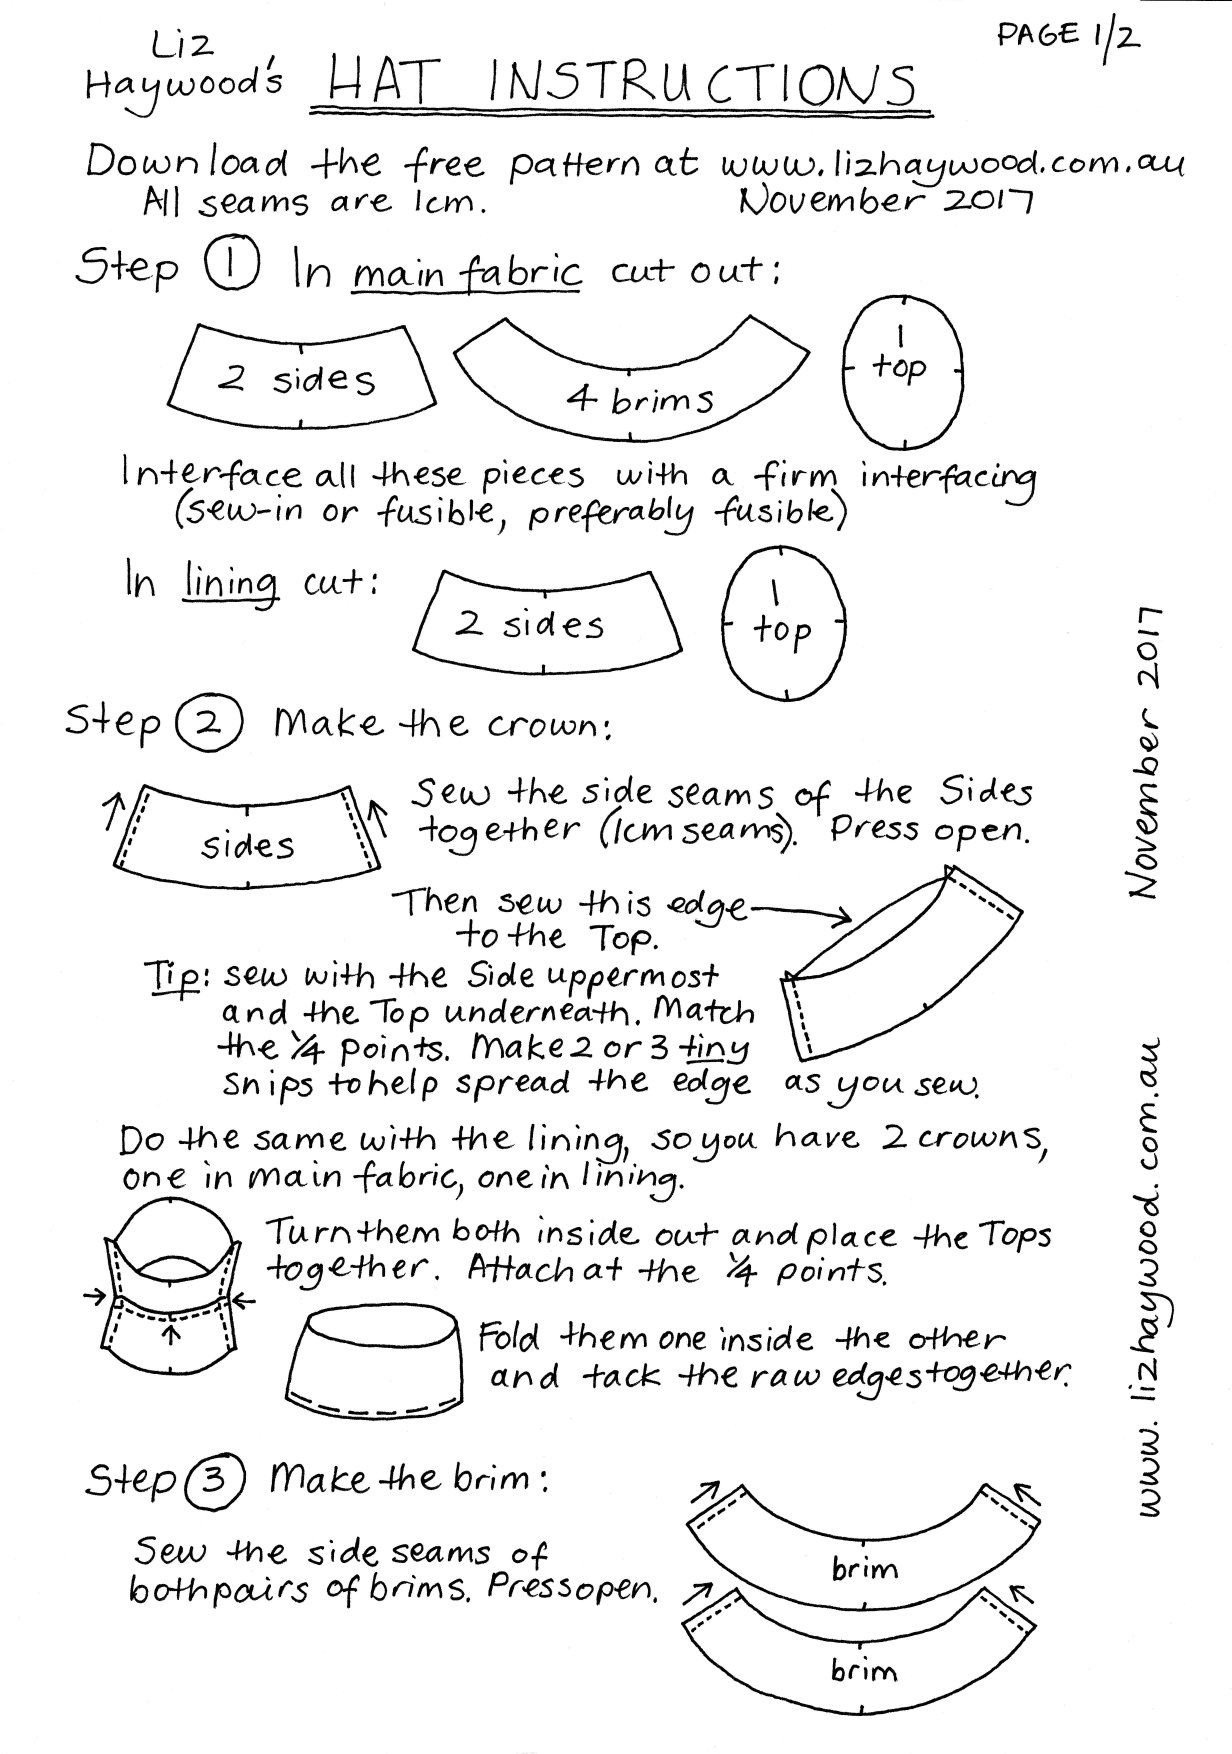

Some photos to supplement the instructions:
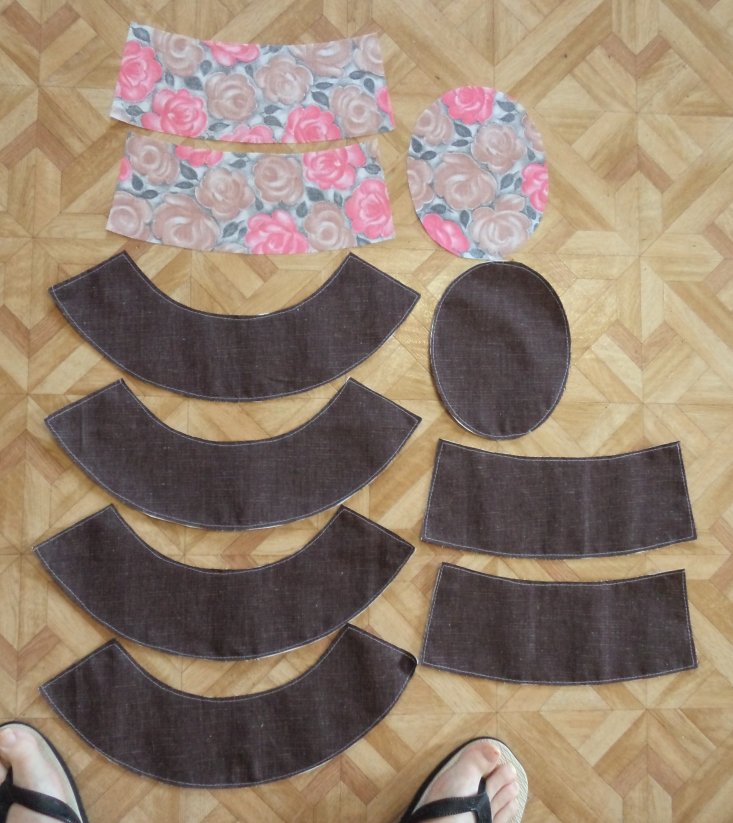
Step 1 Cut out all the bits.

Step 2 Make the crown, one in lining and one in main fabric.
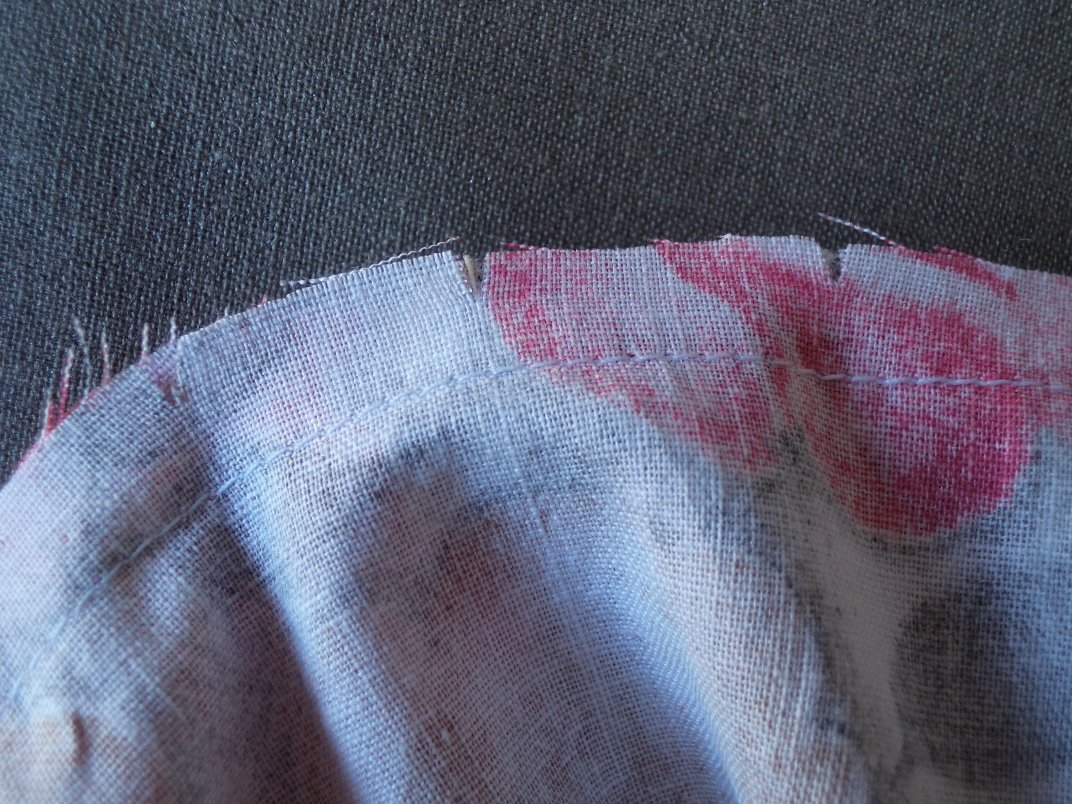
Sew the Top onto the Side with the side uppermost. Make some tiny snips in the Side to help it match the curve while you sew.
Join the two crowns together at the top, catching it at the quarter points.

Step 3 Sew the brims together around the edge.
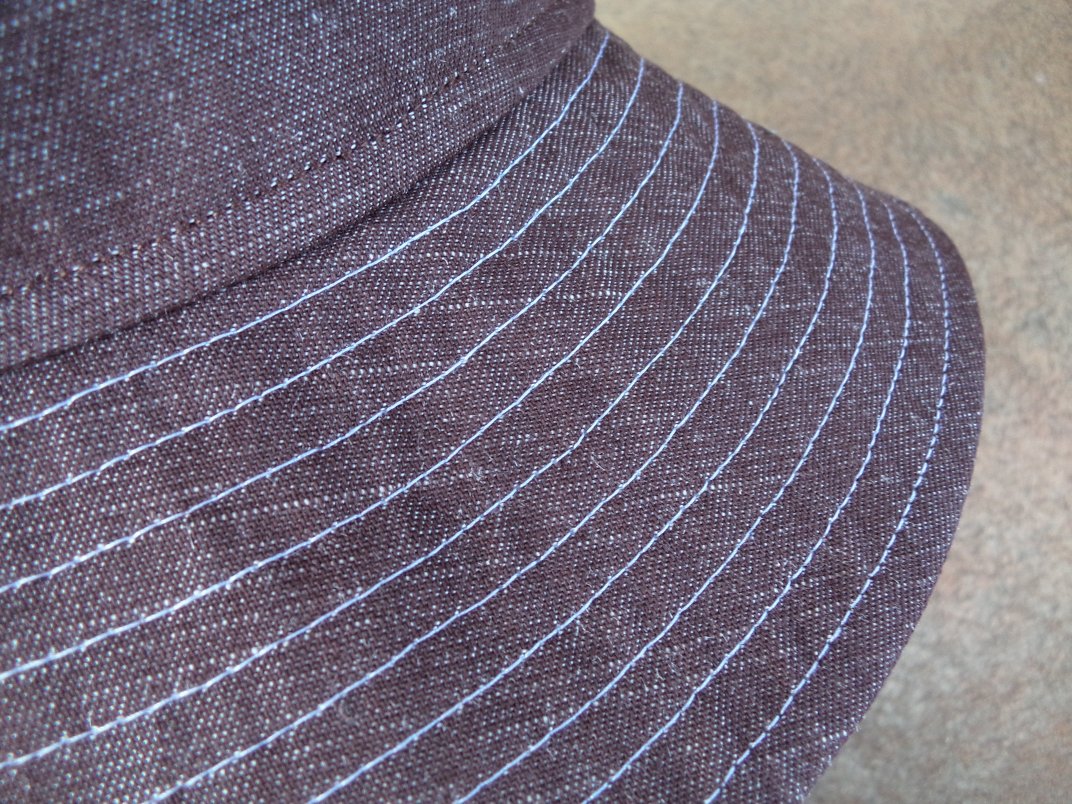
Run some topstitching around the brim…
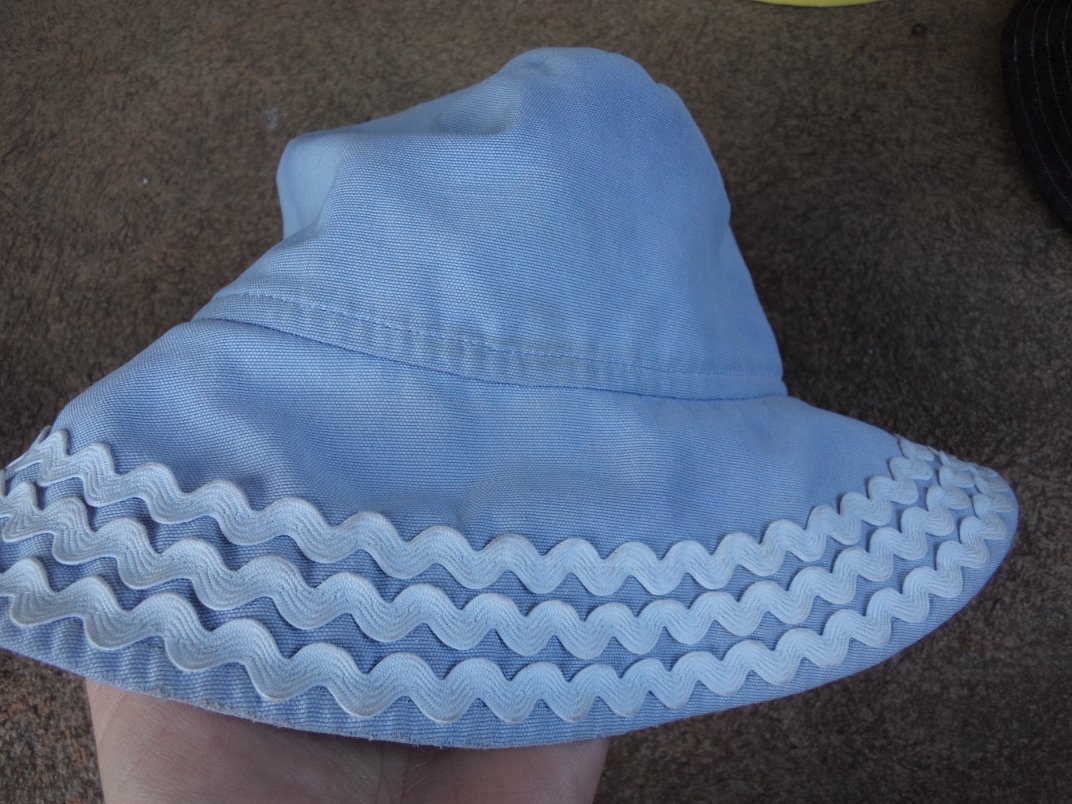
…or some braid or ric rac…
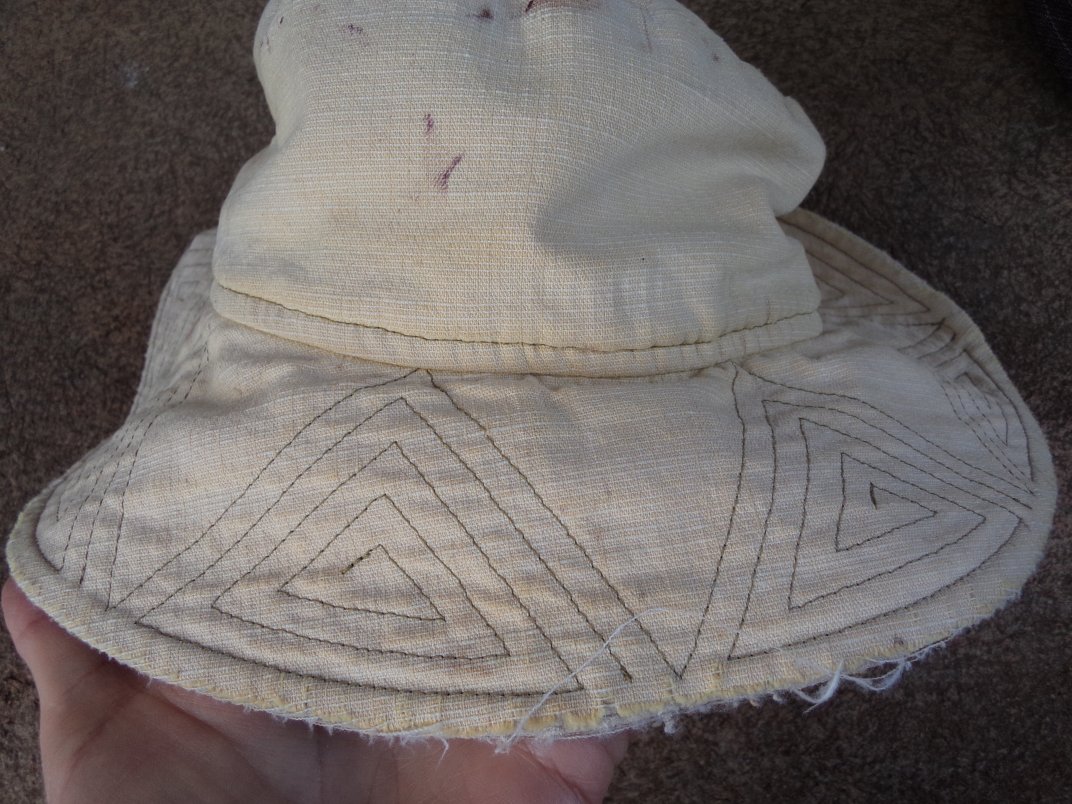
…or some fancy stitching like my old old hat. There are eight triangles around this brim.
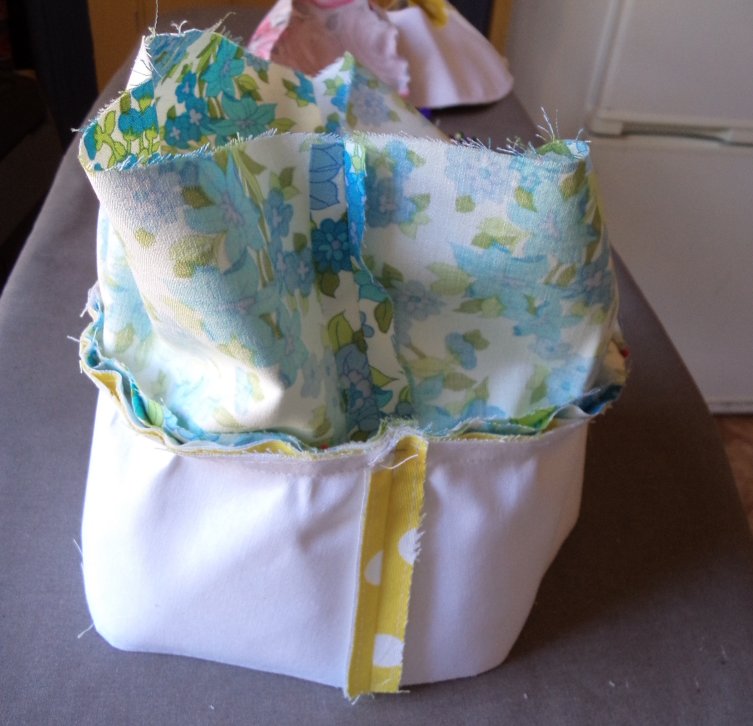
Step 4 The crown and brim ready to be joined.

The crown and brim pinned together waiting to be sewn.
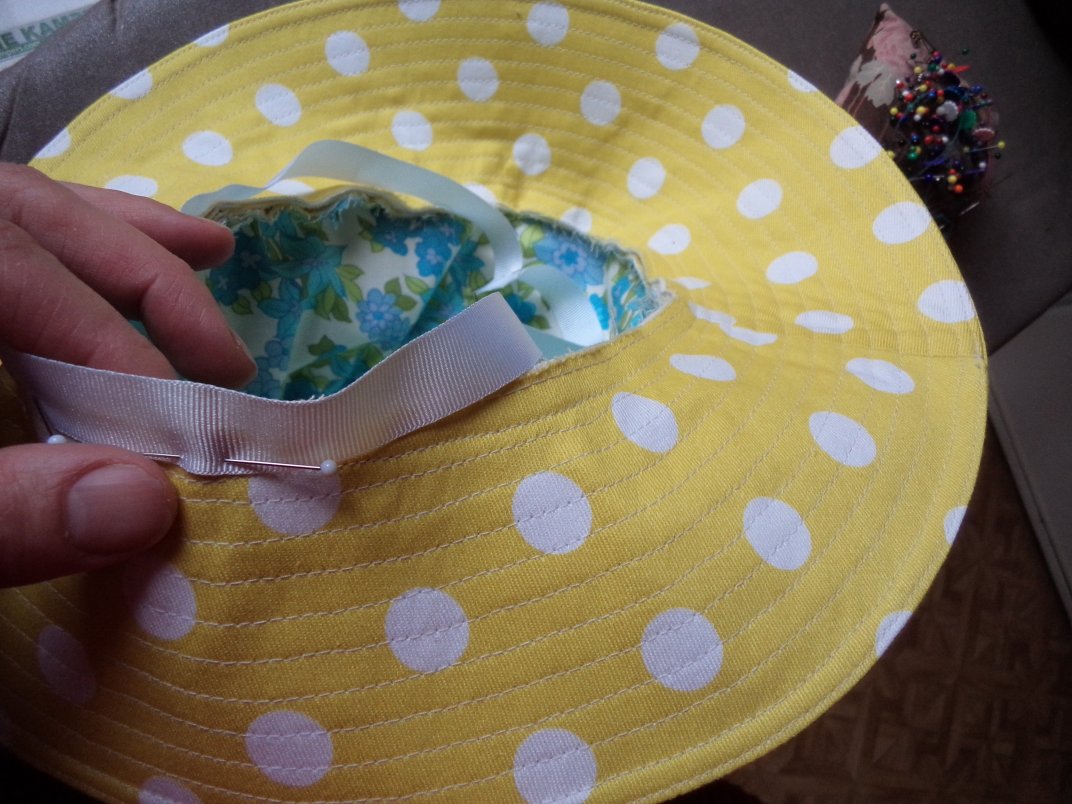
Step 5 Adding the interior ribbon.
Enjoy this hat pattern.
Cheers!
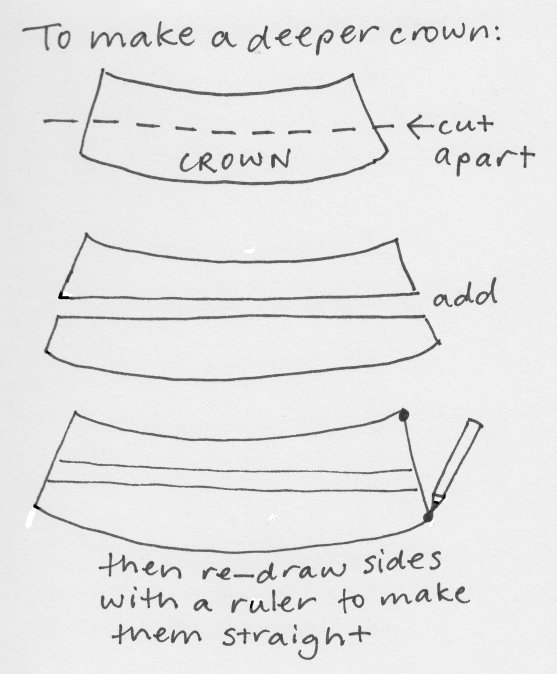
PS – Running Mom, here’s how to make the crown deeper:
Gorgeous hat Liz! I particularly like the large brim. I shall definitely be downloading the pattern. It is perfect for having in your bag while out and about. Thank you
Thank you Linda. I hope you have fun sewing it.
Thank you so much for the free pattern. I am using this for base measurements for a Henry Jones Sr hat as a gift for my brother. I also plan to make one for myself. This is exactly what I was looking for.
Ah yes, it would be a good base for a Henry Jones sr hat. Hope it goes really well for you!
Hi Liz, Thank you very much for providing this pattern and excellent instructions- I really appreciate it! I just finished making this hat from 12oz canvas (it is for bush walking and general rough use). I would like to make another one straight away, but this time with a brim that isn’t quite as ‘dipped’. My wife loves the one I have already made so she can have it and I will tackle another. To make the brim less dippy, I would just make the brim pieces with a slightly tighter curve (as if they belong to a circle with smaller diameter), but to the same internal measurement (such that it will match the crown), wouldn’t I? Okay thank you very much again and have a great week.
Hi Jim, I am thrilled that you enjoyed my pattern. When you say you’d like it “less dipped”, do you mean you don’t want it to sit so low over the eyes? If so, you’ll need to “cut and spread” the outer edge of the brim (and, like you said, keep the same internal measurement so it will match the crown). Cut one out in paper and pin it to the hat you’ve already made to check it. Cheers!
Hi Liz,
Thank you for the pattern…and for letting me know that I am not the only large head wandering in the one size fits all wilderness!
You’re welcome Alex – there’s more of you out there than anyone realizes!
Hello Liz,
I found your hat pattern. And would like to make it. But can you help me? I am from Holland and the meaning of 1 cm seam allowances is a bit difficult for me. Is the seam allowance already in the pattern or do I have to measure it? It is because of the language that I do not understand. That’s why I hope you can help me. Thank you very much. Liesbeth
Hello Liesbeth,
The pattern already has the seam allowance included. You don’t need to add anything.
I hope you enjoy making your hat, and please leave another comment if you need help. Cheers!
I have just found your pattern – thank you! My husband has been badgering me to make him a hat in a ridiculously loud fabric but I was holding off until I found a good pattern. Now I have. No excuses now! 🙂
You’re welcome Julie, I hope you enjoy making it. Mine are still going strong and the old ones still get worn for gardening jobs.
I made your hat pattern on Saturday …I’m thrilled with how it turned out. Great instructions resulted in a finish I am proud of. (This is rare). Thank you!
That’s wonderful. Thanks for commenting.
Made this bucket hat today out of an old red towel to, it turned out a bit cock-eyed as my cutting was not very accurate and didn’t put a proper seam round the edges so it would fray and give a regety look.
Overall a bloody good pattern with good crown depth which is often hard to find in a hat
Cheer Gus, thanks for using my pattern. I’m with you on crown depth 🙂 I hope you enjoy wearing it.
Hi Liz, I’m so glad I came across your pattern. It was detailed yet easy to understand and follow and my finished hat was near perfect for me a beginner. Thank you.
You are very welcome! Best wishes for your future sewing adventures 🙂
Thank you so much for the pattern. We are on lockdown over here in US and it made my afternoon pass in an enjoyable way! The sizing is perfect.
The best thing we can do is stay at home right now. Thanks for giving my pattern a go! And leaving a lovely comment too.
I love my hat! But I went wrong somewhere – the seam is in the front. What did I do wrong?
Many thanks; I’m glad you like it. The top of the hat needs to have the seams at the sides of the oval – easy to get around the wrong way when you’re in the throes of sewing but probably doesn’t affect the fit of the hat too much 🙂
I just finished another hat and I got it perfect this time. Thanks so much! I love this hat!
Excellent work! Thanks for commenting 🙂
bonjour et merci pour le chapeau
You’re welcome!
Thank you for this hat pattern. I like your diagrams and instructions. I’ve been asked to make this type of hat for my son. Almost no “off the shelf” hats fit his 25” head (size 8 hat size). He also has a deeper crown. Do you have any suggestions on adapting the pattern to his head size or do you have a pattern already available in his size? Thank you for your help.
Hi Running Mom! Your son’s head size is just one size bigger than the pattern – he is about a 64cm and the largest size is 62cm. Print off the pattern and draw in the next size following the arrangement of the other sizes.
To make the crown deeper, I’ve put a how-to diagram at the end of the post. Might be trial and error to find out exactly how much deeper to make it, but you could pin the paper pattern together and try it on his head to get an idea.
When you sew it, cut a 68cm interior ribbon.
Best wishes!
Thanks for the wonderful pattern. I’ve been making masks during the pandemic and wanted to try something more interesting. Since I do a lot of gardening, I like to wear a hat when I’m out in the sun. Your pattern is great and the directions are easy to follow!
You’re welcome Eleanor! I wear mine all the time in the garden 🙂
Just looking at your photos, it appears you have extended the depth of the crown on brown hat. If so, could you let me know how much you have extended it by please. Looks great.
Hi Wilma, the hats are all the same, made from the same pattern with the same crown depth. Maybe the camera angle tricks the eye?
But, last week I made this hat for my daughter who asked for a deeper crown after trying on my hats (photo is here). I made it 1cm deeper but she’s since told me that now it’s too deep and the original was fine. Seems that daily wearing is the best way to perfect the nuance of fit 🙂
Hi Liz, thanks for the pattern. I just finished one yesterday and I’m reasonably happy with my efforts. I plan to have another go with the round crown but thought I would just check a couple of things before I start. When doing a head measurement do you measure where the hat sits ie across the forehead and down behind the ears? I did this and got about 57cm and so used the pattern guide for 58cm. Also, is there any way to double check after printing the pattern that it has come out the right size? Looking forward to having another go at it. Thank you!
Hi Catherine, thanks for your comment and questions.
For measuring the head, I put the tape measure above the eyebrows and take it around the head horizontally. Hair type, hairstyle and frequency of haircuts can affect head size but if the 58cm is okay for you I would stick to it.
Re: checking the pattern’s printing, the height of the crown pattern measures exactly 11cm in the centre. Sorry I see there’s no test square to measure – I was a bit new to making digital patterns when I did this one.
Best wishes for your next hat 🙂
Hi Liz,
What a lovely pattern and so kind of you to provide it for free. I really look forward to making one of these, but… I was wondering how you would hack it into a reversible hat. Could I just do some kind of flip through a small opening at the crown-brim assembly, or do I really need the ribbon for form and fit?
Hi Monica, I saw one the other day that someone had made reversible. She made two hats and joined them together around the edges of the brim – she pressed under the brims edges and topstitched them together.
Thanks, yes, that would also work! Now onto cutting 🙂
Thanks so much for the pattern. I’ve now made two—one oval and one round top. They fit well and look good too. Originally I put the seam in the front like one of the other commentators so I had to redo the first one. I used left overs from a skirt for the lining like you suggested and it is fun to see that fabric when I put the hat on. Thanks again and glad I discovered your website.
You’re welcome Annie, I’m glad it worked well for you and thanks for reading my blog 🙂
I’m making my first hat, wish I’d read the comments before as I now realise I’ve made the same mistake as Darlene – never mind, I am sure I’ll be better with the next one! I used bikram for the interfacing – just wondering do you recommend cutting that with the seam allowance removed to allow for easier sewing and joining? Or would you use something a little less firm than bikram?
Hi Yasmin, thanks for trying my pattern 🙂
RE seam allowances on the interfacing, I personally never remove it (it makes it quicker to cut because everything can be cut at once), but lots of people like to. It’s no big deal either way, really.
Do you mean buckram? I would have thought it’s a too little firm for a hat, however, if you like the feel of it and it sews OK, then keep on using it.
Yes, buckram…it was recommended by the store I went to and does say it can be used for hats, but I am finding it a little difficult to turn through after sewing and then shape neatly, leading to my question about removing the seam allowance. I’m redoing the top part of my hat to correct my earlier error and will see how it feels when finished (looks good so far). Next time might try something a little less firm.
thanks for the pattern,not made hats for years,the last one I bought used the interior ribbon that covers the join between the crown and the brim as a sort of channel and a tape threaded through it so you can adjust it,it is great for me as I often wear my hair up and I can then tighten the hat to keep in on in quite windy situations,sorry have not explained well but could add a photo of said bought hat,am going to do this with me made hats in future,have even seen hats with this channel on the outside as a feature ,thanks for everything and keep resting
Hi Jane, thank you, I get what you mean about the channel – a great idea which I will file away for the future 🙂
Thanks for your well wishes.