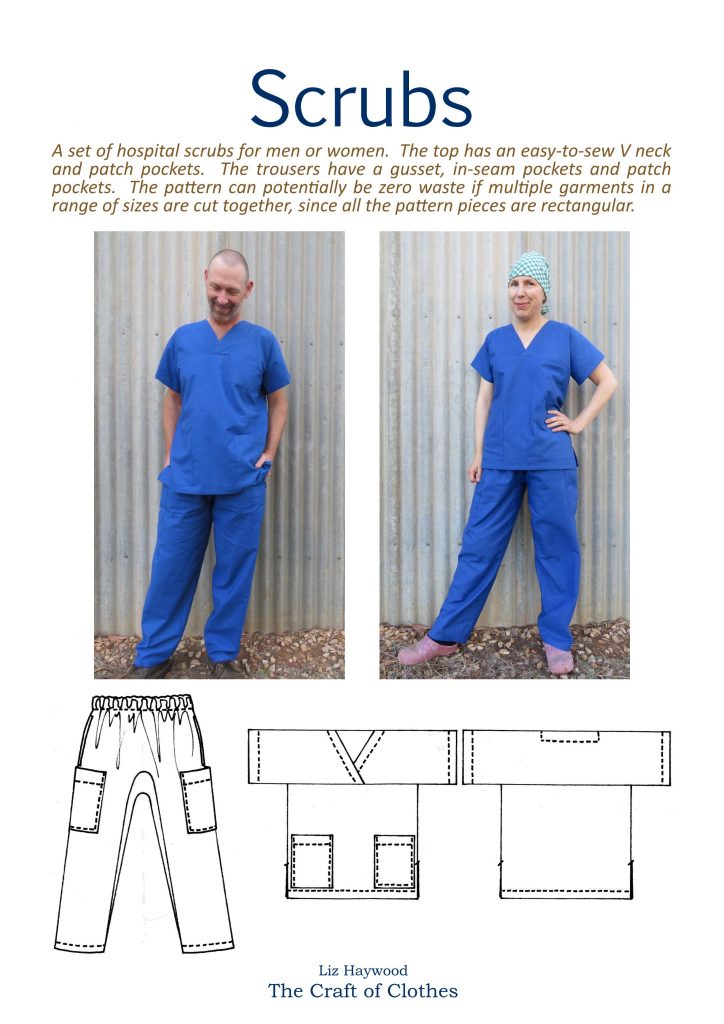
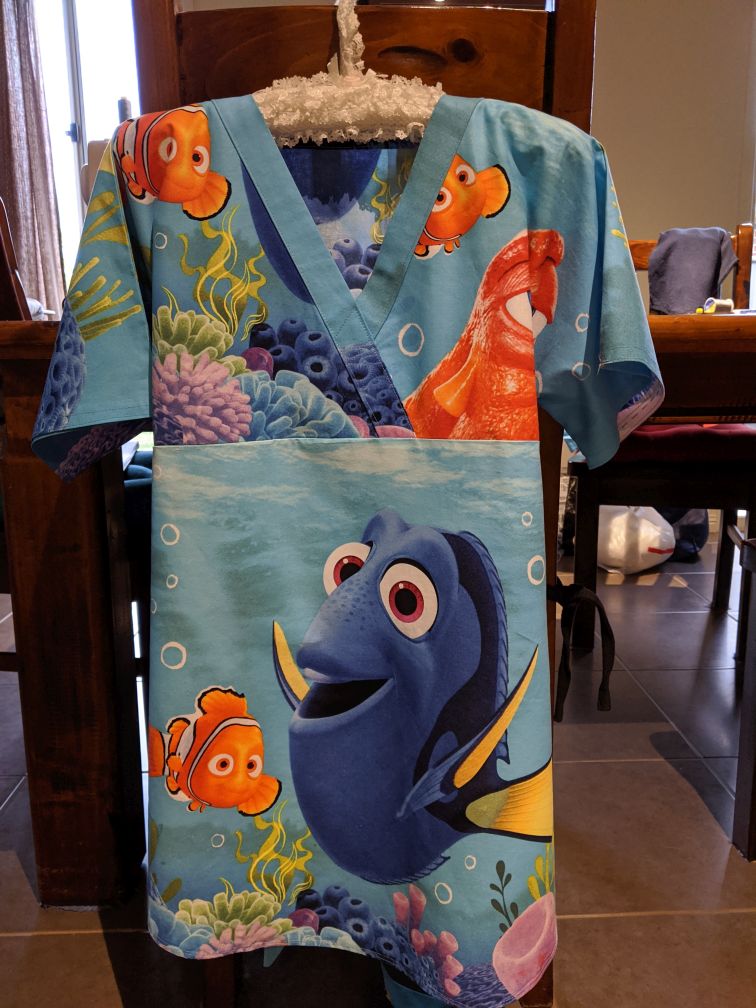
Free pattern: scrubs
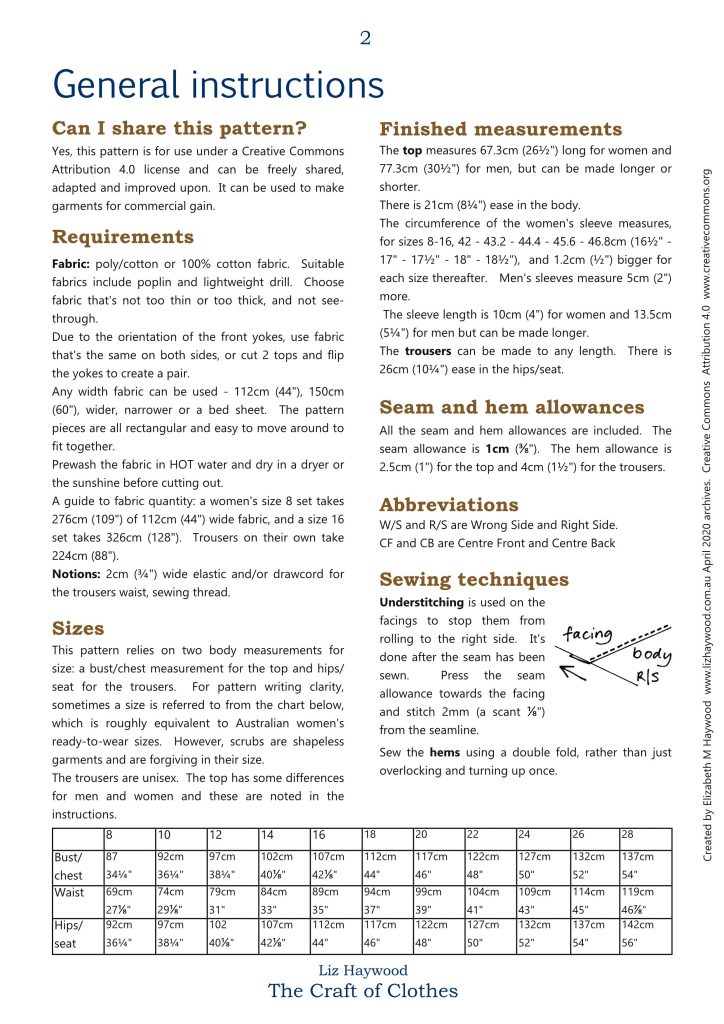
Folks, there’s a shortage of hospital scrubs in the world.
There’s a shortage in Australia, in the UK, and no doubt in other countries too.
This week I attempted to make a zero waste scrubs pattern. (The full pattern is at the end of this post – beset by technical difficulties, the only way I could put it in here is as a series of images, for now. Sorry.)
UPDATE: download a pdf pattern here.
UPDATE: having problems sewing the trousers gusset? Look in the comments for a solution.
UPDATE: a short video of making and cutting out the front yoke pattern is here.
I confess that I failed on the zero waste part; after a solid week’s work I metaphorically collapsed into an armchair and conceded that it’s a low waste pattern instead.
It could be zero waste if you cut out multiple garments across multiple sizes – since the pattern pieces are all rectangles – so it has potential. Where I have failed, zero waste-wise, you may succeed.
This is a free, open-source pattern which can be freely shared, adapted, improved upon, emailed to a friend or published elsewhere.
There are no pattern pieces to print out and tape together – the pattern is contained within the instructions, in the same format as Zero Waste Sewing.
USA friends rejoice, it’s in imperial measurements as well as metric. (Liberian and Myanmar friends can also rejoice.)
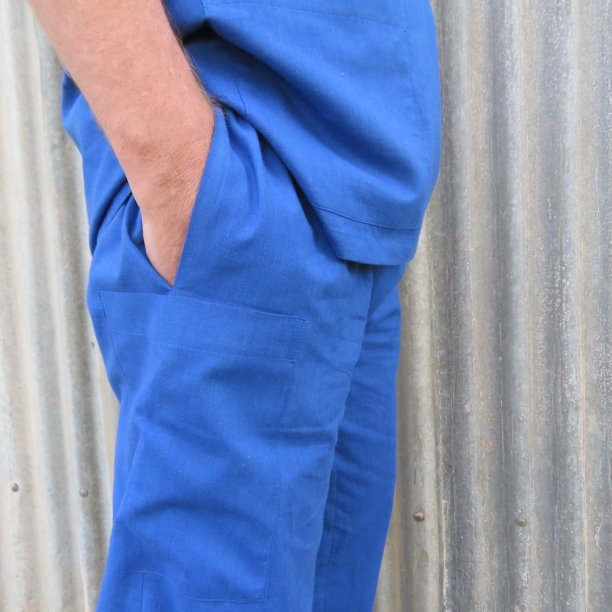
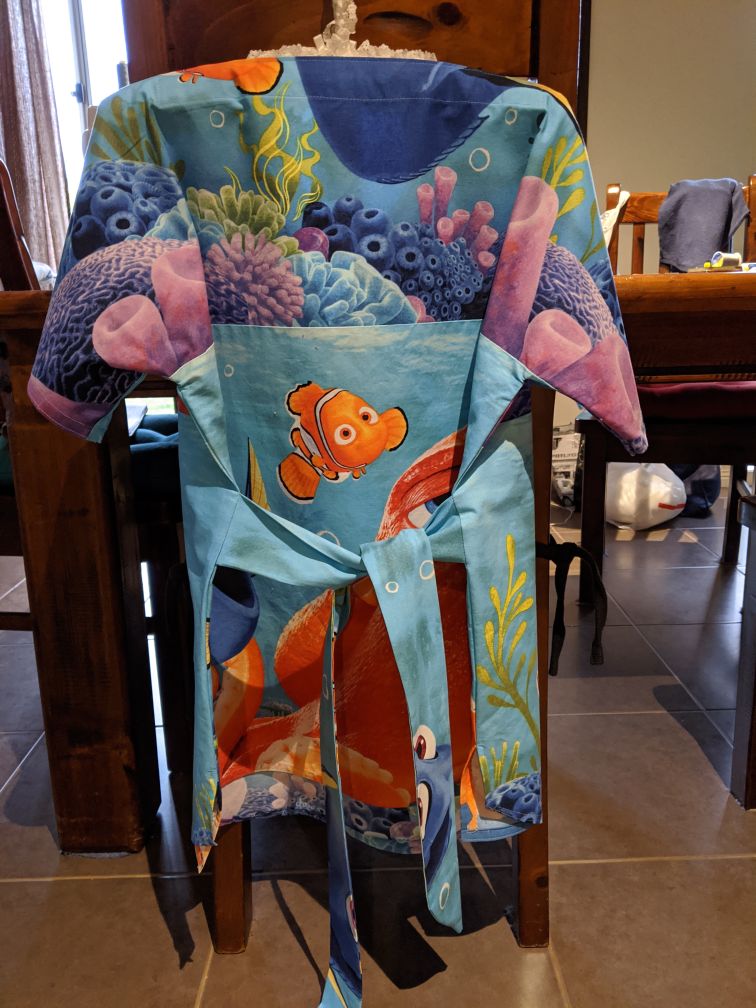
The trousers are adapted from the diamond gusset trousers pattern described here. I’ve made the gusset far easier to sew and eliminated the stress point at the gusset’s apex. I’ve also added pockets and a deeper hem.
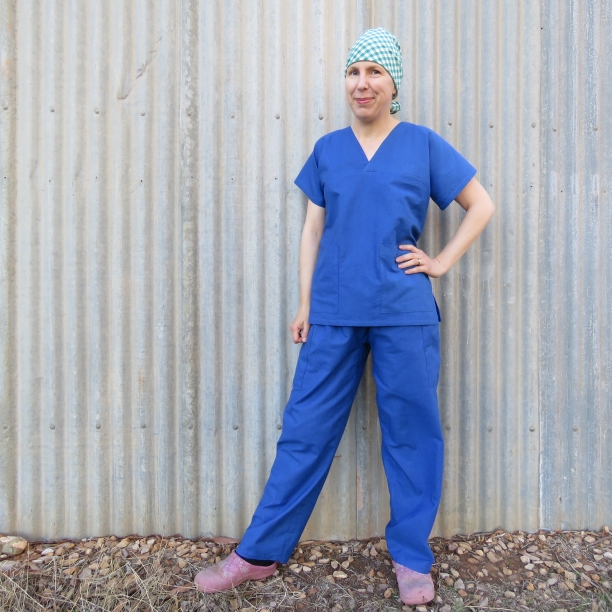
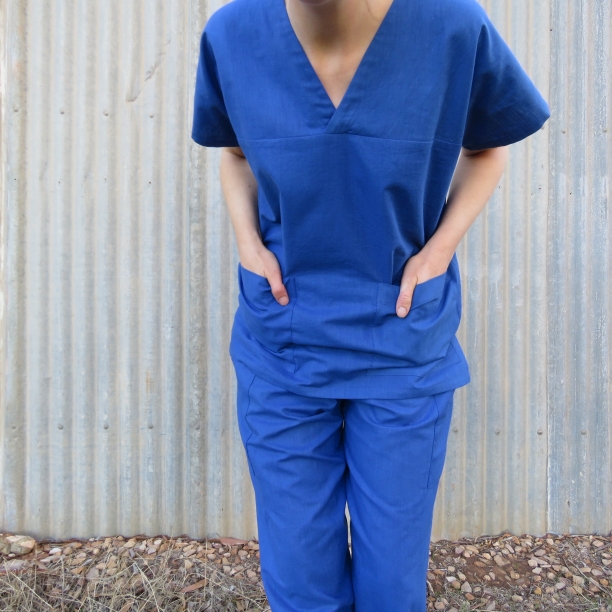
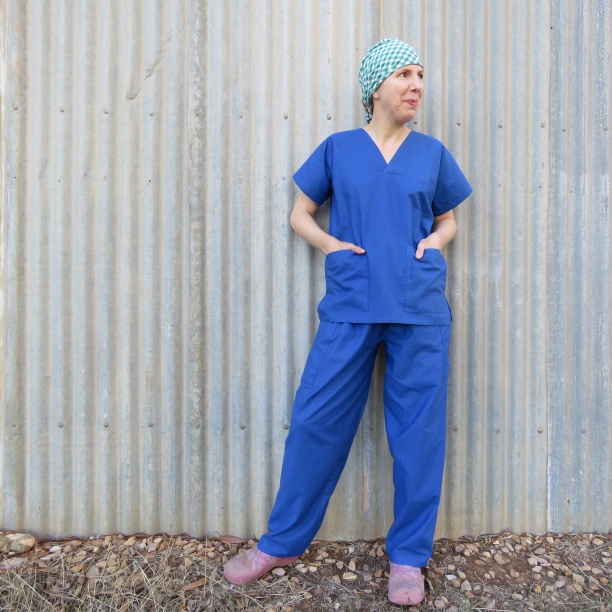
The top is essentially a T shape, with the easiest V neck ever.

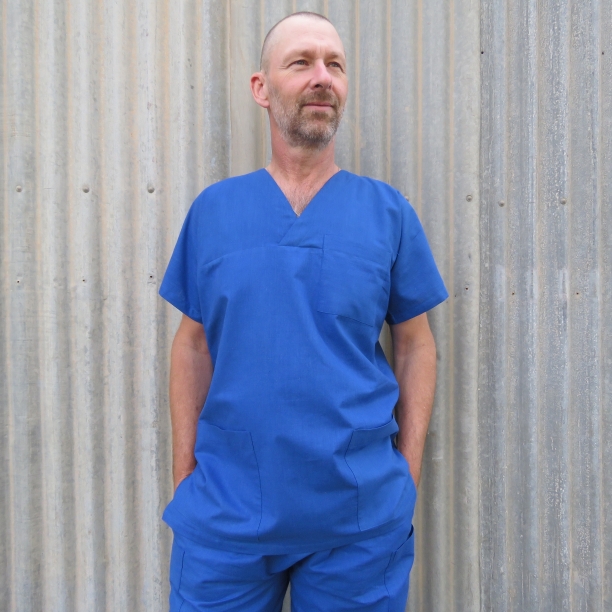
The trousers are the same ones I was wearing, and I’m slightly more than one size smaller than him, however, the seat, leg length and crotch depth are all ok.
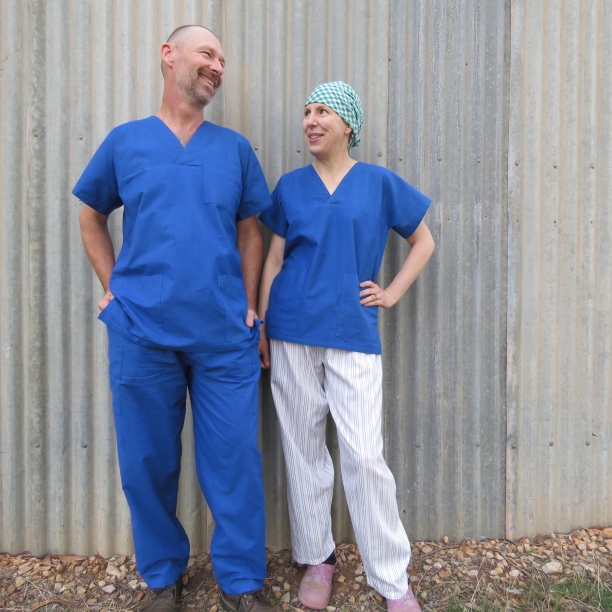
The headscarf I’m wearing is a free pattern on this blog. It wasn’t designed as a surgical cap (I wear it for renovating), but there are some links to free medical hats here. If you’re in Australia and would like to make hats for nurses, here’s a facebook group that will help you.
I’m not the first patternmaker to do zero waste scrubs in response to covid-19. Danielle Elsener of DECODECODECODE in London also has an open source pattern (and she nailed the zero waste). She has some neat ideas in her layout and suggests cutting masks at the same time if there’s space. Her pattern is tiled to print out and the instructions are succinct. UPDATE: I made the scrub top from this pattern here.
If you’re wanting to sew scrubs, join with a facebook group such as The Scrubs Co-op, Spotlight Crafts for a Cause or Rona Scrubs in Australia, For the Love of Scrubs – Our NHS needs you in the UK, or connect with a hospital, local GP or health care worker directly, if you know someone.
Please feel free to share my pattern. If you have any feedback, if you’ve found a typo, easier method or have a good idea, please leave a comment below. You can also send a comment marked private and I’ll read it and reply privately.
Keep safe and well.
Cheers!
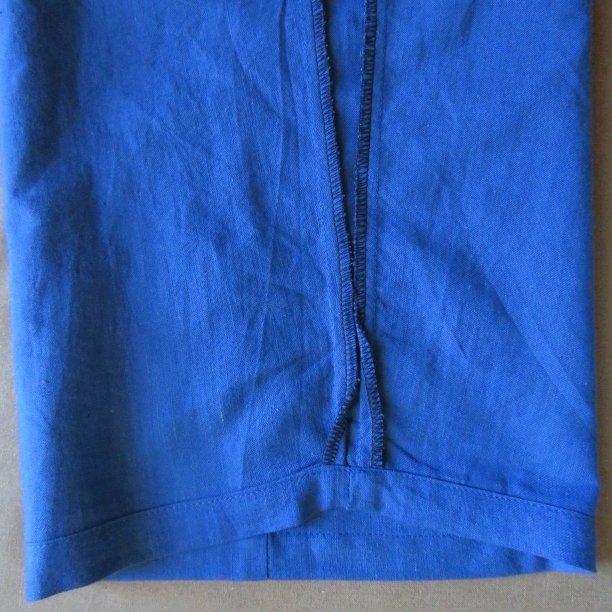
PS Cecilia Digenis, here’s a picture of the end of the trousers gusset:


UPDATE: Here are some photos of Belinda’s maternity version (see the comments, about 8 down, for cutting details).
Discover more from The Craft of Clothes
Subscribe to get the latest posts sent to your email.
How can I download the scrubs pattern/instructions to printout ?
Hi Mary, I’ve just sent you an email. Working on it now. Cheers, Liz
I don’t have a printer can you send me the pattern and instructions
Hi Maureen, it’s only available here as a digital pattern sorry. Hopefully you can make arrangements with someone who has a printer.
Would love to have your pattern and instructions.
Thank you.
You’re welcome – the download link is at the top of the page 🙂
Please could I get the pattern.
Hi! Do you have a suggestion to modify this to make maternity scrubs?
Hi Sarah, thanks for asking. Someone else asked that – Belinda on June 15th.
Here’s my reply but I haven’t tried it myself and don’t know how Belinda went:
Here’s how I would adjust the scrub top to a maternity one:
Make the whole top 5cm (2″) longer, if not 10cm (4″).
Flare out the side seams by 5cm (2″), to increase the hem circumference by 20cm (8″). Yep, a trapezium.
Lower the centre front hem by 7. 5cm (3″), tapering back to nothing at the side seams. ie you’ll have a curved hem at the front. You can take a smaller hem eg 1cm to cope with the curved edge.
Might need to go up one size – usually do when pregnant.
Best wishes with it and thanks for sewing scrubs 🙂
Hey Liz and Sarah,
The maternity scrub top I made went very well. I followed the instructions from Liz (basically) but added a wide tie which did up at the back, so it didn’t look too sack-like. My friend loved it. My suggestion Sarah, is to just give it a crack! If it doesn’t work, unpick it and give it another try!
I don’t think I can add a pic here, can I Liz? Otherwise I’d send my finished product.
Cheers,
Bel
Hi Belinda, sounds like a sewing victory!
You can email me a pic and I’ll put it at the end of the post. liz@lizhaywood.com.au Think I can only add a photo to comments if it’s already on the internet and has a URL.
Need to print your pattern and instructions. Is that possible
Just done it! – please see the link.
Wow this is the most complicated confusing no waste pattern I’ve ever seen. Usually you see the pieces laid out to fit the fabric you’re cutting from and a variation of different widths and arrangements for different average size pieces. They show the ration and relationship of the pieces. This is just a list of triangles and it seems so complicated to make. I’ve seen course patterns more easy to get a grip on. Thankfully I don’t need any scrubs …they looks super easy to make just the instructions seem to be written by an insane person on acid.
Dear Eli,
Yes, the pattern looks complicated at first glance because it’s in a huge range of sizes and two measurement systems. However, it’s simply a matter of working through step-by-step and plenty of people have used it successfully.
Yours,
Insane person on acid
Yes please… How to download
Just done – please see the link.
Liz that’s a lovely thing you have done⚘. Just bought fabric from spolight but no patterns available. I’m from Gold Coast Australia. Are you able to send me pattern download link please.
Hi Joan, I’ve just moved things around so there’s a direct link in the blog post.
Thank you so much for your generosity. I am located in W.A. Would like to make this for my Doctor Niece. Do you have a version that I can download/print?
Hi Cal, there’s now a direct link in the blog post 🙂
Hi Liz, Sorry I’m same can’t find the PDF link. Cheers Deidre
Hi Deidre, there’s now a direct link in the blog post 🙂
Thanks (from Cheshire in the UK) for this well planned and well explained pattern.
Cheers Frances. Best wishes for your scrub sewing.
I am totally inspired by the whole concept of a zero waste pattern. I think it’s sooooo clever. Thank you! I really struggled with the gusset though. The fabric kept bunching up and I’d sew through too many layers (argh!). Can anyone give any advice on that please? Should I snip the seam? Thank you
Hi Fiona,
I am totally enamoured with zero waste! Like that you are too.
Some gusset advice:
1. Sew with the gusset underneath and the trousers on top (the pattern says this anyway).
2. Pin on the stitching line carefully before sewing.
3. You can make the “upside down U” of the trousers wider, for example 4cm (1 1/2″) instead of 2.5cm (1″), in Step 7 on page 6. It’s no big deal on trousers with this much ease. This will make the U part wider and should be easier to sew the gusset in. This could be the answer for you.
4. If you feel the situation is desperate and you need to snip the seam, make a few tiny snips no more than half the depth of the seam allowance. I didn’t need to snip, but I certainly did need to pin.
Hope this works for you.
Thanks for making scrubs.
Cheers, Liz
First of all many thanks for the wonderful thing you have done here. This pattern is amazing and has enabled me to do something really worthwhile.
I just have a trouser gusset question. when you say”Sew only to the end of the gusset’s seam line not all the way to the end” where is the gussets seam line?
Hi Cecilia, thanks for giving it a go! And thanks for sewing scrubs.
Very sorry for the gusset confusion – I could have written this part much clearer. When you sew the gusset in the trousers front for Step 5, stop sewing 1cm before each end of the gusset. Although the narrow ends of the gusset are rounded, they need to be sewn in a point so you can sew the short seam below the gusset at the ankle. So when you sew the second side of the gusset to the trousers back, taper the stitching line on the gusset so you’re sewing to the same point (then trim off the excess gusset). Since the seam is sewn with the trousers uppermost, you’ll still see where to sew on the trousers.
I hope this helps!!
Might also help to look up some gusset sewing tutorials. (edit: just remembered there’s a gusset tutorial here).
I’ve put a photo in the blog post for you.
I have had good luck basting gusset in by hand before machine sewing. It goes pretty fast and helps eliminate mistakes. Love the pant
Thanks for the tip Peggy!
And thanks for sewing scrubs 🙂
Many thanks that makes sense to me now. I hope mine will look as good as yours. I’ll let you know.
Cheers, Cecilia!
This is a great pattern, but would suggest making the yokes deeper…4-5cm for women, 5-6 cm for men, otherwise they are too tight under the arms IMHO. It also makes the neck hole bigger, and more comfortable to get on and off. Just remember to lengthen the facings to match. Happy sewing!
Thanks Trish for your valuable feedback!
Many thanks for further explanation re the gusset, I have had the very same problem. Also the lower part of the gusset came too far down the trouser leg so that it interfered with the hem, unlike in your picture. I will have to shorten the gusset but not sure why this is happening. Thanks
Hi Patricia, I’m not sure why the gusset is too long either. The gusset reaches almost the entire length of the inside leg and by the time the hem is folded up it’s pretty much at the end. Although I pressed the gusset’s seams towards the gusset, I pressed them the opposite way just at the hem so it wasn’t so bulky. If you need to shorten the gusset it won’t affect the fit in any way.
Thanks for sewing scrubs. Sounds like all the scrub sewing is starting to make big difference.
Many thanks, will shorten slightly. THe top is a fantastic pattern…..so quick and looks really good.
Glad to hear – thanks for giving it a try 🙂
Dear Liz, Many thanks for this very useful and cleverly designed pattern; I particularly like the design of the top. I’ve just finished a batch of five suits in various sizes and am waiting for feedback on how well they fit before making some more. I used 92″ wide sheeting and was able to cut them with very little waste indeed. I struggled with the gusset too, but found it much easier to sew with the gusset on top and the trousers underneath. I left a gap in the waistband and had the tapes tie at the left hand side, as I thought that that would be more comfortable than having a bulky bow at the navel (that’s a blatant excuse – I hate making buttonholes!)
Hi Catherine, thanks for your feedback! Good idea for the drawcord – will be interested to hear the verdict from the wearers. The trouser gusset could be sewn with a slightly smaller seam allowance eg 7mm or 6mm if it helps. On trousers this roomy it won’t make any difference to the fit.
Thanks for making scrubs.
Hello again, I’ve received very positive feedback from the scrubs wearers – and I don’t think they were just being polite, as they’ve asked for more! I’m busy on those just now. However, there was another part of the pattern that I found difficult, and I don’t understand why – it looks so simple. When stitching the underarm – side seam of the tunics, I often find that the fabric bunches up under the arm, despite my being careful to leave a gap as instructed at each end of the yoke/body seam and to keep the excess fabric out of the way as I stitch the armpit. I’ve made a mess of a few now, unpicking and re-doing. I’ve tried stitching the seam in two separate operations, under the arm then checking that everything lies flat, then the side seam, but even that doesn’t always work. And yet sometimes it all works first time, and I can’t see what I’ve done differently. Have you any suggestions? Thanks!
Hi Catherine, that is good news!
Thoughts/suggestions on the underarm:
Think the key is to match the underarm points exactly.
Stick a pin through the underarm points to match them exactly before sewing. When your reach the pin, plunge the machine’s needle down into the point then take the pin out. Pivot, and keep sewing.
If you sew the seam in two separate operations, do you sew from the underarm point out each time? Match the underarm points with a pin, then put the machine’s needle exactly in the point, whip out the pin and start sewing. Do the backstitching carefully in case you go beyond the point.
Some people prefer to sew the side seams first (stopping 1cm short of the top), then sew the body to the yoke, then sew the sleeve seam.
It’s okay if you want to take a smaller seam allowance if that helps. Make sure you’re not taking bigger.
Do you press after each sewing operation?
Sometimes it looks bunchy after sewing but pressing flattens things out.
I hope this is helpful and apologies if you’ve already tried these.
Cheers,
Liz
Dear Liz, Thank you for your detailed reply. I’ll be extra careful from now on to match the underarm points – I thought I was doing that, but presumably not well enough. Yes, I do press after each operation, and sometimes that does rescue seams that look bunchy. But I’ll also try the technique of sewing the side seams first, that certainly looks worth a go. Back to the workroom!
Hi Liz.
I’ve just taught myself to sew (with a little help from YouTube and a borrowed sewing machine from my Mum). Have so far made four scrub tops for myself and two for girlfriends. I’ve even made scrunchies with leftover fabric! We get loads of positive comments from our work colleagues. My friend was asked where she bought her scrub top from 🙂 What a huge compliment! I’ve recommended your pattern to everyone who asks – so thank you.
Can you suggest how I might adjust the scrub top pattern to allow for pregnant colleagues? Would the bodice be more of a trapezium shape? Looking forward to hearing your ideas.
Cheers,
Bel
Hi Belinda,
That is so cool that you started sewing and making scrubs!
Here’s how I would adjust the scrub top to a maternity one:
Make the whole top 5cm (2″) longer, if not 10cm (4″).
Flare out the side seams by 5cm (2″), to increase the hem circumference by 20cm (8″). Yep, a trapezium.
Lower the centre front hem by 7. 5cm (3″), tapering back to nothing at the side seams. ie you’ll have a curved hem at the front. You can take a smaller hem eg 1cm to cope with the curved edge.
Might need to go up one size – usually do when pregnant.
Best wishes for your sewing adventures – I hope you keep on sewing after the scrubs shortage ends.
Cheers,
Liz
TKS so much! Both for making theis amazing patatern (I loved not having to printa, just follow the instructions) and trying Danille’s pattern (I just cound’t find out her pieces and after reading your post they were totally clear for me).
I’ve just made my scrub set, and find the need to add an elastic to to back, but otherwise, I made exactly as told (don’t have a blog anymore, so didn’t post any pic).
I’m a pediatrician, but I’m working as GP at front line on COVID fighting here in Brasil (Everybody can see our problems here, we have the daily deads record for 10 days now 🙁 ) and the scrubs are really a great thing, so we wont bring virus to our home and families.
I hope I can sew mine and for others.
Joana
We have seen Brazil on the news; it looks pretty tough. Thanks for making scrubs and most importantly doing front line health work. Take care.
It is though here 🙁
Tks so much
Hi, can I have a A4 pdf copy of the scrub top? I find your instructions easy and would like to try making a scrub top!
Sure, there’s a link at the top of this post for the pdf. Best sewing wishes!
I’m a nurse practitioner transferring to the covid clinic at my practice soon and, with two little ones who want immediate hugs when I get home, I realized I need something I can change out of quickly when I get home. I wanted something I didn’t need to pull over my head, so I bought every button-front scrub top and coat I could find at the thrift store. My plan is to tailor them and attach to your wrap skirt pattern for an easy-off dress. I’m going to dye them all one color and then I’m set! Thanks for the awesome resources you provide!!
Cheers, Maggie! Best wishes for your transfer and thanks 🙂
Thanks (from İstanbul in the Turkey) for this well planned and well explained pattern.
Cheers, Serpil. I hear Turkey is doing it tough. Thanks for sewing scrubs!
Thank you so much for this pattern! I am a high school teacher near Boston, MA USA and find myself sewing my own PPE for my return to the classroom in a couple of weeks. Your pattern is a silver lining in this situation.
Thanks Cheryl. I don’t envy you returning to the classroom clad in PPE but I hope it works out for you. Best wishes 🙂
Just making a junior version for my granddaughter’s 5th birthday next Friday. She wants to be a vet so needed some scrubs!
Just guessing the measurements but following your instructions.
Many thanks for providing them
Jan
Living in NZ at the moment aka Covid with our daughter and family. Missing our younger daughter and family at home in Wales.
Thanks for giving it a whirl Jan – hope it’s a great success with the birthday girl!
Just in case you’re checking replies – how did this work for you? I’d like to make some for my little girl. I was just going to wing it with the rise/ankle measurements, was thinking 15% of the length (I mean total length of the piece of fabric, so twice the leg) and ~30% of the width respectively. What did you end up with?
Hi there is no curve to the back of the neck i understand straight across sits well on the neck? Can’t wait to give these a go but just wanted to clarify this.
Hi Diane, yes, that’s correct the back neck goes straight across. Seems to sit okay but it’s easy to put in a curve if you want – just sew a curved shape at the back neck seam in Step 21 on page 11, clip or trim the seam, then proceed to Step 22.
Thanks for sewing scrubs 🙂
Great ty for a quick reply. One more question, why is the front yoke bigger and how does it all fit together?
The front yoke is deeper so it doesn’t hike up at the front – because (ah! I just remembered!) the back neck is straight across! So the shoulder seams will sit towards the back but the neck will sit level.
Take a read through the sewing instructions for the assembly. The top is basically T-shaped with a horizontal seam from armpit-to-armpit.
Please please help, I’m at my wits end with the armpits. No matter how hard I try I cannot get them to lie flat, all creasing and buckling no matter how careful I am matching seams. Is there another way to do them ? I’ve spent hours and have unpicked endless times.
Hi Diane, I’m so sorry you’re struggling. Belinda has jumped in with a solution while I was still dithering over the keyboard.
Did you read the reply re: underarms to Catherine McConnell elsewhere in the comments?
Debulk any excess fabric and iron it flat. There’s some creasing, but it’s not noticeable when you’re wearing it
I did yes but I just can’t line up all seams to lie flat, I over lock does that make it too thick?
Please can i get this pattern
Hi Ali, the download link is at the top of the page 🙂
witam gdzie moge dostac wzor do pobrania pliku pdf
Możesz pobrać wzór z linku na górze strony.
Ta strona internetowa ma przycisk Tłumacz Google.
Jak mogę pobrać wzór / instrukcję do wydruku?
Wystarczy kliknąć link. Instrukcje są w języku angielskim.
Thanks for a great pattern.
Just one question. When the shirt is completed, how wide is the front facing on the cross over part. Think I’ve confused myself and tried to double it over. I know it is 4cm when it is first folded then sewn initially onto the shirt.
Does it end up being 3cm wide or is it 1.5cm
Sorry to be a pain.
Thanks Brooke, no not a pain at all! The facing will be 3cm wide (inside the neck) when it’s finished. It’s an 8cm wide strip, folded in half to be 4cm, then sewn on with a 1cm seam allowance making it 3cm finished. It gets pressed inside the neck just like a regular facing.
My first garment project was to make my mum a scrub top with some fabric I received in a recent stash of vintage fabric.
I was so nervous and stressed as this pattern had me doing a lot of new things I’ve never done!
It fit and she absolutely LOVES it!
Thanks for sharing a sewing victory! And thanks for sewing scrubs 🙂
Dear Liz thank you for this pattern. I am having Trouble getting the side seams of the trousers to line up. After struggling with two different pairs I had the thought that maybe because one side edge is a selvedge the other edge might be stretching out. Usually I sew pants from the bottom up but that doesn’t seem to work. Also, can the rounded end of the gusset just be cut off? I’m having trouble getting it into the seam. I really want to make this all work as I love the gusset idea and of course the no waste. Brilliant work LIz!
Hi Peggy, thanks for persevering!
The sides of the trousers might not match if the curved back (Step 3, Page 5) starts at the raw edge rather than the stitching line. In this case, sewing the side seams from the bottom up like you usually do is a good idea, then you can trim any excess off the top – or just “take care of it” when you press the waist casing down. The technical term for this is fudging 🙂
With the gusset, yep, trim the ends if it’s easier to get in.
Thanks for sewing scrubs!
Ok so I can see that where I place the pocket on the curved back is going to make a difference. So the actual curve end should fall in (or start) from the stitching line? And so the top of the pocket would be measured down from there? It’s amazing how that little difference has such big consequences! Thank you so much Liz. Today, because I screwed up the gusset and ran out of material,I will have to make a new one out of some wild print fabric. This should Be interesting! Or maybe I will try out my idea for an open gusset (for peeing) with the wronged piece( I cut it in half by mistake). Maybe laying out the whole rectangle of fabric and cutting out the middle triangle (gusset) would eliminate my on the fold mistakes? Maybe I’m over involved, it’s lockdown here.
Hi Peggy,
Sorry, I had momentarily forgotten about the pockets; many people don’t put them in the trousers because it’s a potential nook for contaminants (and it’s quicker to bang out scrubs if you don’t have to sew pockets).
Yes, if you take the curve to and from the stitching line you won’t have a problem with the pocket. Sorry, the instructions don’t mention this at all.
If I were you I would sew the gusset back together and use it; there’s 26cm ease on these trousers and the affect on the fit will be unnoticeable.
Thank you Liz!
Thank you Liz for encouragement
hi liz, wanna thank you for this free pattern. I need this kind of stuff because i am not very skillfull. The top I´ve made turn out great but the pants are huge, really big at my hips and thighs, so I had to trim the excess of fabric and now they look like a pair of trouser for the office jejejejeje it´s weird.
Please keep sharing free pattern with us, best regards from Caracas, Venezuela, across the world
Hi Ari, so wonderful to hear from people reading this so far away. Thanks for commenting.
Yes, the pants are loose with 26cm ease – if you make them again you could easily go down one or two sizes.
No-one was born knowing how to sew – everyone starts off the same, makes mistakes, has victories, keeps trying, grows in confidence…and gets better at it, and you will too.
Thanks for sewing scrubs 🙂
Hi Liz,
Thank you so much for this free pattern and the clear instructions. I’ve been looking for a pattern to make a pair of gusseted trousers and came across your scrubs pattern after I had purchased some lightweight white cotton piqué fabric – but only 165 cm of 150 cm width (which shrank to 160 cm in the wash) – based on an ordinary trouser pattern I have and the fact that I am 146 cm tall and a size 14 thanks to the inactivity of the last year and comfort eating.
I have to admit that my project is to make cropped aikido gi trousers for my initial training rather than scrubs (shame on me). I have cut out the pattern in tissue paper, which covers me from my ankles to my bust, and I guess this is down to the ease in the seat which I definitely need for freedom of movement. I can get away with mid-calf length trousers, so I cut the pattern to 93 cm long, based on a pair of 80-cm capris. The patch pockets will be repurposed as knee reinforcements.
The only way I can fit the pattern on the fold is crosswise, but I can cut it out lengthwise in two layers (by the way it looks like pincord). I only need one gusset, so could I eiher put a seam in the middle of the gusset (far from ideal) or should I cut it crosswise out of the spare fabric left over and give up one of the inseam pockets. Obviously, I won’t be distressing the fabric with all that built-in ease, but I’m at a loss as which way to work it. I’d bereally grateful for your advice on this!
Kind regards from Toulouse where I rediscovered my trusty 1974-era sewing machine to occupy lockdown days
Shula
Hi Shula, it’s okay to cut the trousers crosswise as long as you don’t think it’s going to shrink any further, but since it’s pincord-like it would be better to go lengthwise. I think cutting the gusset crosswise so you don’t get a seam in it sounds like a good idea. If you need the inseam pockets you could use a different fabric (if you use a piece of skin-coloured fabric they won’t show through the white pique).
Best wishes with it! I visited Toulouse in the 1990s and loved it.
Cheers, Liz
Hi Liz, Thanks so much for that advice, I really prefer cutting the with the grain as that’s going with the weave, natural stretch and visually kinder! The knee patches are more important than 2 pockets and will also be smaller than the generous allowance you’ve given for pockets (a paper tissue is all I carry).
I’ll cut the fabric today.
Thanks so much!
Have a great day!
Shula (never been Down;Under unfortunately).
HI LIz, Great pattern and initiative! Can you send me a link to the pattern. Thank you Susan
Thanks Susan – the link is in the post in the 4th paragraph in blue letters.
Thanks for sewing scrubs 🙂
Hi. Could I have a guide on how much fabric needed for just a top. Approx size 10.
Hi Vicki, I estimate you’ll need 1m x 112cm wide.
Thanks for sewing scrubs 🙂
Hi Liz,
I know I’m late to the party, but I’d
really like to try your scrub pants.
My problem is that I have a 52″ waist, & the attention span of a kitten, with math skills to match. Is there a way to grade it up?
Hi Laurinda,
You’re not late – there are plenty of people still making scrubs, if the analytics are anything to go by!
I’ll send you an email with some dimensions today.
If anyone else is reading this and requires a size beyond the pattern, I’m happy to grade up.
Hi Liz
Thank you for this pattern. I am attempting to make a scrub top. All went well until I did the front yoke. I cut out one piece only then was confused by the pictures with the centre seam showing over on the right. So I thought i needed to fold my piece so there was some fabric to ‘extend the line’ on. then I cut my piece as directed but the end product was far too narrow to fit the back yoke.
I now feel like I should cut 2 yokes, put them on top of each other and make the diagonal cut as directed. However, when I measure the 18cm down from the neck, there is still 10.1 cm left at the bottom of that side. What happens to that? Do i just put the facings on the diagonal cut part?
Sorry to be confusing, but the directions just don’t make sense to me because nowhere does it say to cut two front yokes. Any advice for me please? Thank you
Hi Carolyn,
Make a front yoke pattern piece on paper first following the directions on page 4 (all the other pieces can be drawn directly onto the fabric).
Yes, cut two yokes. Here’s a video that I hope helps: https://youtu.be/1jMyAEBE2N8
Thanks for sewing scrubs 🙂
Oh my goodness……just printed your pattern, unticked the last few irrelevant pages, just went to get it from the printer …. wasted half a Reem of paper printing ALL the comments!!!!!! Aaaaaargh.
Dang! There’s a LOT of comments!
Hello! I can find the instructions but not the pattern. I would like to make these for my daughter (she is 2) I think I can use yours as a draft. It is difficult to find a child pattern. Anyway, is there a place I can fine the printable cut out pattern pieces?
Hi Brittany, the pattern is contained within the instructions, as it’s mainly square shapes, and you draw them yourself. Sorry, there’s no printable pattern.
You could easily use the concept for your daughter if you measure some of the clothes she already has to find the key widths, lengths and armhole/crotch depths.
Best wishes with it.
Thank you for making this pattern available. It is so well drafted and I found the instructions were excellent, particularly the clever back facing. Plenty of wearing ease!
I lengthened the sleeve by 10cm and am wearing it as a leisure wear tunic. Also integrated the pockets into the bottom hem to mix it up a little. I have recommended the pattern to my weaving group as it could easily be adapted for handwoven.
You’re welcome Karen – it would be a good one for weavers to adapt.
Hey Liz,
Just wanted to drop a note to say thanks very much for making this pattern and making it available to us. This is my first time sewing any garment, I have completed 2 tops and I am currently finishing a third, and it’s been worry free, except for my own mishap first time around where I read the instructions wrong.
Thanks again from a grateful ED nurse
Thank you Patrick, I really appreciate your comment.
Thanks for giving scrub-making a whirl and doing all the things you do in your job.
Hi Liz,
I’m pretty novice for a sewist. My math calculates the ease at 10” and 12” for top and bottom, minus 4*3/8” for the seam allowances. Is this right? Just double checking, because googling on the topic recommends 3” ease for both parts. Not sure if I did the math wrong though….
I just bought the fabric for this today! Can’t wait to make it! I’m going to try to find some fabric I don’t care about to make a mock-up first though…. Maybe paper?
Hmmm…3″ ease isn’t very much for scrubs, unless you’re using knit fabric.
Your calculations are good. Some people prefer to make paper patterns first, especially if they aren’t used to drawing straight onto the fabric.
You can see in the photos of me and Mr H how they fit, but if you find they’re too roomy for you it’s a simple matter to run in the sides (or give them to a bigger sized colleague and make yourself another set).
Best wishes with it, and if you get stuck I’m here to help!
Hi Liz,
Do you have any tips for sizing down? I’m wanting to start on winter sewing for my kiddo and he’s grown out of the previous zero waste pants pattern I used for him. The gusset on these feels like it would be perfect for climbing and playing.
Hi Lauren, I would draw it on paper first, and get the right seat width, leg length and ankle width. The gusset/crotch depth requires a bit of trial and error, because the gusset width contributes to the crotch depth. If you err on the long side for the crotch depth and baste the gusset in first for a fitting, you can always make it higher if needed. I hope this helps!
Thank you so much for drafting this pattern and for making it available! I am an ultra-novice sewist (as in, this is literally the very first thing I’ve made!) and found your detailed instructions to be easy to follow and sensible. I do not understand the complaint I read earlier, because if I can make this as my first-ever project then you’ve managed to create a pattern that caters to the lowest-possible skill level.
My seams aren’t perfectly straight and I’m sure I’ve cut parts off-grain, but the finished scrubs are perfectly passable and have been worn with pride multiple times now. The ease is comfortable and the tips you included on making a higher/lower neckline and longer/shorter sleeves mean that I can confidently adapt the upper part of the top to be a little more modest in the summer months, and a little lower/shorter to show off colourful under-layers in the colder months.
I’m so glad this was my first project because having this foolproof pattern to learn on gave me so much confidence in using my new sewing machine, and I don’t fear that I’ll waste fabric on a garment that won’t ‘work’– knowing that it WILL work if the instructions are followed also emboldened me to get a little adventurous with trying a pleat or a tuck here, or a curve there! And if you leave off the pockets, it makes a super comfy, normal top, so even my non-medical/veterinary/clinical friends get to enjoy the results of my sewing adventures.
So, very sincerely, thank you. You made an intimidating concept accessible and simple, and now I’m comfortable enough with basic sewing that I’ll make repairs or tiny alterations to keep clothes in service for as long as possible– the zero waste of this pattern extended far beyond the creation of the scrubs. My whole family have dumped all their mending on me, and I’m delighted to do it!
Oh Evan, a whole new world awaits you and your sewing machine!
So thrilled your first project worked out well and I’m honoured to play a part in it.
Hi Liz, Is there any chance you can send me the pattern so I can print it out.
Hi Nicola, you can download it straight from the blog post – click on the fourth paragraph (“UPDATE: download a pdf pattern here.”) and it will take you to the pdf.
THANK YOU!!
I’m planning a project involving waterproof pants (for biking in the rain—the bike umbrella keeps most everything dry, but not the legs from the knees down) and had the thought that scrubs-style would offer me something with minimal and straight seams. This was one of the top results on google, and it looks absolutely splendid.
It being zero waste is excellent too, since I won’t have much use for any scraps. It also saves impressively on fabric! I need to double check my patterns and math because this is an absurd amount of savings if correct, but if I’m recalling properly, I have a pj pants pattern that takes over two yards of 60″ fabric, whereas these pants could be done (without pockets) with under two FEET of 60″ fabric, as I’m short enough that a 30″ side seam will fit me.
I’m glad I found your blog, and I’ve been looking through several other no-waste posts of yours. I’ll definitely be returning here again for inspiration!
I’ve not made pants with a gusset before, only ones from a shaped pattern, which eventually gave out in the crotch. Do you have any tips for ensuring the gusset provides enough room?
Hi Hann, that is an impressive fabric saving. I too am a cyclist (or was, pre-long covid) and have worn waterproof pants. Mine were purchased and I adapted them to have elastic at the ankles so they didn’t hit the chain, and ankle zips so I could easily take them on and off over shoes.
I think the gusset should be roomy enough, although I haven’t tried these on a bike. I recommend reinforcing the crotch seam, front and back, with either tape or a strip of fabric, as it will take strain when you get on and off.
Best wishes with them.
Those are good tips, thank you! I had been intending to be able to put the pants on over my usual clothes, but neglected to consider putting it on while wearing shoes.
I was also already planning to reinforce all the seams with tape, for waterproofing reasons. Don’t want the rain sneaking in through all the holes I’m about to make wth sewing! I’ll definitely be sure to tape both sides of the crotch seams for stability.
I think I’ll probably make myself some pajama pants first with this pattern, and see how they feel, before I cut into the waterproof fabric. May need to adjust the looseness for wearing over my clothes.
For the waistband— it ends up being 12 inches minus seam allowances larger than the waist measurement. Is this entirely reduced by elastic? I don’t think I’ve worn pants with that much of an elastic decrease before; previously it’s been closer to six inches.
That is a good idea making pajama pants first, then you can try them on over your clothes. The waist needs to be big enough so you can pull them on over your seat, and since the sides are straight the waist is the same as (hips + ease). You could curve the side seams in a bit at the waist if it’s too boofy around your waist, as long as you can still get them on.
I thought a bit more about the waterproof pants I had. I had a problem keeping my feet dry as the rain would run down the waterproof pants and into my boots (this didn’t happen if I wore leggings and changed when I got to work, as the leggings fabric just absorbed the rain). The waterproof pants weren’t long enough to sit over my boots and anyway I’d put elastic in the hems. Never really resolved this but wondered if some sort of spat made from waterproof fabric attached to the end of the pants would do the trick? Or maybe the pants just needed extra length to sit well over the top of my boots when riding, and no elastic? They were an okay length if worn while standing up, not bending knees constantly while riding.
Anyway, I guess you can check all this while riding a bike wearing pajama pants over your clothes!
That makes sense. I hadn’t been thinking about room in the seat when looking at the waistband size.
I appreciate the further thought! I had a general idea of wearing them with rainboots, with the top of the boots inside the pants, but something like a spat or gaiter would definitely allow for more versatility. I definitely have some testing to do!
Thinking on this pattern again as I’m getting ready to test it out, and it seems the piece of cloth I was intending to use would leave me a bit high-water, which is not what I’d prefer. It’s wider than I’ll need, though, so I was thinking I can cut a strip off the side and use it to adjust the length.
I was wondering if you’d have any thoughts on the best way to do it. I figure I’ve got a couple options for locations- I can attach a rectangle to one end of the fabric, and use that side either as the front or the back, or divide the rectangle in two to create a symmetrical waistband, or use a long thin strip for the waistband with only one seam in it instead of two. These methods would not affect the shape of the garment, only the number and placement of the seams.
Or I could attach it to the bottoms of the legs as cuffs, which WOULD affect the shape of the garment, as that length wouldn’t be included in the gusset. (I guess I could cut the whole piece in half and join the pieces together with the extra material, so the garment stayed the same shape, but splitting the extra material between the cuffs and the gusset seems the least best option.)
What do you think? If you were adjusting it, which would you pick?
The material is a plain dark brown, and looks the same however you rotate it.
Hi Hann, some thoughts:
-Does the pattern fit if you simply turn the fabric 90 degrees and cut it out around the other way?
-If you’re testing it with a view to using a better fabric later, I agree it’s best to not change the shape. I would probably cut the excess width off the side and stitch it to the cut end, then position that seam on the back.
I hope you get on well with it.
Thank you for the pattern, I am still using it in 2025. So easy for beginner.
Thank you, so nice to hear!