5 Favourite sewing tips from The Dressmaker’s Companion
The Dressmaker’s Companion is a book absolutely loaded with sewing tips, and these are five of my favourites. These are five tips that have made a BIG difference to the way I sew; maybe you already do them or maybe you’ll find them useful too.
1. Sew an ease stitch around the sleeve head
It seems like a very ordinary part of sewing sleeves in now, but I remember when I first got on to it -it was such a revelation! It made such a big difference to the quality of my sewing. Previously I’d been easing the sleeve head as I actually sewed it by having the sleeve underneath, but it was rather hit and miss for some garments (jackets, for example!) and using an ease stitch gave so much more control.
The ease stitch is a row of long machine stitches sewn over the sleeve head, with long tails left at the end.
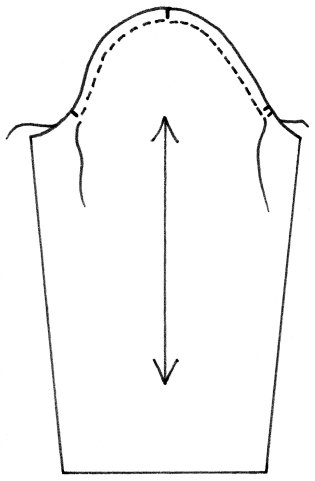
There are a few different ways of doing it:
- Sew one row on the stitching line, and when you sew the sleeve in stitch exactly on this line (I do mine this way).
- Sew one row inside the stitching line, say, halfway between the stitching line and the raw edge.
- Sew two rows, similar to gathering. One row on the stitching line, and the other half way between the stitching line and the raw edge.
Pull up the ease stitches gently and adjust as you pin the sleeve into place.
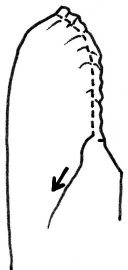
Sew the sleeve in with the sleeve uppermost, over the top of the row of ease stitches.
2. Hand sew fastenings with four strands of thread
At the very beginning of my career, I had a stint at the hand finishing table of a fashion workroom in Adelaide (before they went offshore….). I joined about four or five others, sewing press studs, hooks and bars, and shank buttons with press studs sewn behind (chiffon shirts were in fashion). Four threads were always used, and each stitch had to be neat and robust. Using four threads makes the work go faster.
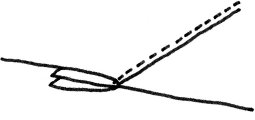
How to thread a needle with four threads without getting in a tangle:
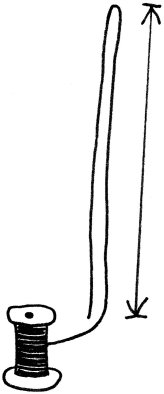
Pull a double strand of thread the desired length off the spool.
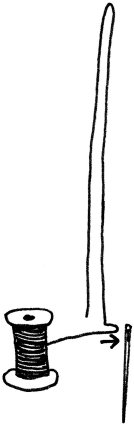
Thread the needle close to the spool with a folded-over loop of thread.

Pull the loop through the eye until you have four strands the same length.
3. Don’t forget to understitch!
Understitching is an excellent technique for controlling collars and facings. It keeps the seam lines from rolling to the right side and makes ironing easier too, particularly for fabrics that don’t press into crisp folds. I probably use understitching on almost every garment I sew.
To understitch, sew the seam and neaten it if necessary. Press the seam allowance towards the facing or underneath side, either with an iron or with your fingers as you sew. Hold the fabric with your thumbs underneath to feel where the seam allowance is and with your fingers on top to pull the fabric tight either side. With the right side facing up, stitch through the facing and seam allowance, staying close to the stitching line (between 1mm-3mm). If you’ve snipped any curves, make sure all the little sections between the snips are pushed to the same side.
Should you understitch if you also plan to topstitch? Sometimes I do, depending on how well the fabric presses and holds the edge. If the fabric doesn’t press sharply or is bouncy or hard-to-handle, I usually do understitch first.
4. Make the garment in your head before you make it
An unusual sort of sewing tip, and you might be the sort of person who likes to proceed blindly, but I like to get things clear in my head from the start. I find that if I leave things undecided, the garment will almost certainly not get finished.
When I was a fashion student, our teacher asked us to find some ready-made garments and write out the order they were sewn in. We also had to write out the intended sewing order for garments we made in class (from patterns we’d made ourselves). After a while it became easy to “make” the garments in our heads before we sat down to actually make them, and we didn’t need written instructions anymore.
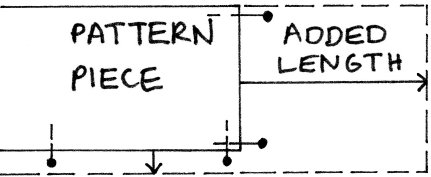
5. Leave cutting reminders for yourself
We’ve all done it: intended to add extra length onto a pattern, or add a seam allowance, and forgotten and cut on the wrong line.
If you need to add extra length or seam allowances to the pattern pieces when you’re cutting out, put pins sticking out beyond the cutting line to remind you to add on (even if you’ve drawn a line on the fabric). I always do this. It’s very easy to get distracted and cut on the wrong line, and it’s usually on the very last piece, too.
Helpful? I hope so.
Cheers!
Started your Christmas shopping yet? Autographed copies of The Dressmaker’s Companion are available from me direct, here.
Discover more from The Craft of Clothes
Subscribe to get the latest posts sent to your email.
I love these tips – especially the ease stitch… makes it less likely I will put off tackling the dreaded sleeve. It’s really why I don’t make shirts – I only have shirt patterns 🙂
You’re welcome Rebecca 🙂
The four threads trick is extremely interesting Liz. I don’t use press studs much, and one of the reasons is that they are so tedious to hand sew. Sewing them in half the time, could be just the change required!!
PS Have just requested your book for the Gold Coast library.
It’s a game-changer!
Thanks for requesting my book. I hope you’re the first person to borrow it.