Free pattern: wraparound skirt
Hello All,
Here’s a pattern for a 6-gore wraparound skirt. It has a generous wrap and is very suitable for one-way prints. It would also look good in a plain fabric with topstitched seams.

If you’ve never drafted a pattern before, this is a good one to start with because it’s straight forward and easy-fitting. You’ll need your waist measurement, a ruler, pencil and L-square, and of course paper.
This is a step-by-step, but there’s a summary at the end so scroll down if you want the overview first.

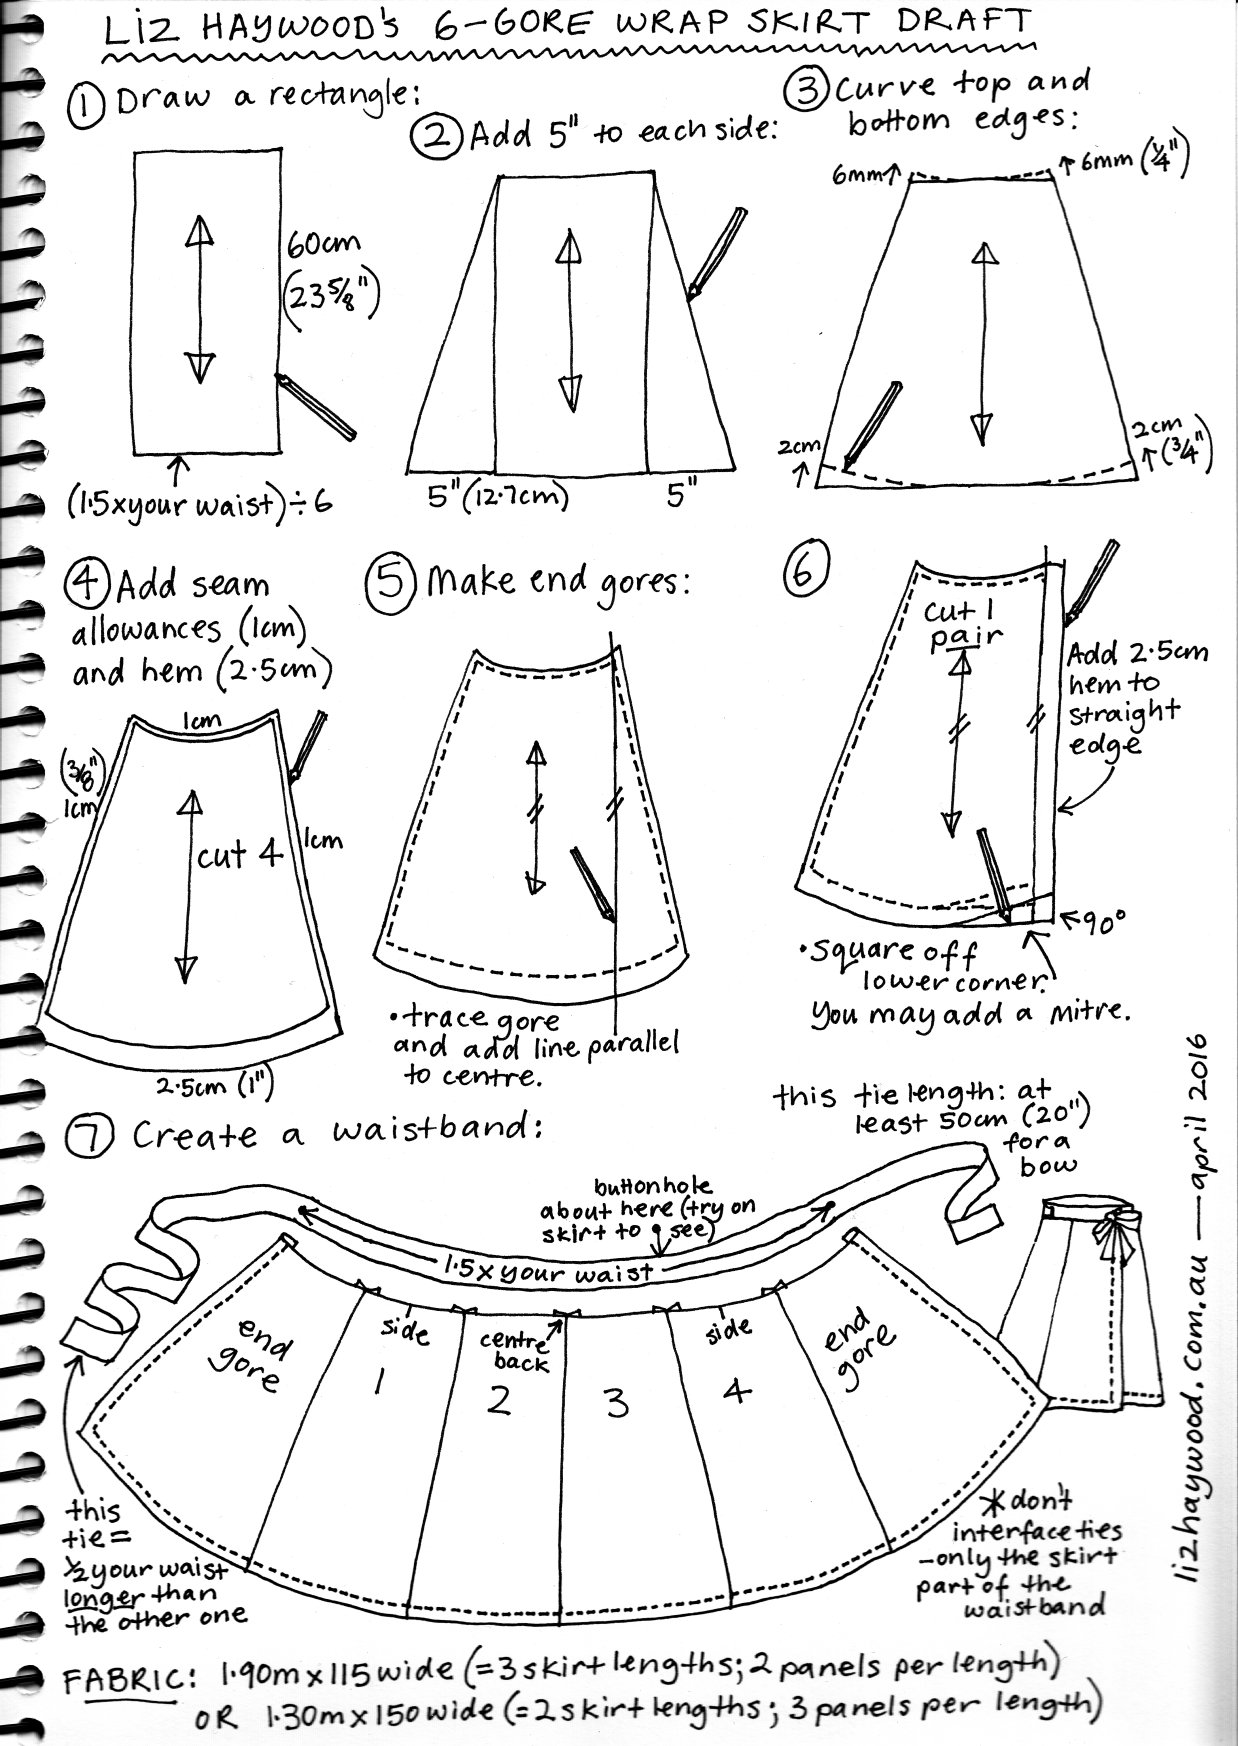
Step 1: Draw a rectangle as shown. My waist is 30″, so my rectangle is 7.5″ wide. Draw in a central grainline (fold the paper to find the perfect centre).

Step 2: Add 5″ to each side and connect to the top corners with a diagonal line.
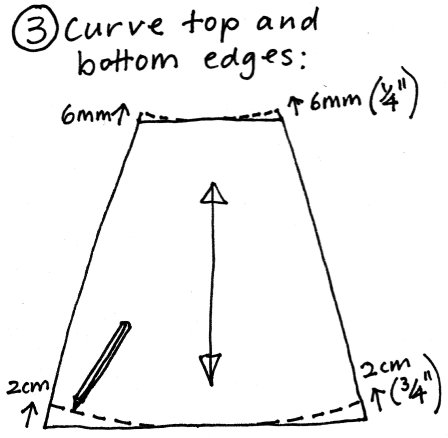
Step 3: Create pleasing curves at the top and bottom. Mirror them on each side by folding the paper along the central grainline. The sides should measure 60cm.
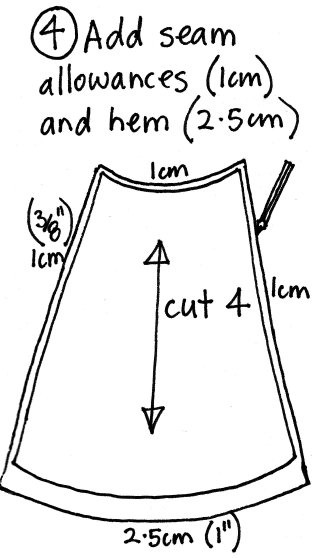
Step 4: Add whatever seam and hem allowances you prefer (shown are what I did). The curved hemline will not accommodate a hem deeper than 1″. You can also adjust the length now if you want to, keeping the sides on the same plane and extending them with a ruler. You may also increase the amount of flare at the sides, but don’t decrease any or the skirt might be too tight around the hips. This pattern piece is now finished -you’ll cut 4 of them for the skirt.

Step 5: The skirt also needs a differently shaped panel at each end of the wraparound. Trace around the pattern you’ve just made, and add a line parallel to the centre grainline. The line should run through the stitching line at the top corner.
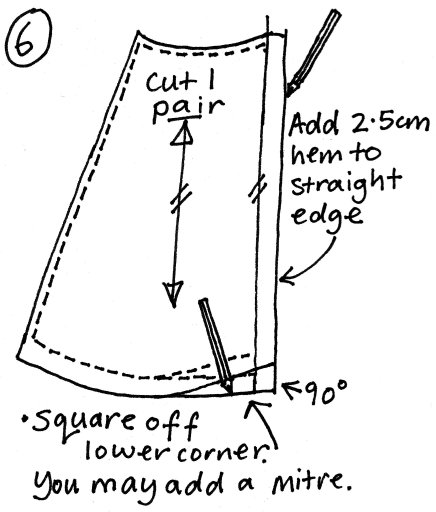
Step 6: Add a hem to the straight line you just drew. Make it the same as the hem allowance on the skirt and you can do a mitre at the corner. Straighten off the lower edge so the corner is 90 degrees. This pattern piece is now finished. You’ll need to cut two as a pair.
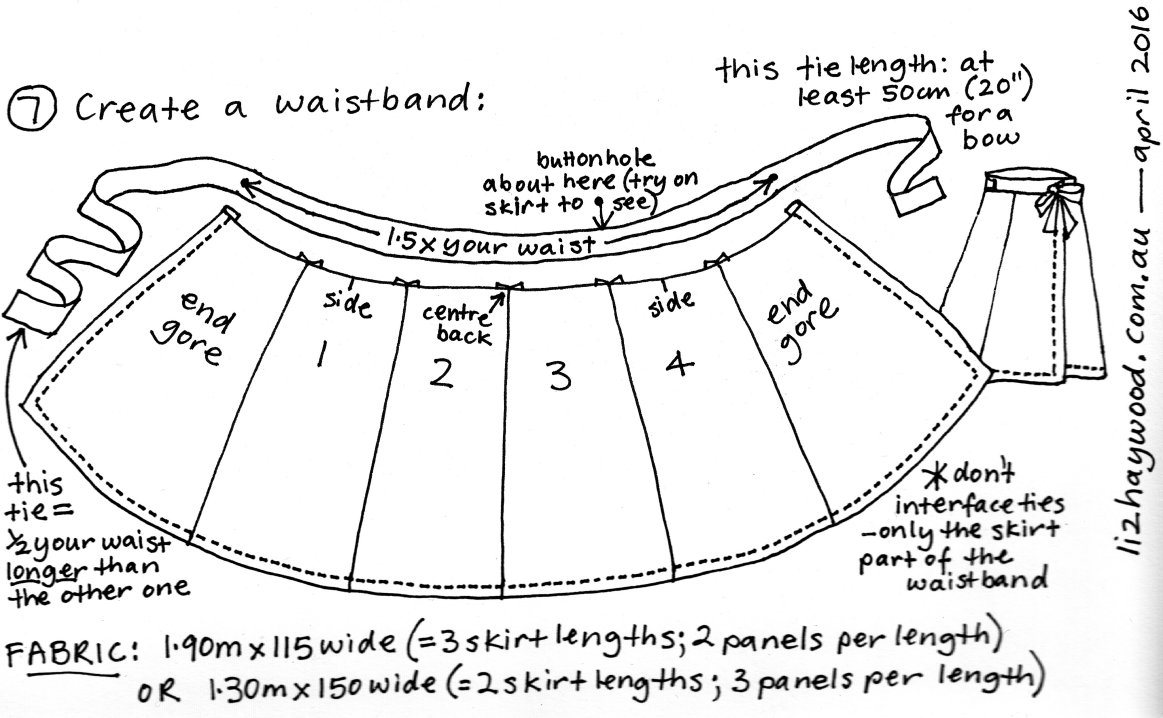
Step 7: The last pattern piece you’ll need is a waistband. The part that’s attached to the skirt needs to be 1.5 times your waist measurement. Note that the ties at each end are different lengths. On my skirt, I made the one on the right 21″ long, and the one on the left 33″ long. The buttonhole needed to bring the tie through should be located between panels 3 and 4. Instead of a buttonhole, you can make a join in the waistband with a gap for the tie. BTW, I cut my waistband at 3.25″ (8.2cm) wide, to finish at 1.25″ (3.2cm) wide.
Here’s the summary. You may also be interested in the Zero Waste wrap skirt draft.
You can probably work out the sewing order from my drawing: 1) join all the panels together 2) do the mitres and hems 3) attach the waistband and make the ties 4) make a buttonhole in the waistband.
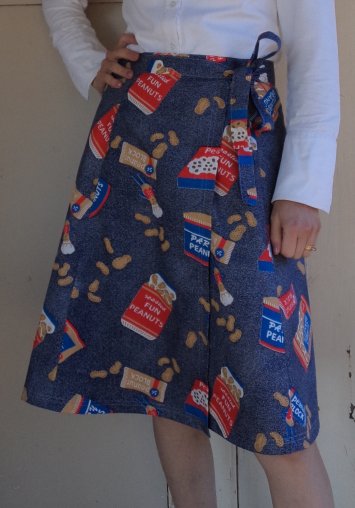
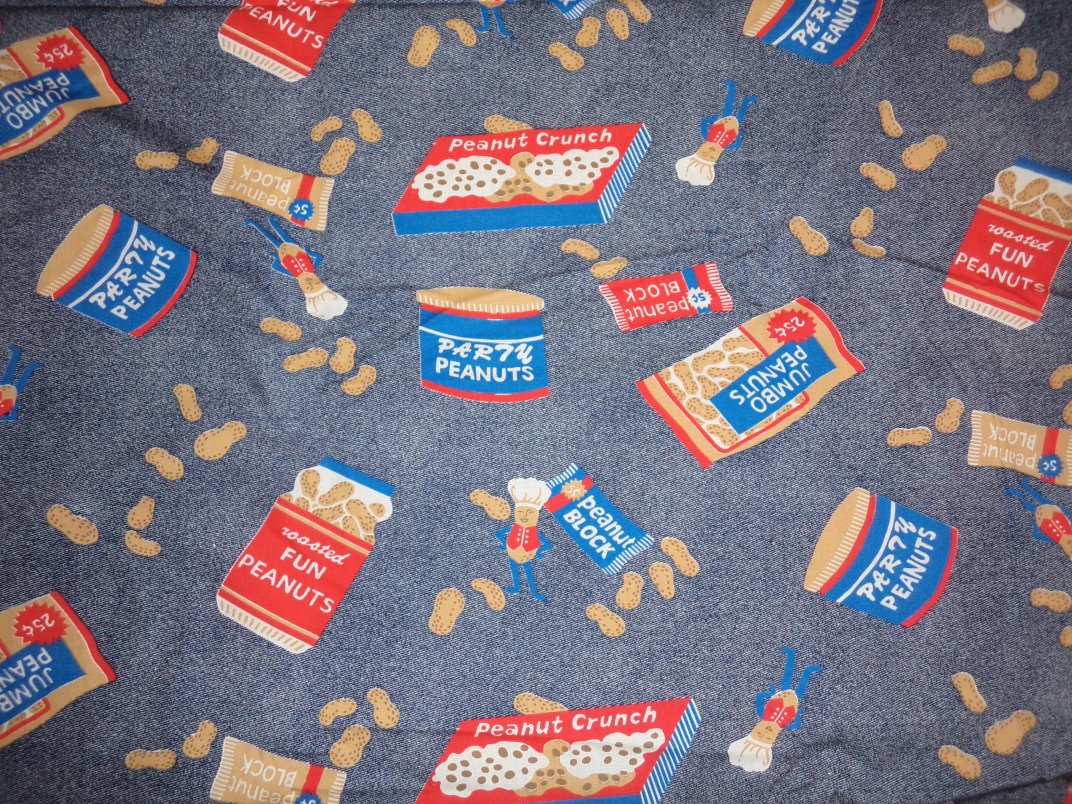
I made my skirt using some very old novelty print fabric with peanut-themed print. The pattern pieces barely fitted across its 90cm width. I think it’s cotton, about quilting weight. Anyone got any ideas how old this fabric might be? 1970’s? 1960’s? Even 1950’s? The colours are most accurate in the pictures of me wearing it.

I mitred the corners and sewed the hems with two rows of stitching.

The buttonhole in the waistband. It’s positioned almost between panels 3 and 4.

Originally I had a join in the waistband with a gap, which I positioned in the centre of panel 4, but it wasn’t far around enough so I made a buttonhole further along. If you do decide to have a gap in the waistband, trim back the seam allowance inside the waistband so it doesn’t show through the gap.
Cheers!
Update: This has become by far my most popular post ever. If you’ve made this skirt, please feel free to leave a comment and if possible a link where we can see your great work!
Another update: This skirt can be made with 3 gores. Click here to read how.
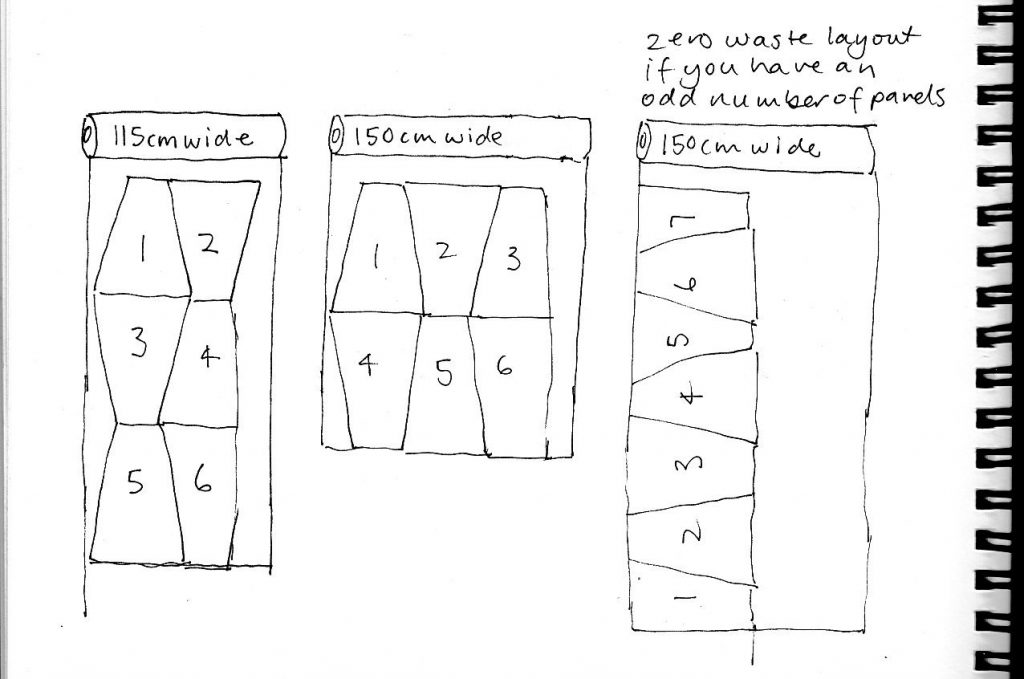
Update Aug 2021: Here’s a sketch of the cutting layout – check that your panels fit into the fabric. See here for a zero waste skirt.
Hi Liz,
Thank you for posting the “easy to understand diagram” of how to make a pattern for a wrap skirt. I had been thinking if I could make a wrap-around skirt pattern of “fits in various sizes” before. But looking at your pictures and calculation, I thought it might be difficult to make such a pattern, at least for me. But I can make a pattern for myself following your direction. Thnak you. By the way, you are such a brilliant drawer and your writing is beautiful!
Thanks, Chiggy, I’m sure your wrap skirt will be great!
Cheers, Liz
Hi dear,thanks so much,have been looking for this,can you post other patterns and sewing tips?
Hi Ruth, you’re welcome. Feel free to look through the archives of this website – there’s a lot here as I’ve been writing weekly for nearly 9 years. Free patterns can be found here.
Hi, Liz, can this pattern work for plus size women(XXL to XXXX4)? Your instructions are pretty clear and would like to make it. Been looking for a simple skirt pattern and hope I can use yours
Hi Kristine, thanks for asking. To be honest I haven’t tried it, but it should probably work okay. I look forward to hearing how it goes 🙂
Hi, Kristine. Did you ever make this pattern? My 3xl daughter has requested a wrap skirt but I’m just mediocre sewist.
Thanks for the pattern its so simple
You’re welcome, I hope you enjoy wearing it too.
If i want it to wrap twice around would I just do the waist measurement x 2 or 2.5?
Hi Julie. Do it 2x the waist. The width of the rectangle in Step 1 would therefore be (2x your waist) divided by 6, and then the skirt will be a double layer of fabric all the way around when it’s worn.
All the best with it,
Liz
Approximately how many yards of fabric should I purchase to make this skirt?
Hi Rebecca, the fabric requirements are at the bottom of the draft. A yard is only 3″ short of one metre.
If you aren’t sure, take your pattern along to the fabric shop and get the sales assistant to help you.
Hope it goes well for you.
I’m not sure how I missed that. Thanks!
That’s ok! I forgot to write that if the fabric is one-way (like mine was), an unusual width or if your skirt is a large size you’ll need to do your own layout.
Hi Liz!
Many thanks for the pattern. If I want to make the skirt longer, do I just add the required length at the bottom of each part? For example 15 centimetres? I am quite tall and like longer skirts anyway.
Thanks a lot! 🙂
Sophie
Hi Sophie. Yes, just add onto the bottom of each panel. Extend the sides with a ruler to meet the new hemline. C’est facile!
I hope you enjoy making and wearing it!
Hello!
Thank you for sharing this tutorial. I’ve just read it and it seems really clear! I think I will sew a new skirt next weekend 🙂
Hi Elodie, all the best with it,
Cheers, Liz
I’ve made several skirts from this pattern using SARI fabric bought off eBay! PERFECTION!
Fantastic! Thank you so much for commenting. This post has had well over 100,000 visits and I sometimes wonder how many skirts got made and are in the world being worn.
Many thanks.
I bought a lovely remnant at Spotlight today (when I bought my new machine ).
They marcked it as one metre, but it’s almost 1.5, so I’m going to make this skirt. I might even wear it up for a visit….
Excited to hear about your new machine and honoured that this is one of your first projects on it. Looking forward to seeing it.
Liked this so much I bought fabric!
Hello Barbie, I hope you like wearing it as much as I like wearing mine.
My machine is being serviced right now, but when I get it back, I’m going to make myself one of these! Thanks for the easy to follow instructions and greetings from the Netherlands
You’re welcome! Thanks very much for leaving a comment, and I hope you enjoy your skirt.
Super-excited to find this pattern to recreate a skirt I had in the 70s. I’ve been searching for a pattern to accommodate my unstable waist size & hips!
Your instructions & drawings are so clear they inspire confidence. Many thanks
Thanks Sally, I hope it goes really well for you!
Love your page!! Thanks for the wrap around pattern.
Cheers, Susan!
Normally I sew pretty slowly but this took me about 2 hours from laying out my pattern to finishing my hem. I needed a skirt for a funeral so had to rush thru. I didnt add the button hole and need to clean up a couple seams, but it fit great and looked very nice. Thanks for the easy to follow instructions!!!
Hi Sandy, lovely to hear of your sewing success. Cheers!
How would you change the calculations to make a three paneled skirt? Thanks!!
Hi Ella, try this:
Step 1. Make the horizontal dimension (1.5 x your waist) divided by 3 (instead of divided by 6).
Step 2. Add 10″ (25cm) to each side instead of 5″.
Step 3. The top and bottom will need to be curved much more since you’ve only got 3 panels. Curve the top edge up by 3cm and the bottom edge by 8cm.
Step 4. Obviously only cut one of these panels.
Steps 5, 6 and 7 are the same.
I’m inspired to make one now! Cheers, Liz
Thank you so very much!
Like the pattern but am confused on how to make the end panels. An I just squaring up on side or am I adding another flair and then squaring It up?
Hi Patsy, there’s no flare on the ends; you’re just squaring up on one side.
Hi Liz, If I wanted to make the skirt more flared ie having 6″ on the sides instead of 5″, what would be the best way to adjust the curve? Is there a calculation I could use? Thanks!
Hi Asha, there isn’t a calculation, only your calibrated eye! Probably the easiest way: cut out the skirt with the extra flare added, then when all the panels are sewn up (but before the hem is sewn), trim off any pointy peaks on the hem so you have a smooth flowing curve. Same at the waist, if required. (I doubt there will be much change, if any, if you’re only adding 1″ extra flare.) Follow up with a tape measure to check that the skirt is the same length all way around. Transfer any changes to the pattern so you have it for next time.
All the best with it!
Hi Liz
Do you think this would work for a 9 gore wrap.
Thinking of drafting one for my mother who usually has skirts with six gores and a zip fastener. She now has dementia and thinking of using velcro for fastenings too.
Thinking 3 gores of the 9 could be used as overlap for the whole of the front .
What are your thoughts?
Trish
Hi Trish, yes it would work for 9 gores.
In Step 1, divide by 9 (instead of 6).
In Step 2, you won’t need to add as much as 5″ of flare on each side; try 3″.
In Step 3, you probably won’t need to curve the edges as much but I’m not sure without trying it myself. Try half as much and see what it looks like – the more panels this skirt has, the less curved they need to be.
You’re correct, 3 of the 9 gores will lap over on the front, since the skirt is 1.5 times the body circumference.
Best wishes, Liz
Hello, I have just found your page, and I like this skirt.
I wonder please could you help me to adjust the back gore(s) to accomodate a sway back and larger bottom, so that it doesn’t ride up when wrapped?
Thank you
Carol
Hi Carol, you would have to commit yourself to wearing the wrap skirt the same way each time, ie the wrapover in the same place. Before you stitch the waistband on, either put some darts in the back or take in some of the back seams at the top (=essentially taking a dart at the top of a seam). Try it on with the waistband pinned on to see how deep the darts need to be for a smooth fit.
If you’re a pear shape with a small waist and much larger seat, I would make each panel 1-2cm wider to give ample wraparound (since the pattern is drafted based on a waist measurement).
All the best with it!
Thank you Liz. I would imagine I would need to add some length to the darted panels as that would lift them a bit? I’ll have a go anyway, it should work.
Cheers
Carol
Maybe – hadn’t thought about that. Think it would be better to level the skirt from the top rather than the bottom, but you know your figure better than me! Check the length when you pin the darts in, and try shortening it at the top waist if needed. Cheers, Liz
Im looking to make a dress like burda pattern https://jaycotts.co.uk/products/bd6583-burda-style-pattern-6583-dress but with extra wide at the bottom by adding extra fabric there in gores from like knew down. But I cant find the pattern I want Im using normal cotton fabric.
Hi Jayamila, you could make a two piece dress if you can find a top pattern like the Burda. The wrap skirt can be extended to floor length and extra width added to each gore. Best wishes with it.
Can’t can’t can’t can’t can’t thank you enough for this post I lovvvve the pattern and the way you put it it’s like heaven for me. So excited to try it and really looking forward seeing other designs as I love patten making in the exact way you examined it. Thank you so much
Hi Maya, so glad it clicks with you! Best wishes for your sewing plans 🙂
I’m very new to sewing, prone to silly mistakes, and don’t know much technique. This was my first time making a pattern (first wrap skirt I just traced from one I bought years ago). But since I make those mistakes…I didn’t read thoroughly and forgot to add a seam allowance to the waist width. But no worries! I cut another panel to make up for it.
I freestyled a little bit – shortened the skirt and then decreased the flare. It turned out great! Thank you for the pattern! Looking forward to seeing what else I can learn from you!
Hi Laura, thanks for sharing your sewing victory 🙂
No-one was born knowing how to sew – everyone starts in the same place and makes mistakes as they learn. Being able to freestyle-it, adapt, accommodate mistakes and fix things as you go is part of success.
Best wishes for your sewing adventures!
Hi Liz, first thanks for this pattern!
I just bought a curtain in a thrift store so I can do any mistakes in this fabric before buying a prettier one, can this skirt be reversible?
Regards from Florida USA
Hi Virginia, yes it can be reversible. You can make it a double layer, maybe with a different fabric on the other side.
If the curtain fabric looks good on both sides, you could make the skirt reversible by sewing the seams as flat felled and the hem as a double fold hem or perhaps bound.
Hello Liz
Am almost finished with my first skirt ever thanks to your tutorial. Can you explain step 7 for a true beginner…how do you cut the waist band? Curved, straight….??? Did you do 8.2cm wide so cut 16.4 cm wide and folded? just doing the waist and adding velcro Thank you kindly…
Gen
Well done Gen on your first skirt, and honoured that it’s my pattern you used.
Cut the waistband as a long straight strip (sorry, it looks curved on the sketch). I cut mine 8.2cm wide so that the finished width is 3.2cm wide (it will be folded over, so that’s 3.2cm + 3.2cm, plus 2 x 1cm seam allowances. Yes, that doesn’t quite add up properly but it’s converted from inches).
Enjoy wearing!
Thank you, will try,
I am having trouble figuring out how much fabric to buy. I see your recommendation at the bottom of the page, but this morning my brain is not comprehending what the skirt length is … and how that relates to the number of panels. And it looks like you need 6 panels, so I am not sure how thus figures in the calculation. Ahhh! Please help!
Hi Stephanie, I’ve just put a sketch with a cutting layout at the end of the post – I hope that helps.
Thanx a lot for this…Will try it this coming weekend…
You’re welcome 🙂
G’day!
Will this formula for wrap around skirt work for a barbie doll? I’m looking desperately for a wrap around skirt for a vintage barbie type body…if you could advise if this would work I’d greatly appreciate your feedback.
cheers,
Sherry from Toronto, Canada
G’day Sherry! Yes, I think it could. Try making the top of each panel 3.5cm, the bottom 8cm and the length 10cm. 6mm (1/4″) seams & hems are included in this. Best wishes xo
Hi, I’m kinda new to sewing and I don’t know where to start. Could you help me start?
Hi Avery, it’s kind of tricky via a blog. In person is far better. Do you have sewing teacher or friend/family member who sews who can help get you started? Best wishes with it, Liz xo
hi, I don’t understand any of this can you explian it to me? the patterns I mean
I’ve just used your pattern using off cuts from four different coloured corduroy fabrics I’d got left over after making some pinafores, I’m really pleased with the result, just got to work out how I can send you some photos to show off my handiwork! Such a simple but very effective pattern, I’m really pleased I did it! Thank you for putting the pattern on the Internet !
That sounds wonderful! – I’m a great fan of corduroy.
Alas, there’s no way to put photos in the comments but my email is liz@lizhaywood.com.au
Hi Liz
Thank you for sharing your pattern for a wrap skirt, which I used to wear lots in the 70s and have been looking for a pattern for a while. I’m heading to India later this year and would like a skirt that’s cool to wear, covers my calves and has a very generous overlap in the front so that legs aren’t exposed for temples etc. Can you please tell me if the overlap section is just the two end gore pieces or does it overlap more than that? If that’s the case, I can probably add another gore to make the overlap better.
Hi Mary, thanks for asking about that. The wraparound is designed to wrap 1.5 times around, so there’s plenty of coverage in the overlap section.
Have a lovely trip.
This is just what I am looking for. What would you suggest for adding a ruffle? At what point would you recommend I start curving the front up, and if by doing so, should I widen the front? My daughter wants her bridesmaids to wear a wrap skirt with ruffles, and I feel that the multiple gores would give a longer skirt a good shape? What do you suggest?
Hi Bev, are the skirts full length? If so, you could try curving the front at about knee level, but you’ll only need to do it on the outer front – the underneath front could stay squared. If the skirts are shorter, experiment with a skirt run up in a cheap fabric – once you’ve got the right curve, you can use it for all the bridesmaids. You probably won’t need to widen the front as the skirt already wraps around 1.5 times.
A skirt length tip for bridesmaids: hem them all the same distance from the ground, so that in the photos they are all level (unless you have bridesmaids of dramatically different heights).
I hope it’s a lovely wedding and all the sewing doesn’t stress you out 🙂
Hi. I’m curious about the 3 gore pattern, but the page the link takes me to won’t load correctly.
Has anyone else had this problem?
Hi Gregory, Sorry about that, thanks for saying something. I’ve just tried and it’s not loading properly for me either. The link is https://lizhaywood.com.au/free-pattern-3-gore-wrap-maxi-skirt/ I went in to edit it but weirdly the link is correct. Replaced it anyway and it seems to be OK now. This post is old and WordPress has had many updates since then, so maybe that’s why???
Many thanks, Liz
Thanks, that works.